11 October 2012

Chicken Fried Steak - The Southern Comfort Food Classic


Though I don't subscribe to the old Southern saying, "If it ain't fried, it ain't food," I do occasionally indulge. But only if it's worth it. And a properly made chicken fried steak is definitely worth it. Also known simply as CFS among those who really love it, it's the ultimate comfort food in certain parts of the country.

I don't think it deserves its reputation as a greasy, high-fat food. At least not the way I make it. I use organic grassfed beef, all organic ingredients, and shallow-fry it. The oil needs to be good and hot (or you will end up with greasy steaks!), but you can't really get a temperature reading on such a shallow depth of oil; just aim for something less than smoking hot. I add back just 3 tablespoons of the pan drippings for 2 cups of gravy. Sounds pretty healthy to me!

Of course, my Southern grandmother used Crisco, bacon grease or lard for all her frying. But I like to think she'd be on board with my healthed-up versions of her food.

Chicken Fried Steak

(Makes 4 servings)

The Steak
1 pound top round steak
1 1/4 cup flour
1/4 teaspoon salt plus more 
1/4 teaspoon coarsely ground black pepper plus more
1/4 teaspoon cayenne 
1 large egg
1/2 cup milk
1/2 cup organic canola oil

The Gravy
3 tablespoons pan drippings
3 tablespoons unbleached all-purpose flour
2 cups milk (or replace 2/3 cup with beef broth)
1/2 teaspoon coarsely ground black pepper
1/4 teaspoon salt

1 Cut the round steak into 4 pieces. With the textured side of a meat tenderizer (OXO Good Grips Meat Tenderizer), pound each piece (on a meat-only dishwasher-safe cutting board) until almost double in size and about 1/4 inch thick. 

2 In shallow dish combine the flour with 1/4 teaspoon each of salt, coarsely ground black pepper and cayenne. In another shallow dish beat together the egg and milk.

3 Working with one piece at a time, season both sides with salt and pepper, dip into the egg mixture, dip into the flour mixture, dip into the egg mixture again, dip into the flour mixture again. Really press the flour in. This really goops up the hands, so just use one hand and keep one hand clean; you'll need it.

4 When all meat is coated, heat oil to a depth of not more than 1/16 to 1/8 inch. You just need enough oil to cover the pan generously. In my All-Clad Stainless 12-Inch Fry Pan, that's 1/2 cup. When the oil is hot, put in two pieces at a time; don't crowd the pan. Cook for about 3 or 4 minutes, or until well browned and crunchy. With tongs, turn steaks and cook second side for about 3 or 4 minutes. Turn carefully so as not to lose the crust; chicken fried steak is all about the crust.

5 Drain on a paper towel-lined plate (wad up the paper towels; don't just lay them flat on the plate). Repeat. Then proceed to the most important part of chicken fried steak--the cream gravy! Pour off the fat in the skillet, then measure back into the skillet 3 tablespoons of the pan drippings. Use the ingredient list above, but go to my Cream Gravy post for the directions (and a little story about a real pioneer woman, my great grandmother).

6 Plate up the steaks with a generous serving of Mashed Potatoes on the side. Pour the gravy over both. Biscuits and a bowl of collard greens on the side round out this classic Southern meal.  

04 October 2012

Banana Pudding Ice Cream - Frozen Version of Southern Classic


Summer might be over, but it's still ice cream weather. My Southern genes have been coming out lately, so I made my banana pudding ice cream, the frozen version of that quintessential Southern dessert. And I used all organic ingredients, including the vanilla wafers.

Really ripe bananas have the most flavor, but my organic bananas were still a bit green in spots and not quite soft enough. To instantly "ripen" bananas and intensify their flavor, just put them on a foil-lined baking sheet in a 400-degree oven for about 10 minutes, or until the skins blacken. Let them cool while you make the custard. Three medium bananas, just over a pound total, made one cup mashed.

This is my new favorite hot weather comfort food dessert (if you don't count watermelon, that is). What's yours? Check my Recipes index page for more ice cream, sherbet and frozen yogurt flavors. And come back next week for my current favorite Southern comfort food meal! 


Banana Pudding Ice Cream - Frozen Version of the Southern Classic / www.delightfulrepast.com


Banana Pudding Ice Cream


(Makes about 5 cups)

1 cup milk (I use 2%)
1/2 cup sugar
2 tablespoons cornstarch
1/8 teaspoon salt
3 large egg yolks

1 cup heavy cream
1 cup coarsely mashed very ripe banana, mashed with 2 teaspoons freshly squeezed lemon juice
1 or 2 tablespoons dark rum, optional

1 teaspoon vanilla extract
1 cup coarsely crushed vanilla wafers


1 In heavy-bottomed 2-quart saucepan, heat milk just to a simmer.

2 While milk is heating, in 1.5-quart bowl whisk together sugar, cornstarch and salt. Whisk in the egg yolks until mixture is smooth.

3 Whisk hot milk into egg mixture, then pour mixture into the saucepan. Over medium-low heat, stir constantly until mixture thickens and registers 170 degrees on instant-read thermometer, about 10 minutes; do not boil.

4 Stir in cream. Strain custard into medium bowl (I use a 2-quart glass measure to make pouring into the machine easier); whisk in mashed banana, rum (if using) and vanilla extract. Cover and refrigerate until well chilled, at least 8 hours or overnight.

5 Assemble the Cuisinart ICE-21 Frozen Yogurt-Ice Cream-Sorbert Maker; turn it on. While it is running, pour the chilled mixture through the spout. Let mix until thickened, about 20 minutes. Or follow the directions for whichever brand ice cream maker you have. If you have a KitchenAid, you can use their KitchenAid Ice Cream Maker Attachment.

6 Transfer the soft ice cream to a freezer-safe airtight container, layering in the crumbled vanilla wafers as you go, and place in freezer for at least 4 hours. Even after days in the freezer, this ice cream was very scoopable and did not need to be left out for 15 minutes before serving.

Note: The scoop in the photo above is the OXO Good Grips Solid Stainless Steel Ice Cream Scoop, the best I've ever seen; even works on hard ice cream.


Disclosure: We are a participant in the Amazon Services LLC Associates Program, an affiliate advertising program designed to provide a means for us to earn fees at no cost to you by linking to Amazon .com and affiliated sites. This helps cover some of the costs of running the blog. Thank you for your support. 

Jean

If you liked this post, please Pin it and share it!

27 September 2012

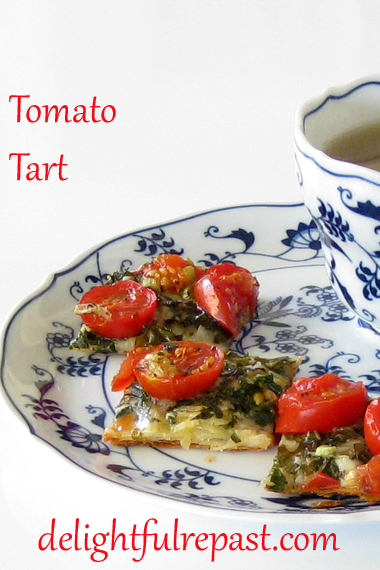
Tomato Tart


The cherry tomatoes just keep on coming! This was my first year planting them and I had no idea how much those few tiny plants were going to produce. Of course, they're wonderful in soups, salads and pasta; but there's nothing quite like a tomato tart. It might look a bit fancy, but to me it's just comfort food. A larger slice makes a lovely first course, tiny slices make great HDs (hors d'oeuvre) or afternoon tea savories.

I've made the tart with filo and pie dough as well, both delicious; but using frozen puff pastry makes it really easy (It's been ages since I've made homemade puff pastry--I'm not so averse to time-saving measures as I once was!). I usually make the tart with sliced medium-sized tomatoes, but this year I grew cherry tomatoes instead.

My tomato tart makes even bland store-bought tomatoes taste the way they should, so don't feel you needn't bother if you're not a gardener. This time I made the tart with raw tomatoes, but if you have the time, giving them a bit of a roast beforehand takes out some of the moisture and intensifies the flavor. Directions below. 


What do you do with a bumper crop of tomatoes? 


Tomato Tart - for Appetizers or Afternoon Tea / www.delightfulrepast.com


Tomato Tart


(Makes one 10x10-inch tart)

1 sheet (1/2 package) frozen puff pastry
2 tablespoons extra virgin olive oil, divided
1 tablespoon finely minced shallot
2-3 tablespoons finely grated Parmesan
12 ounces cherry tomatoes, halved*
3 scallions (white & light green part only), thinly sliced
1/4 cup basil leaves, thinly sliced (chiffonade)

1/4 cup flat-leaf parsley, chopped
1/8 teaspoon salt, divided
1/4 teaspoon pepper, divided

* Raw or roasted. These photos show tart made with raw tomatoes. if you have the time, giving them a bit of a roast beforehand takes out some of the moisture and intensifies the flavor. Just preheat the oven to 450F/230C/Gas8. Rub some olive oil on a foil-lined rimmed baking sheet and place the tomato halves cut side up (cut side down, they will go from roasting nicely to stuck to the foil in the blink of an eye). Roast about 30 minutes, remove from the oven and cool slightly. 

1 Thaw pastry at room temperature for 45 minutes. Preheat oven to 425F/220C/Gas7. In small pan, heat 1 tablespoon olive oil and sauté shallot; cool. Measure Parmesan. Prep tomatoes, scallions, parsley, and basil.

2 Gently unfold pastry on lightly floured 12-inch square of parchment paper, roll out pastry to 11-inch square. Trim edges to make 10-inch square. Transfer pastry on parchment to an ungreased 17x11x1-inch baking sheet. Score edge at 1/2 inch; prick pastry thoroughly with a fork inside the scored edge.

3 Spread shallot and oil over pastry. Sprinkle Parmesan over pastry. Combine scallions, basil, parsley, 1 tablespoon olive oil, pinch of salt and 1/8 teaspoon pepper; scatter evenly over tart inside the scored edge. Place cherry tomato halves, cut side up, on tart; sprinkle with a pinch of salt and 1/8 teaspoon pepper. 

4 Bake for 20 to 25 minutes, or until crust is golden. Transfer to wire rack to cool for 10 minutes before *cutting and serving. Cut into 4 pieces for a lunch serving, 8 for a first course serving, or into small squares for an hors d'oeuvre or afternoon tea savory. Serve warm or at room temperature.

* I've used the OXO Good Grips Pizza Wheel for Non-Stick Pans for years on this as well as pizza, and it cuts like a dream!


Disclosure: We are a participant in the Amazon Services LLC Associates Program, an affiliate advertising program designed to provide a means for us to earn fees by linking to Amazon .com and affiliated sites. We are a ThermoWorks affiliate, earning a small commission at no cost to you on purchases made through our links. This helps cover some of the costs of running the blog. Thank you for your support. 

Jean

If you liked this post, please Pin it and share it!

20 September 2012

Gougeres - French Cheese Puffs


Cocktail party foods, as I said last week, aren't really my thing. But this one is my favorite. Gougeres (pronounced goo-ZHAIR) are these gorgeous little savory French puffs that never fail to impress. Everyone thinks they're difficult, but they're not. So you can come off like some sort of culinary genius with comparatively little effort or skill! 

Actually, it is gougères, but I usually leave the diacritical marks out of my posts for simplicity sake. The recipe is just a variation on the pâte à choux (cream puff dough) I've always used for cream puffs, eclairs and profiteroles. So, naturally, while stirring these up my craving for all of those was stirred up! It's a safe bet you'll be seeing them here very soon!

Gougeres, like their sweet cousins, are crisp on the outside and soft on the inside. Delicious with a glass of Champagne or other wine, it's a perfect addition to your HD (hors d'oeuvre) tray. Gruyere is the classic cheese, but a good Cheddar works equally well. For a touch of green, stir in a teaspoon of finely minced flat-leaf parsley. 

What's your favorite libation and accompanying nibbles?

Gougeres

(Makes about 15)

1/2 cup water
4 tablespoons (2 ounces) unsalted butter, cut into 4 pieces
1/4 teaspoon salt
1/4 teaspoon dry mustard
Pinch cayenne
1/2 packed cup (2.5 ounces) unbleached all-purpose flour
2 large eggs
1/2 packed cup (2 ounces) finely shredded Gruyère or Cheddar
2 tablespoons finely shredded Parmesan
1 teaspoon finely minced flat-leaf parsley, optional

1 Preheat oven to 425 degrees. Line large baking sheet (I use a heavy-duty half-sheet pan) with parchment paper. Measure out all ingredients. In 2-quart saucepan, combine water, butter, salt and spices; bring to a boil.

2 Remove from the heat. Add the flour all at once, and stir with a wooden spoon until it comes together into a smooth dough. Return to medium heat, and stir until it dries out a bit and pulls away from the pan, leaving a film on the bottom of the pan, at least 2 minutes. Remove from heat, and let cool for 3 minutes.

3 Very vigorously beat the eggs into the dough one at a time, beating thoroughly after each until fully incorporated. Beat in the cheeses and the optional parsley or other green stuff, if using.

4 Pipe, scoop* or spoon small mounds of dough onto the parchment-lined baking sheet, spacing them 2 inches apart. Bake at 425 degrees for 10 minutes. Reduce heat to 375 degrees; continue baking for 20 minutes, perhaps 25. The puffs should be well browned and very crisp.

* Using a scoop is the easiest, neatest method of forming the puffs. No messy pastry bag to clean up afterward. If you don't have a #60 scoop, get one now! Not just for gougeres, but for profiteroles, small cookies and who knows what all. The other scoop size I use a lot is the larger #40 scoop.

Note: If you missed last week's post, go there now for more Cocktail Party Foods.

13 September 2012

Cocktail Party Foods


It's been years since I've given a Smart Little Drinks Party. I'm more the cozy little dinner party type. But once in a while, one steps out of one's comfort zone, puts an extra coat of wax on the wooden surfaces and hopes for the best. I draw the line at setting out ashtrays. Of course, no one I know smokes, but if they did ... well, not in my house. Oh, and schedule the carpet cleaning for after the party, not before.

You know I'm all about the food, so you're on your own figuring out the drinks. As far as I'm concerned, just give me a pretty stemmed glass of Pellegrino with a wedge of lime. I don't have much of a repertoire of HDs (hors d'oeuvres), so I'm turning to friends in the blogosphere for an assortment of small bites you can choose from for your next party. The only recipes I've blogged that fit remotely into this category are: Baba Ghanoush, Hummus, Pimento Cheese and Salsa. And I'll post my recipe for Gougeres (pictured above) next Friday.

We're all busy, right? So I've rounded up mostly make-ahead, fuss-free HDs that won't leave you too wiped out to enjoy your guests. Let's get the party started! (Just don't get too crazy - this is real life, not Mad Men, you know!)

Blue Cheese Biscuits - David Lebovitz
Cheese, butter, cream - what's not to love - and they can be made ahead!

Ina's Stilton and Walnut Crackers - Leite's Culinaria
Make ahead, freeze, defrost, slice and bake - you can't not make these!

"Instant" Deli Olives - Five Euro Food
Charles says "It's hard not to just stand next to the bowl and hog them all!

Tuna Avocado Tartare - That Skinny Chick Can Bake
I'm a sucker for anything that can be served on a cute little spoon!

Filo Cups with Italian Sausage - Sippity Sup
It won't be a party if you don't serve up a little something in filo cups!

White Onion and Pecorino Tarts - The British Larder
If you put it in a tiny tart, I'll even eat stuff I don't like - but who doesn't like onions and cheese!

Italian Eggrolls with Sauce - Barefeet in the Kitchen
Every cocktail menu must have something in spring roll wrappers!

Tapas-Style Spice-Roasted Almonds - One Perfect Bite
You have to serve some nuts, and you can't just pop open a can! (If you do, at least hide the can.)

Doron's Turkey Meatballs - Orangette
A spin on the classic cocktail party meatballs!