24 November 2022

Velvety Vanilla Cupcakes - with Strawberry Buttercream Frosting

Velvety Vanilla Cupcakes - with Strawberry Buttercream Frosting / www.delightfulrepast.com

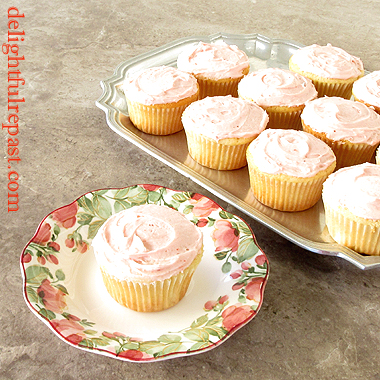
Velvety Vanilla Cupcakes are, I think, the ideal cupcake—rich, buttery, flavorful, with a texture that is, well, velvety! I developed the recipe years ago, first as gluten-free for my gluten-free friends. For that version, go to Velvety Vanilla Cupcakes - That Just Happen to Be Gluten-Free. But these are made with my usual organic unbleached all-purpose flour.

There are times when Vanilla Chiffon Cupcakes are called for. Otherwise, I'm team butter cake cupcake all the way. No need to separate eggs and fold in the whipped egg whites—not that there's anything difficult about that, but it does mean another bowl and another beater and several more minutes, and who needs that! Just keep it simple.

The cupcakes are frosted with a simple buttercream frosting, flavored and colored with either my homemade strawberry freezer jam or a tiny batch of simple pectin-free jam (below). This frosting is soooo good. It tastes like homemade strawberry ice cream. Of course, if fresh strawberries are available, there's my Fresh Strawberry Frosting.

Great for an afternoon tea or parties and showers, but I didn't have a special occasion in mind. It's just nice to have a stash of cupcakes in the freezer for a rainy day! 


Velvety Vanilla Cupcakes - with Strawberry Buttercream Frosting / www.delightfulrepast.com

If you like it, please Pin it and share it!


Velvety Vanilla Cupcakes


(Makes 24)

3 large eggs (medium, in UK)
1 cup (8 fluid ounces/237 ml) milk, divided
2 teaspoons vanilla extract
2 dip-and-sweep cups (10 ounces/283 grams) unbleached all-purpose flour
1 1/2 cups (10.5 ounces/298 grams) sugar
3 1/2 teaspoons baking powder
1/2 teaspoon salt
12 tablespoons (6 ounces/170 grams) unsalted butter, room temperature

1 Preheat oven to 350F/180C/Gas4. Put 2½-inch paper bake cups in two standard muffin tins. In small bowl (I use a Pyrex 2-cup glass measure), lightly whisk together the eggs, 1/4 cup of the milk, and the vanilla extract.

2 In large mixing bowl, combine flour, sugar, baking powder, and salt; and mix on low speed for one minute to "sift." Add the softened butter and remaining milk. Mix on low speed until combined. With mixer on medium-high speed, beat for a minute and a half. Scrape the bowl (I use this silicone spatula).

3 With mixer on medium speed, gradually beat in the egg mixture in three batches, beating for 20 seconds after each addition. Scrape the bowl.

4 Using a 1/4-cup measure, fill the bake cups with a scant 1/4 cup of batter. Bake for about 20 to 23 minutes or until they test done with a toothpick.

5 Immediately remove from pans and cool on wire rack for an hour. They must be thoroughly cool before frosting.


Strawberry Buttercream Frosting


8 tablespoons (4 ounces/113 grams) unsalted butter, room temperature
3 packed cups (12 ounces/340 grams) powdered sugar 
1/16 teaspoon salt
1 teaspoon vanilla extract
4 tablespoons homemade less sugar strawberry freezer jam
A little milk, if needed for proper consistency

In bowl of stand mixer, or with a hand mixer, cream the butter until smooth. With the mixer on low speed, gradually beat in the powdered sugar. Scrape the bowl. Add the salt, vanilla extract, and jam; and beat on high speed until frosting is light and fluffy, about 5 minutes. You will likely have to add the liquid ingredients (the jam and perhaps a little milk) before adding all the powdered sugar. 


Tiny Batch Strawberry Jam


4 ounces (113 grams) frozen unsweetened whole strawberries
1/4 cup (1.75 ounces/50 grams) sugar
1 1/2 teaspoons freshly squeezed lemon juice
Pinch of salt

In small saucepan, cook over medium-low heat for about 10 minutes, stirring frequently. About halfway through, use a stick blender to puree the softened berries. Set aside to cool thoroughly before using in the frosting.

Disclosure: We are a participant in the Amazon Services LLC Associates Program, an affiliate advertising program designed to provide a means for us to earn fees by linking to Amazon .com and affiliated sites. We are a ThermoWorks affiliate, earning a small commission at no cost to you on purchases made through our links. This helps cover some of the costs of running the blog. Thank you for your support.

Jean

If you liked this post, please Pin it and share it!

03 November 2022

Orange Chiffon Cake - and ThermoWorks Silicone Tools Giveaway

Orange Chiffon Cake - and ThermoWorks Silicone Tools Giveaway / www.delightfulrepast.com

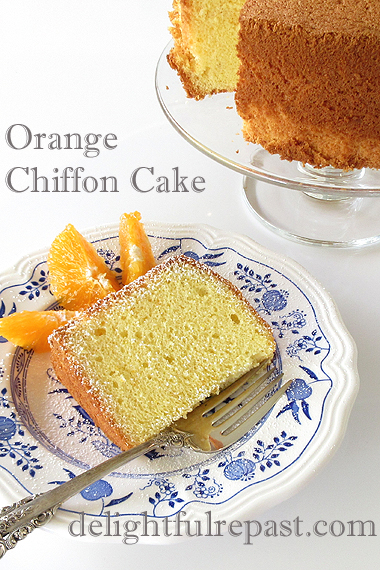
The Orange Chiffon Cake

Orange Chiffon Cake is the most refreshing of cakes and so light it practically floats off the plate! If you're new to chiffon cakes, they are like angel food cakes, but made more luscious by the addition of oil and egg yolks.

Chiffon cakes typically, and originally, are made with vegetable oil and cake flour, two things I don't keep in my kitchen. So I started experimenting with using extra virgin olive oil (a fruity rather than peppery one) and my usual organic unbleached all-purpose flour and came up with this delightful cloud of a cake.

Here are three of my other cakes made with olive oil, in case you'd like to try them: Olive Oil Apple Cake, Olive Oil Carrot Cake, Olive Oil Fig Cake. If you're in the mood for chiffon, try my Vanilla Chiffon Cupcakes; but do make them with a fruity extra virgin olive oil instead of the organic canola oil I used for chiffon cakes back then.

If you have a 7-inch (18 cm) angel food cake pan that is not nonstick, use it. I have this very useful multipurpose 3-inch deep 7-inch diameter round pan and turn it into a tube pan any time I need to with this Ateco Stainless Steel 2x3-Inches-High Round Form that turns any pan into a tube pan. Just center it in the pan and fill in the batter around it. 

Another thing I love about chiffon cakes is that, when you're making cakes with a filling or frosting that must be refrigerated, chiffon cake is fine straight out of the refrigerator; but butter cake needs to be brought to room temperature for the proper texture. 

The ThermoWorks Hi-Temp Silicone Tools

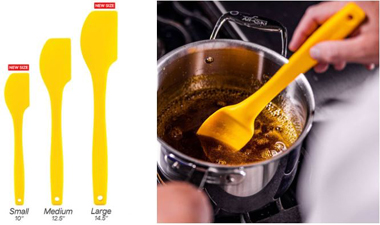
I've tried dozens of spatulas over the years (as you may know, I have a serious gadget habit), and thought I'd found the ultimate one 8 years ago. But when ThermoWorks came out with theirs I could see that its shape would likely solve the only problem I had with my old favorite. So I had to try it. And it did solve that problem. I have a new favorite and I don't see how it could be improved upon.  

With its rounded side, this spatula scrapes every last drop of batter from my mixing bowls as well. I got the small and the medium and use them both. If you're cooking for a large family or making big quantities of food for whatever reason, you might also want to get the large spatula. And I got the spoonula for making custards and puddings. They're all part of the ThermoWorks Hi-Temp (rated to 600F) Silicone Tools collection, as are the silicone hotpad/trivets you've seen here before. 

See the giveaway info below the recipe. Two winners will be selected!

Orange Chiffon Cake - and ThermoWorks Silicone Tools Giveaway / www.delightfulrepast.com

If you like it, please Pin it and share it!


Orange Chiffon Cake


(Makes one 7-inch/18 cm tube cake)

3 large eggs, separated while cold, then brought to room temperature (about 1 hour)
3/4 dip-and-sweep cup (3.75 ounces/106 grams) unbleached all-purpose flour
1/8 packed cup (0.5 ounce/14 grams) non-GMO cornstarch
3/4 cup (5.25 ounces/149 grams) sugar, divided
1 1/2 teaspoons baking powder
1/4 teaspoon salt
Finely grated zest of one large orange (about 1 tablespoon)
1/4 teaspoon cream of tartar
1/4 cup (2 fluid ounces/59 ml) extra virgin olive oil
1/4 cup (2 fluid ounces/59 ml) freshly squeezed orange juice
1 teaspoon vanilla extract

1 Separate the cold eggs, putting the whites into a 1.5- to 2-quart mixing bowl and the yolks into a small bowl. Cover and bring to room temperature, about 1 hour.

2 Once the separated eggs are at room temperature, preheat oven to 350F/180C/Gas4. Cut a 7-inch circle of baking parchment paper to fit in the bottom of the pan. Do not grease the pan. 

3 In 2.5- to 3-quart mixing bowl, whisk together flour, cornstarch, 1/2 cup (3.5 ounces/99 grams) of the sugar, baking powder, salt, and orange zest.

4 Add the cream of tartar to the room temperature egg whites in the 1.5- to 2-quart mixing bowl. Using hand mixer on medium speed, beat the egg whites and cream of tartar until nearly at soft peaks stage. On high speed, gradually beat in the remaining 1/4 cup (1.75 ounces/50 grams) sugar until egg whites are stiff enough to hold up in soft peaks but are still glossy and moist. Watching carefully, continue beating until whites just reach stiff peaks but are not dry; set aside.

5 Make a well in the center of the flour mixture and add the egg yolks, olive oil, orange juice, and vanilla extract. Whisk vigorously, or beat with hand mixer on medium speed, until smooth, about one minute.

6 With a silicone spatula*, gently fold the egg whites, a third at a time, into the batter just until blended.

* The ThermoWorks hi-temp silicone spatulas (small or medium—I used the small) are perfect for this. The shape does the best job of scraping the bowl clean. And they are an easy-to-clean one-piece design. 

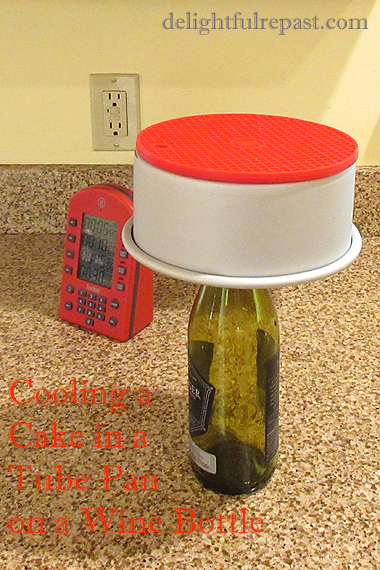
7 Pour the batter into the prepared pan and gently smooth the top and run a skewer through the batter a few times to break up any large air bubbles. Bake for about 35 to 40 minutes, or until a wooden skewer inserted into the center of the cake comes out clean or cake springs back when pressed gently. Immediately turn the pan upside down over the neck of a wine bottle and leave it there for 30 to 45 minutes.

Orange Chiffon Cake (this photo, cooling a cake in a tube pan on a wine bottle) / www.delightfulrepast.com
Cooling a cake in a tube pan on a wine bottle really works!
Doing this keeps the chiffon cake from settling and losing its light texture.
(That's a ThermoWorks 7-inch Hi-Temp Silicone Hotpad/Trivet on top of the pan
and my favorite timer, ThermoWorks TimeStack, that times four things at once!)

8 To remove the cake from the pan, run a thin-bladed metal spatula around the tube and the inside of the pan. Invert onto serving platter and let cool completely. If you like, make a simple glaze of powdered sugar and orange juice to drizzle over the cake.


ThermoWorks Hi-Temp Silicone Tools Giveaway


This giveaway is open to readers in the US* who are 18 years of age or older. To enter, leave a comment below (one entry per person). Be sure to tell me what color you prefer. Please include your email address in the body of your comment. If your name is drawn and I have no way to contact you, you will be disqualified. Must enter by 11:59 p.m. Eastern time Tuesday November 22.

* If you are outside the US but would like to have this sent to someone you know in the US, go ahead and enter!

Two winners will be chosen by random drawing and be announced here in the comments before noon Eastern time on Thursday November 24. If I don't hear back from the winners of the random drawing by noon Eastern time Saturday November 26, new winner(s) will be selected from the original entrants (those who commented before the giveaway deadline).

Disclosure: ThermoWorks provided the spatulas and spoonula for review purposes and two sets for the giveaway. The views expressed here are entirely my own. I always tell my readers what I really think!

Disclosure: We are a participant in the Amazon Services LLC Associates Program, an affiliate advertising program designed to provide a means for us to earn fees by linking to Amazon .com and affiliated sites. We are a ThermoWorks affiliate, earning a small commission at no cost to you on purchases made through our links. This helps cover some of the costs of running the blog. Thank you for your support.

Jean

If you liked this post, please Pin it and share it!