Showing posts with label giveaway. Show all posts

19 October 2023

Perfect Pumpkin Pie - ThermoWorks Giveaway

Perfect Pumpkin Pie - ThermoWorks Giveaway / www.delightfulrepast.com

With the autumn baking season upon us, it's time for the annual quest for the perfect pumpkin pie
and to take stock of our kitchen tools to make sure we have what we need in the months ahead. 

The Pie

I've posted Pumpkin Pie before, including ones made with canned evaporated milk, but I can't buy organic evaporated milk just anywhere, so I developed a recipe I can make with readily available organic milk and cream. 

When I make pumpkin pie for just us, I use just 1/4 cup of sugar. I know, I know, it sounds extreme; but we love it. However, knowing other people might not, I would use 2/3 cup when making the pie for guests. But lately I've tried out a 1/2-cup version on some of them and they've loved it, so this recipe says "1/2 cup (3.5 ounces/99 grams) sugar." I hope you'll try it!

I've posted lots of different pie crusts, including gluten-free pie crust, made with different techniques. This is my favorite recipe using a food processor. If you don't have a food processor, you can easily adapt it to making it by hand. Food-processor all-butter pastry has a tendency to be difficult to cut with a fork, but I've included some significant changes/additions I've made to make the crust fork-tender. It's foolproof; you can't mess this up!

You just need one crust for a pumpkin pie, of course; but never waste time making just one crust. Always make the double-crust recipe and store one in the refrigerator for a few days or in the freezer for a couple months. It's very satisfying seeing a little stack of dough disks in the freezer ready for future pies! 
I've also posted various methods over the years to help you avoid the dreaded "soggy bottom," including fully prebaking the pie shell or using a pie tin on a pizza stone; but I wanted to find a way to have a lovely crisp, golden, un-soggy bottom using my all-time favorite pie plate, the classic 9-inch Pyrex glass pie plate. If you've had any of these challenges, I hope you'll find something here that works for you.

The Giveaway

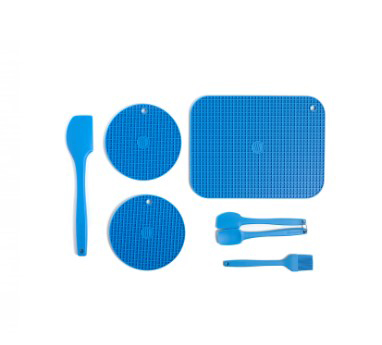
And, just in time for your fall baking, a giveaway from ThermoWorks of some of my favorite, tried-and-true, in-constant-use items! The Hi-Temp Silicone Kitchen Kit (in your choice of 10 colors): One Medium Silicone Spatula (12.5"), One Mini Silicone Spatula & Spoonula set, Two 7" Round Silicone Trivets, One Large 9" x 12" Trivet, and One Small Silicone Brush. And drumroll please, my favorite kitchen timer: the TimeStack quadruple timer (in your choice of 10 colors) that shows you all four displays and alarms at once. You can even record your own voice for each alarm.

The hotpad/trivets are amazing! I've tried all kinds, and these are the best. Super sturdy, yet flexible, and very grippy, they are my favorite hotpads. As trivets when cooking, baking, or serving a meal buffet- or family-style, they protect your tabletop or countertop from hot dishes and pans, round or rectangular. And hot pans and casseroles won't slide off these trivets.

Perfect Pumpkin Pie - ThermoWorks Giveaway (Hi-Temp Silicone Kitchen Kit) / www.delightfulrepast.com

And the TimeStack—
Why do I need a four-channel timer in my home kitchen? Because we use a timer for everything: brewing tea several times a day, checking the rising bread dough, baking, getting the laundry out of the dryer, watering the fruit trees for a certain length of time. We even use a timer as an alarm clock on those rare occasions when we need one. You'll wonder how you ever lived without it! 
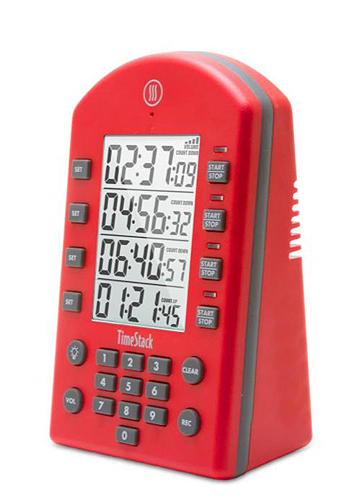
Perfect Pumpkin Pie - ThermoWorks Giveaway (TimeStack) / www.delightfulrepast.com

These items make wonderful gifts as well. You'll find the giveaway rules below the recipe. And do leave a comment, even if you're not entering the giveaway. I love your comments! Happy Autumn! 


Perfect Pumpkin Pie - ThermoWorks Giveaway / www.delightfulrepast.com


Pumpkin Pie


(Makes one 9-inch pie, 8 servings)


The Pastry - Food Processor Method

(for two single-crust pies or one double-crust pie)
 
2 1/4 dip-and-sweep cups (11.25 ounces/319 grams) unbleached all-purpose flour
1/4 dip-and-sweep cup (1.06 ounce/30 grams) tapioca flour
1 tablespoon sugar
1 teaspoon salt
2 sticks (8 ounces/227 grams) unsalted butter, cut into 1/4-inch slices
1 large egg, lightly beaten
4 tablespoons (2 fluid ounces/59 ml) ice water
1 tablespoon apple cider vinegar


The Filling

 
1/2 cup (3.5 ounces/99 grams) sugar
2 tablespoons non-GMO cornstarch
1/4 teaspoon salt
1 teaspoon cinnamon
1/2 teaspoon ginger
1/4 teaspoon allspice
1/8 teaspoon nutmeg
1/8 teaspoon ground cloves
3 large eggs
1 15-ounce (425 grams) can pumpkin (not pumpkin pie filling) or 1 3/4 cups pumpkin puree
3/4 cup (6 fluid ounces/177 ml) milk
1/2 cup (4 fluid ounces/118
 ml) heavy cream


1 Weigh/measure flour, sugar, and salt in 2- to 2.5-quart mixing bowl. Whisk vigorously for about 30 seconds to "sift." With food processor's metal blade in place, scoop out half (1 1/4 cups) the flour mixture into the work bowl of the food processor. Spread the butter slices evenly over the fairly even flour mixture. Pulse until no dry flour remains and mixture is starting to form clumps of dough, about 25 to 30 one-second pulses. Don't get hung up on counting the number of pulses, just watch for the clumping to begin. With a silicone spatula, spread dough evenly around the work bowl. Sprinkle with the remaining flour and pulse until the dough is just barely broken up, about 5 1-second pulses.

2 Transfer the dough back to the 2- to 2.5-quart mixing bowl. If the kitchen very warm, cover and refrigerate the dough for 10 minutes or so before proceeding. Sprinkle the dough with the egg-water-vinegar mixture and use the spatula to fold and press the dough until it comes together into a ball.

3 Turn the dough out, dividing onto two pieces of plastic wrap and flatten each slightly into a 4- to 5-inch round disk. Wrap and refrigerate for at least 2 hours or up to 3 days. You can even freeze the dough, wrapped well, for up to a month. To defrost the dough, move it from freezer to refrigerator for one day before using it. Let thoroughly chilled dough stand at room temperature for 10 to 15 minutes for easier rolling.

4 In medium bowl (using a 2-quart glass measure makes it easy to pour the filling into the crust), whisk together sugar, cornstarch, salt and spices. Whisk in the eggs, then the pumpkin and then the milk and cream. Refrigerate filling until ready to fill the pie shell, up to a full day.  

5 For single-crust pie: On lightly floured surface with lightly floured rolling pin, roll out the dough to 13 inches in diameter and 1/8 inch or so thick. Transfer the dough to the pie plate, pressing the dough (but not stretching it) to fit the pie plate, getting down into the corners, with a half- to one-inch overhang (trim with knife or scissors). Cover with the reserved piece of plastic wrap and chill for 10 minutes before fluting the edge. Cover and return to refrigerator while the oven heats up.

6 Put the oven rack in the lowest position. Preheat the oven to 450F/230C/Gas8. Pour the filling into the chilled unbaked shell and place it on a parchment-lined baking sheet to catch any butter drips. As soon as you put the pie in the oven, reduce temperature to 425F/220C/Gas7. Bake for 20 minutes. Reduce heat to 350F/180C/Gas4. Bake for about 40 to 45 minutes (after about 15 minutes, I put on a pie crust shield to ensure that the crimped edge doesn't burn), or until knife inserted midway between edge and center comes out clean or until it registers 185F/85C on an instant-read thermometer.

Note: After you've made pumpkin pie a few times, you can tell just by looking whether or not it's done. It will look darker and shinier and will have puffed up a bit and then fallen, and it should be fairly firm but still have a little jiggle left in the center (unless, of course, you're making it for Mr Delightful who wants his pie very firm, no jiggle!).

7 Cool on wire rack for 2 hours, then lay a square of wax paper over the top and refrigerate for at least 3 hours. Serve with softly whipped cream. I sweetened and flavored 1 cup of heavy whipping cream with 4 teaspoons of real maple syrup and 1 teaspoon of vanilla extract. And I sometimes garnish with a sprinkling of cinnamon sugar.

Note: Leftovers can be stored in the refrigerator for up to 3 or 4 days. As if!


Perfect Pumpkin Pie - ThermoWorks Giveaway / www.delightfulrepast.com
My pumpkin pies often crack because I overbake them to
suit Mr Delightful's preference for a very firm custard.


ThermoWorks TimeStack and Kitchen Kit Giveaway


This giveaway is open to readers in the US* who are 18 years of age or older. To enter, leave a comment below (one entry per person). Be sure to tell me what color you prefer. Please include your email address in the body of your comment. If your name is drawn and I have no way to contact you, you will be disqualified. Must enter by 11:59 p.m. Eastern time Tuesday October 31.

* If you are outside the US but would like to have this sent to someone you know in the US, go ahead and enter!

The winner will be chosen by random drawing and be announced here in the comments before noon Eastern time on Thursday November 9. If I don't hear back from the winner of the random drawing by noon Eastern time Friday November 3, a new winner will be selected from the original entrants (those who commented before the giveaway deadline).

Disclosure: ThermoWorks provided the timer and kitchen kit for review purposes and for the giveaway. The views expressed here are entirely my own. I always tell my readers what I really think!

Jean

If you liked this post, please Pin it and share it!

03 November 2022

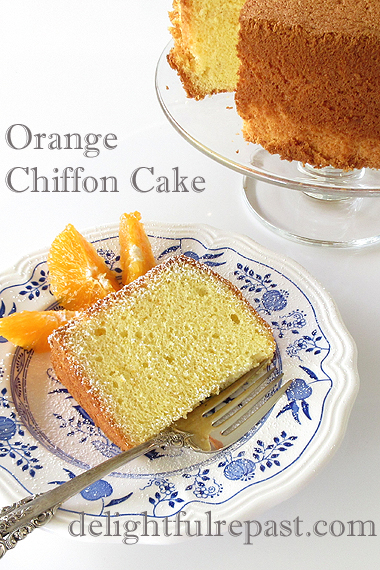
Orange Chiffon Cake - and ThermoWorks Silicone Tools Giveaway

Orange Chiffon Cake - and ThermoWorks Silicone Tools Giveaway / www.delightfulrepast.com

The Orange Chiffon Cake

Orange Chiffon Cake is the most refreshing of cakes and so light it practically floats off the plate! If you're new to chiffon cakes, they are like angel food cakes, but made more luscious by the addition of oil and egg yolks.

Chiffon cakes typically, and originally, are made with vegetable oil and cake flour, two things I don't keep in my kitchen. So I started experimenting with using extra virgin olive oil (a fruity rather than peppery one) and my usual organic unbleached all-purpose flour and came up with this delightful cloud of a cake.

Here are three of my other cakes made with olive oil, in case you'd like to try them: Olive Oil Apple Cake, Olive Oil Carrot Cake, Olive Oil Fig Cake. If you're in the mood for chiffon, try my Vanilla Chiffon Cupcakes; but do make them with a fruity extra virgin olive oil instead of the organic canola oil I used for chiffon cakes back then.

If you have a 7-inch (18 cm) angel food cake pan that is not nonstick, use it. I have this very useful multipurpose 3-inch deep 7-inch diameter round pan and turn it into a tube pan any time I need to with this Ateco Stainless Steel 2x3-Inches-High Round Form that turns any pan into a tube pan. Just center it in the pan and fill in the batter around it. 

Another thing I love about chiffon cakes is that, when you're making cakes with a filling or frosting that must be refrigerated, chiffon cake is fine straight out of the refrigerator; but butter cake needs to be brought to room temperature for the proper texture. 

The ThermoWorks Hi-Temp Silicone Tools

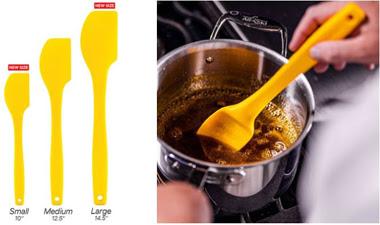
I've tried dozens of spatulas over the years (as you may know, I have a serious gadget habit), and thought I'd found the ultimate one 8 years ago. But when ThermoWorks came out with theirs I could see that its shape would likely solve the only problem I had with my old favorite. So I had to try it. And it did solve that problem. I have a new favorite and I don't see how it could be improved upon.  

With its rounded side, this spatula scrapes every last drop of batter from my mixing bowls as well. I got the small and the medium and use them both. If you're cooking for a large family or making big quantities of food for whatever reason, you might also want to get the large spatula. And I got the spoonula for making custards and puddings. They're all part of the ThermoWorks Hi-Temp (rated to 600F) Silicone Tools collection, as are the silicone hotpad/trivets you've seen here before. 

See the giveaway info below the recipe. Two winners will be selected!

Orange Chiffon Cake - and ThermoWorks Silicone Tools Giveaway / www.delightfulrepast.com

If you like it, please Pin it and share it!


Orange Chiffon Cake


(Makes one 7-inch/18 cm tube cake)

3 large eggs, separated while cold, then brought to room temperature (about 1 hour)
3/4 dip-and-sweep cup (3.75 ounces/106 grams) unbleached all-purpose flour
1/8 packed cup (0.5 ounce/14 grams) non-GMO cornstarch
3/4 cup (5.25 ounces/149 grams) sugar, divided
1 1/2 teaspoons baking powder
1/4 teaspoon salt
Finely grated zest of one large orange (about 1 tablespoon)
1/4 teaspoon cream of tartar
1/4 cup (2 fluid ounces/59 ml) extra virgin olive oil
1/4 cup (2 fluid ounces/59 ml) freshly squeezed orange juice
1 teaspoon vanilla extract

1 Separate the cold eggs, putting the whites into a 1.5- to 2-quart mixing bowl and the yolks into a small bowl. Cover and bring to room temperature, about 1 hour.

2 Once the separated eggs are at room temperature, preheat oven to 350F/180C/Gas4. Cut a 7-inch circle of baking parchment paper to fit in the bottom of the pan. Do not grease the pan. 

3 In 2.5- to 3-quart mixing bowl, whisk together flour, cornstarch, 1/2 cup (3.5 ounces/99 grams) of the sugar, baking powder, salt, and orange zest.

4 Add the cream of tartar to the room temperature egg whites in the 1.5- to 2-quart mixing bowl. Using hand mixer on medium speed, beat the egg whites and cream of tartar until nearly at soft peaks stage. On high speed, gradually beat in the remaining 1/4 cup (1.75 ounces/50 grams) sugar until egg whites are stiff enough to hold up in soft peaks but are still glossy and moist. Watching carefully, continue beating until whites just reach stiff peaks but are not dry; set aside.

5 Make a well in the center of the flour mixture and add the egg yolks, olive oil, orange juice, and vanilla extract. Whisk vigorously, or beat with hand mixer on medium speed, until smooth, about one minute.

6 With a silicone spatula*, gently fold the egg whites, a third at a time, into the batter just until blended.

* The ThermoWorks hi-temp silicone spatulas (small or medium—I used the small) are perfect for this. The shape does the best job of scraping the bowl clean. And they are an easy-to-clean one-piece design. 

7 Pour the batter into the prepared pan and gently smooth the top and run a skewer through the batter a few times to break up any large air bubbles. Bake for about 35 to 40 minutes, or until a wooden skewer inserted into the center of the cake comes out clean or cake springs back when pressed gently. Immediately turn the pan upside down over the neck of a wine bottle and leave it there for 30 to 45 minutes.

Orange Chiffon Cake (this photo, cooling a cake in a tube pan on a wine bottle) / www.delightfulrepast.com
Cooling a cake in a tube pan on a wine bottle really works!
Doing this keeps the chiffon cake from settling and losing its light texture.
(That's a ThermoWorks 7-inch Hi-Temp Silicone Hotpad/Trivet on top of the pan
and my favorite timer, ThermoWorks TimeStack, that times four things at once!)

8 To remove the cake from the pan, run a thin-bladed metal spatula around the tube and the inside of the pan. Invert onto serving platter and let cool completely. If you like, make a simple glaze of powdered sugar and orange juice to drizzle over the cake.


ThermoWorks Hi-Temp Silicone Tools Giveaway


This giveaway is open to readers in the US* who are 18 years of age or older. To enter, leave a comment below (one entry per person). Be sure to tell me what color you prefer. Please include your email address in the body of your comment. If your name is drawn and I have no way to contact you, you will be disqualified. Must enter by 11:59 p.m. Eastern time Tuesday November 22.

* If you are outside the US but would like to have this sent to someone you know in the US, go ahead and enter!

Two winners will be chosen by random drawing and be announced here in the comments before noon Eastern time on Thursday November 24. If I don't hear back from the winners of the random drawing by noon Eastern time Saturday November 26, new winner(s) will be selected from the original entrants (those who commented before the giveaway deadline).

Disclosure: ThermoWorks provided the spatulas and spoonula for review purposes and two sets for the giveaway. The views expressed here are entirely my own. I always tell my readers what I really think!

Disclosure: We are a participant in the Amazon Services LLC Associates Program, an affiliate advertising program designed to provide a means for us to earn fees by linking to Amazon .com and affiliated sites. We are a ThermoWorks affiliate, earning a small commission at no cost to you on purchases made through our links. This helps cover some of the costs of running the blog. Thank you for your support.

Jean

If you liked this post, please Pin it and share it!
24 June 2021

Apple Galette - ThermoWorks TimeStack Giveaway

Apple Galette - ThermoWorks TimeStack Giveaway / www.delightfulrepast.com

The Apple Galette

An apple galette is what I make when I don't have the time, or inclination, to make an Apple Pie—rolling out two crusts, peeling and slicing all those apples, making a pretty crimped edge. I just wasn't up for all that today.

The solution? A galette, or rustic tart, is quicker and easier than a double-crust pie or a tart. You can make it free-form on a baking sheet, as I did for my Rustic Peach Tart, or make it in a 9-inch glass pie plate.

Just make the same amount of dough you would for any 9-inch single-crust pie, but roll it a bit larger to about 14 inches. Center it in the pie plate, not worrying about evening up the ragged edges, pour in the filling, and then bring that raggedy overhanging pastry up over the apples.

I hope you'll leave a comment, enter the giveaway, and perhaps explore more of Delightful Repast while you're here. If you see something you like, be sure to Pin it, tweet it, whatever-social-media-you-have it.


Apple Galette - Rustic Apple Tart (this image, my watercolor sketch of apples on branch) / www.delightfulrepast.com
My watercolor version of a beautiful pencil drawing by UK artist Valerie Callen


The ThermoWorks TimeStack

Even though I had read about the TimeStack, I was shocked when it arrived. This thing is like the grandfather clock of kitchen timers! It's more than 6 inches tall and 4 inches wide, and it needs to be because it has four separate (independent) timers, each with four separate huge-digit, easy-to-read displays (no toggling).

Why do I need a four-channel timer in my home kitchen? Because we use a timer for everything: brewing tea several times a day, checking the rising bread dough, baking, getting the laundry out of the dryer, watering the fruit trees for a certain length of time. We even use a timer as an alarm clock on those rare occasions when we need one.

With four timers set, how do you know what each one is for? With this magnificent instrument, you can record a message for each one! 1. Check the dough. 2. Move the hose. 3. Take the casserole out. 4. Leave for appointment. No more sticky notes!

See the giveaway info below the recipe.


Apple Galette - ThermoWorks TimeStack Giveaway / www.delightfulrepast.com

If you like it, please Pin it and share it!

Apple Galette - Rustic Apple Tart


(Makes one 8.5-inch round tart, 6 servings)

Sour Cream Pastry

1 1/4 dip-and-sweep cups (6.25 ounces/177 grams) unbleached all-purpose flour
1/4 teaspoon salt
1/4 teaspoon baking powder
1 stick (4 ounces/113 grams) very cold unsalted butter
1/2 cup sour cream (4 ounces/113 grams), plus a little more if needed

Apple Filling

1 1/2 pounds (about 4 medium) apples* (by volume, about 4 cups/1 litre)
1/4 cup (1.75 ounces/50 grams) sugar
1 tablespoon (0.31 ounce/9 grams) unbleached all-purpose flour
1/2 teaspoon cinnamon
Pinch salt 

I usually use half each of two varieties; such as, Fuji and Pink Lady, Granny Smith and Golden Delicious, or Braeburn and Pippin.

1 In medium bowl, whisk together flour, salt and baking powder. With coarse grater over bowl, shred the butter over the flour. (Don't try to shred the very last—you'll shred your fingers; just cut it up.) Stir with a large dinner fork, making sure all the shredded butter is coated with flour. Mixture should be very chunky.

2 With the fork, stir in the sour cream. If you pinch some of the crumbly dough and it holds together and there isn't a lot of dry flour in the bowl, you've used enough sour cream. If not, either add a bit more or sprinkle on up to a tablespoon or so of cold milk, a teaspoon at a time.

3 Turn the crumbly dough out onto a square of plastic wrap and shape it into a 5-inch disk. Wrap tightly in the plastic wrap and chill in the refrigerator for at least 30 minutes or up to 3 days.

4 If you've chilled the dough for just 30 minutes or so, you can roll it out without waiting. You'll need to let thoroughly chilled dough stand at room temperature for 10 to 20 minutes before rolling. Save the square of plastic wrap; you'll be using it again. (I'm very sparing in my use of plastic wrap and like to get as much use out of a piece as possible!)

5 Preheat oven to 425F/220C/Gas7. Prepare the filling just before you roll out the pastry. In tiny bowl, whisk together sugar, flour, cinnamon and salt. Peel (or not—sometimes I don't) and core the apples, and slice them into a medium bowl. I slice them like this: Peel the apples, cut them in half through the stem end. With a melon baller, remove the core from each half; with paring knife, trim away the peel from the ends. Cut each half in half lengthwise and slice thinly crosswise. You should have about 4 cups. Stir in the sugar mixture.

6 Lightly flour a square of parchment paper on the counter. Place the disk of dough in the center and sprinkle it lightly with flour. If you like, place the reserved piece of plastic wrap on top of the dough. With floured rolling pin, roll out the disk, rolling from center to edge and rotating by quarter-turns to make a round shape, to a 14-inch circle. Don't worry about ragged edges; this is a rustic tart.

7 Butter a 9-inch glass pie plate, using about 1/2 teaspoon of butter. Transfer dough to pie plate, paper side up; remove paper. Press dough into the pie plate without stretching, leaving the raggedy-edged overhang untrimmed.

8 Pour in the apple filling in an even layer. Bring the overhang up over the apples a little at a time, sort of "pleating" as you go. Don't try to be cute—we're going for rustic here! Bake for 20 minutes; reduce heat to 350F/180C/Gas4 and continue baking for about 45 to 50 minutes, until crust is golden brown and juices are bubbling. Can be served from the pie plate or lifted out and placed on a serving plate.


Apple Galette - ThermoWorks TimeStack Giveaway (this photo, the TimeStack) / www.delightfulrepast.com

ThermoWorks TimeStack Giveaway


This giveaway is open to readers in the US* who are 18 years of age or older. To enter, leave a comment below (one entry per person). Tell me why you want a TimeStack. Please include your email address in the body of your comment. If your name is drawn and I have no way to contact you, you will be disqualified. Must enter by 11:59 p.m. Eastern time Wednesday July 7.

* If you are outside the US but would like to have this sent to someone you know in the US (you would have to send them a gift card separately on your own), go ahead and enter!

Winner will be chosen by random drawing and be announced here in the comments before noon Eastern time on Thursday July 8. If I don't hear back from the winner of the random drawing by noon Eastern time Saturday July 10, a new winner will be selected from the original entrants (those who commented before the giveaway deadline).

Disclosure: ThermoWorks provided a TimeStack for review purposes and one for the giveaway. The views expressed here are entirely my own. I always tell my readers what I really think!

Disclosure: We are a participant in the Amazon Services LLC Associates Program, an affiliate advertising program designed to provide a means for us to earn fees by linking to Amazon .com and affiliated sites. We are a ThermoWorks affiliate, earning a small commission at no cost to you on purchases made through our links. This helps cover some of the costs of running the blog. Thank you for your support.

Jean

16 September 2020

Spiced Rice Pudding - Women in the Kitchen Review and Giveaway

Spiced Rice Pudding - Women in the Kitchen Review and Giveaway / www.delightfulrepast.com

Spiced Rice Pudding is the first recipe I've made from Anne Willan's latest book, Women in the Kitchen. You might say the recipe below is my adaptation of Anne's adaptation of Amelia Simmons' recipe (likely an adaptation!) in her book American Cookery published in 1796.

And it isn't the oldest recipe in Women in the Kitchen, which tells the stories of 12 female cookbook authors, from 1661 right up to the present, who shaped and influenced home cooking. Not simply a cookbook writer, Anne is known for her prize-winning literary food writing. 

People of many interests—not just cooking, but history as well as writing and publishing—can enjoy this book. It would be a great resource for writers of historical novels.

I've always been interested in historical foods. Here are a few of the ones I've posted over the years: Sally Lunn Buns, Bakewell Tart, Indian Pudding, Steamed Jam Sponge Pudding, Yorkshire Pudding. So I was fascinated to learn more about the early writers. 

And three of my favorite modern-day female cookbook authors—Julia Child, Edna Lewis, and Alice Waters—are featured in the book. The first of the book's Edna Lewis recipes I'll be trying is Crispy Biscuits, not the light soft biscuits one would expect from a Southerner and which she excelled at. I am intrigued!

I hope you'll enter the Women in the Kitchen giveaway below, whether you want the book for yourself or for gifting. And do let me know in the comments who your favorite cookbook writers are. 

Spiced Rice Pudding - Women in the Kitchen Review and Giveaway / www.delightfulrepast.com
Don't forget to Pin it and share it!

Spiced Rice Pudding


Adapted from Women in the Kitchen by Anne Willan, which was an adaptation from American Cookery by Amelia Simmons

Amelia Simmons
American Cookery
1796
Rice Pudding No. 3

(I halved the recipe, making 6 to 8 servings)

1/2 cup (3.5 ounces/99 grams) Arborio or other short-grain white rice
1 quart (32 fluid ounces/946 ml) milk
1/2 cup (3.5 ounces/99 grams) sugar
1/4 teaspoon salt
1/2 teaspoon allspice
1/2 teaspoon cinnamon
1/2 teaspoon ginger
4 large eggs (medium, in UK)
4 tablespoons (2 ounces/57 grams) unsalted butter, softened
1/4 cup (2 fluid ounces/59 ml) red, rosé or white wine

1 In a heavy-bottomed 2-quart saucepan, bring the rice and milk to a simmer over medium-high heat. Reduce heat and simmer, stirring occasionally, for 15 to 20 minutes, until tender. Remove from heat and let cool.

2 Preheat the oven to 300F/150C/Gas2. Butter a 1.5-quart baking dish.

3 In a 1.5- to 2-quart bowl, with an electric mixer, combine the sugar, salt and spices; beat in the softened butter. Add the eggs and beat for 2 to 3 minutes, until thick and light.

4 With a spoon, stir the egg mixture into the cooled rice mixture, followed by the wine. Pour into the buttered baking dish and bake for about 1 1/4 hours, until pudding is set and top is browned.

5 Allow to cool at least 30 minutes before serving warm. Even longer if you prefer it at room temperature. It's also good cold. Whatever you like. Keeps, covered, in refrigerator for up to 3 days. Serve plain or with berries or other fruit.

Spiced Rice Pudding - Women in the Kitchen Review and Giveaway / www.delightfulrepast.com


Women in the Kitchen Giveaway 


This giveaway is open to US residents* (See next paragraph, international friends!) 18 years of age or older. Leave a comment below (one entry per person). Please include your email address in the body of your comment; I don't have time to track you down. Enter by 11:59 p.m. Eastern time Wednesday September 30. 

* If you are outside the US but would like to have this sent to someone in the US (you would have to send them a gift card separately on your own), go ahead and enter! 

Winner will be chosen by random drawing and be announced here in the comments before noon Eastern time on Thursday October 1. If I don't hear back from the winner of the random drawing by noon Eastern time Saturday October 3, another drawing will be held and a new winner selected from the original entrants (those who commented before the giveaway deadline).

Disclosure: Scribner provided a book for review purposes and for the giveaway. The views expressed here are entirely my own. I always tell my readers what I really think!

Disclosure: We are a participant in the Amazon Services LLC Associates Program, an affiliate advertising program designed to provide a means for us to earn fees by linking to Amazon .com and affiliated sites. We are a ThermoWorks affiliate, earning a small commission at no cost to you on purchases made through our links. This helps cover some of the costs of running the blog. Thank you for your support. 

Jean

17 October 2019

Joy of Cooking: 2019 Edition - Review and Giveaway

Joy of Cooking: 2019 Edition - Review and Giveaway

With its encyclopedic coverage of every aspect of cookery, and tipping the scales at nearly 5 pounds, the 2019 edition of Joy of Cooking is indeed a weighty tome.

More than nine years in the works, Joy of Cooking: 2019 Edition has been fully revised and updated by the original "Mrs Joy's" great-grandson and his wife, John Becker and Megan Scott.

Its wider pages (by about an inch and a half) and sewn binding mean the book will lie flat, a useful improvement over previous editions. Next I noticed the improved index. Just one example: 

The 1997 edition listed

Pâté
   à Choux, 919

   Chicken Liver, 725

The 2019 edition has corrected that error and made separate listings for pâte à choux and the totally unrelated pâtés and terrines.

I was pleased to see that the latest Joy, with legacy material and classics side by side with modern recipes and techniques, has retained the personality and "feel" we love. 

Of course, a volume of this scope has no room for photos, so I've included my own photos of the only recipe I've made so far, the Apple Dumplings, page 688, with the Cream Cheese Pastry Dough, page 665.

Coming November 12!

Joy of Cooking: 2019 Edition - Review and Giveaway


The pastry came together quickly in the food processor, but you can do it by hand as well. With no water added, it's impossible to overwork. I'll be using this lovely pastry for many things, sweet and savory.

Photographed by me with permission of publisher
to show Joy's signature recipe formatting style


I think Irma, the original Mrs Joy, and Marion, her daughter, would be well pleased indeed with this edition. But I fear John Becker and Megan Scott have done themselves out of a job; this edition will not become dated and in need of revision any time soon. 

Whether you are an experienced home cook or a never-cooked-before novice, this comprehensive volume will be an education! Enter my giveaway below to possibly win a copy for yourself or for someone on your gift list.


Joy of Cooking: 2019 Edition - Review and Giveaway


Joy of Cooking: 2019 Edition Giveaway 


Scribner will send winner a copy of Joy of Cooking: 2019 Edition.

This giveaway is open to US residents* (See next paragraph, international friends!) 18 years of age or older. Leave a comment below (one entry per person). Please include your email address in the body of your comment. Enter by 11:59 p.m. Eastern time Wednesday October 23. 

* If you are outside the US but would like to have this sent to someone in the US (you would have to send them a gift card separately on your own), go ahead and enter! 

Winner will be chosen by random drawing and be announced here in the comments before noon Eastern time on Thursday October 24. If I don't hear back from the winner of the random drawing by noon Eastern time Saturday October 26, another drawing will be held and a new winner selected from the original entrants (those who commented before the giveaway deadline).

Disclosure: Scribner provided a book for review purposes and for the giveaway. The views expressed here are entirely my own. I always tell my readers what I really think!

Disclosure: We are a participant in the Amazon Services LLC Associates Program, an affiliate advertising program designed to provide a means for us to earn fees by linking to Amazon .com and affiliated sites. We are a ThermoWorks affiliate, earning a small commission at no cost to you on purchases made through our links. This helps cover some of the costs of running the blog. Thank you for your support. 

Jean