Showing posts with label equipment reviews. Show all posts

19 October 2023

Perfect Pumpkin Pie - ThermoWorks Giveaway

Perfect Pumpkin Pie - ThermoWorks Giveaway / www.delightfulrepast.com

With the autumn baking season upon us, it's time for the annual quest for the perfect pumpkin pie
and to take stock of our kitchen tools to make sure we have what we need in the months ahead. 

The Pie

I've posted Pumpkin Pie before, including ones made with canned evaporated milk, but I can't buy organic evaporated milk just anywhere, so I developed a recipe I can make with readily available organic milk and cream. 

When I make pumpkin pie for just us, I use just 1/4 cup of sugar. I know, I know, it sounds extreme; but we love it. However, knowing other people might not, I would use 2/3 cup when making the pie for guests. But lately I've tried out a 1/2-cup version on some of them and they've loved it, so this recipe says "1/2 cup (3.5 ounces/99 grams) sugar." I hope you'll try it!

I've posted lots of different pie crusts, including gluten-free pie crust, made with different techniques. This is my favorite recipe using a food processor. If you don't have a food processor, you can easily adapt it to making it by hand. Food-processor all-butter pastry has a tendency to be difficult to cut with a fork, but I've included some significant changes/additions I've made to make the crust fork-tender. It's foolproof; you can't mess this up!

You just need one crust for a pumpkin pie, of course; but never waste time making just one crust. Always make the double-crust recipe and store one in the refrigerator for a few days or in the freezer for a couple months. It's very satisfying seeing a little stack of dough disks in the freezer ready for future pies! 
I've also posted various methods over the years to help you avoid the dreaded "soggy bottom," including fully prebaking the pie shell or using a pie tin on a pizza stone; but I wanted to find a way to have a lovely crisp, golden, un-soggy bottom using my all-time favorite pie plate, the classic 9-inch Pyrex glass pie plate. If you've had any of these challenges, I hope you'll find something here that works for you.

The Giveaway

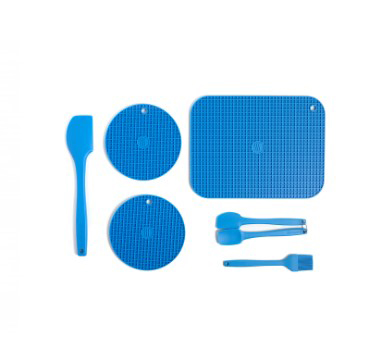
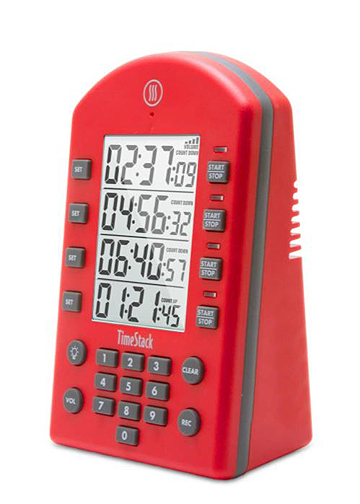
And, just in time for your fall baking, a giveaway from ThermoWorks of some of my favorite, tried-and-true, in-constant-use items! The Hi-Temp Silicone Kitchen Kit (in your choice of 10 colors): One Medium Silicone Spatula (12.5"), One Mini Silicone Spatula & Spoonula set, Two 7" Round Silicone Trivets, One Large 9" x 12" Trivet, and One Small Silicone Brush. And drumroll please, my favorite kitchen timer: the TimeStack quadruple timer (in your choice of 10 colors) that shows you all four displays and alarms at once. You can even record your own voice for each alarm.

The hotpad/trivets are amazing! I've tried all kinds, and these are the best. Super sturdy, yet flexible, and very grippy, they are my favorite hotpads. As trivets when cooking, baking, or serving a meal buffet- or family-style, they protect your tabletop or countertop from hot dishes and pans, round or rectangular. And hot pans and casseroles won't slide off these trivets.

Perfect Pumpkin Pie - ThermoWorks Giveaway (Hi-Temp Silicone Kitchen Kit) / www.delightfulrepast.com

And the TimeStack—
Why do I need a four-channel timer in my home kitchen? Because we use a timer for everything: brewing tea several times a day, checking the rising bread dough, baking, getting the laundry out of the dryer, watering the fruit trees for a certain length of time. We even use a timer as an alarm clock on those rare occasions when we need one. You'll wonder how you ever lived without it! 
Perfect Pumpkin Pie - ThermoWorks Giveaway (TimeStack) / www.delightfulrepast.com

These items make wonderful gifts as well. You'll find the giveaway rules below the recipe. And do leave a comment, even if you're not entering the giveaway. I love your comments! Happy Autumn! 


Perfect Pumpkin Pie - ThermoWorks Giveaway / www.delightfulrepast.com


Pumpkin Pie


(Makes one 9-inch pie, 8 servings)


The Pastry - Food Processor Method

(for two single-crust pies or one double-crust pie)
 
2 1/4 dip-and-sweep cups (11.25 ounces/319 grams) unbleached all-purpose flour
1/4 dip-and-sweep cup (1.06 ounce/30 grams) tapioca flour
1 tablespoon sugar
1 teaspoon salt
2 sticks (8 ounces/227 grams) unsalted butter, cut into 1/4-inch slices
1 large egg, lightly beaten
4 tablespoons (2 fluid ounces/59 ml) ice water
1 tablespoon apple cider vinegar


The Filling

 
1/2 cup (3.5 ounces/99 grams) sugar
2 tablespoons non-GMO cornstarch
1/4 teaspoon salt
1 teaspoon cinnamon
1/2 teaspoon ginger
1/4 teaspoon allspice
1/8 teaspoon nutmeg
1/8 teaspoon ground cloves
3 large eggs
1 15-ounce (425 grams) can pumpkin (not pumpkin pie filling) or 1 3/4 cups pumpkin puree
3/4 cup (6 fluid ounces/177 ml) milk
1/2 cup (4 fluid ounces/118
 ml) heavy cream


1 Weigh/measure flour, sugar, and salt in 2- to 2.5-quart mixing bowl. Whisk vigorously for about 30 seconds to "sift." With food processor's metal blade in place, scoop out half (1 1/4 cups) the flour mixture into the work bowl of the food processor. Spread the butter slices evenly over the fairly even flour mixture. Pulse until no dry flour remains and mixture is starting to form clumps of dough, about 25 to 30 one-second pulses. Don't get hung up on counting the number of pulses, just watch for the clumping to begin. With a silicone spatula, spread dough evenly around the work bowl. Sprinkle with the remaining flour and pulse until the dough is just barely broken up, about 5 1-second pulses.

2 Transfer the dough back to the 2- to 2.5-quart mixing bowl. If the kitchen very warm, cover and refrigerate the dough for 10 minutes or so before proceeding. Sprinkle the dough with the egg-water-vinegar mixture and use the spatula to fold and press the dough until it comes together into a ball.

3 Turn the dough out, dividing onto two pieces of plastic wrap and flatten each slightly into a 4- to 5-inch round disk. Wrap and refrigerate for at least 2 hours or up to 3 days. You can even freeze the dough, wrapped well, for up to a month. To defrost the dough, move it from freezer to refrigerator for one day before using it. Let thoroughly chilled dough stand at room temperature for 10 to 15 minutes for easier rolling.

4 In medium bowl (using a 2-quart glass measure makes it easy to pour the filling into the crust), whisk together sugar, cornstarch, salt and spices. Whisk in the eggs, then the pumpkin and then the milk and cream. Refrigerate filling until ready to fill the pie shell, up to a full day.  

5 For single-crust pie: On lightly floured surface with lightly floured rolling pin, roll out the dough to 13 inches in diameter and 1/8 inch or so thick. Transfer the dough to the pie plate, pressing the dough (but not stretching it) to fit the pie plate, getting down into the corners, with a half- to one-inch overhang (trim with knife or scissors). Cover with the reserved piece of plastic wrap and chill for 10 minutes before fluting the edge. Cover and return to refrigerator while the oven heats up.

6 Put the oven rack in the lowest position. Preheat the oven to 450F/230C/Gas8. Pour the filling into the chilled unbaked shell and place it on a parchment-lined baking sheet to catch any butter drips. As soon as you put the pie in the oven, reduce temperature to 425F/220C/Gas7. Bake for 20 minutes. Reduce heat to 350F/180C/Gas4. Bake for about 40 to 45 minutes (after about 15 minutes, I put on a pie crust shield to ensure that the crimped edge doesn't burn), or until knife inserted midway between edge and center comes out clean or until it registers 185F/85C on an instant-read thermometer.

Note: After you've made pumpkin pie a few times, you can tell just by looking whether or not it's done. It will look darker and shinier and will have puffed up a bit and then fallen, and it should be fairly firm but still have a little jiggle left in the center (unless, of course, you're making it for Mr Delightful who wants his pie very firm, no jiggle!).

7 Cool on wire rack for 2 hours, then lay a square of wax paper over the top and refrigerate for at least 3 hours. Serve with softly whipped cream. I sweetened and flavored 1 cup of heavy whipping cream with 4 teaspoons of real maple syrup and 1 teaspoon of vanilla extract. And I sometimes garnish with a sprinkling of cinnamon sugar.

Note: Leftovers can be stored in the refrigerator for up to 3 or 4 days. As if!


Perfect Pumpkin Pie - ThermoWorks Giveaway / www.delightfulrepast.com
My pumpkin pies often crack because I overbake them to
suit Mr Delightful's preference for a very firm custard.


ThermoWorks TimeStack and Kitchen Kit Giveaway


This giveaway is open to readers in the US* who are 18 years of age or older. To enter, leave a comment below (one entry per person). Be sure to tell me what color you prefer. Please include your email address in the body of your comment. If your name is drawn and I have no way to contact you, you will be disqualified. Must enter by 11:59 p.m. Eastern time Tuesday October 31.

* If you are outside the US but would like to have this sent to someone you know in the US, go ahead and enter!

The winner will be chosen by random drawing and be announced here in the comments before noon Eastern time on Thursday November 9. If I don't hear back from the winner of the random drawing by noon Eastern time Friday November 3, a new winner will be selected from the original entrants (those who commented before the giveaway deadline).

Disclosure: ThermoWorks provided the timer and kitchen kit for review purposes and for the giveaway. The views expressed here are entirely my own. I always tell my readers what I really think!

Jean

If you liked this post, please Pin it and share it!

24 June 2021

Apple Galette - ThermoWorks TimeStack Giveaway

Apple Galette - ThermoWorks TimeStack Giveaway / www.delightfulrepast.com

The Apple Galette

An apple galette is what I make when I don't have the time, or inclination, to make an Apple Pie—rolling out two crusts, peeling and slicing all those apples, making a pretty crimped edge. I just wasn't up for all that today.

The solution? A galette, or rustic tart, is quicker and easier than a double-crust pie or a tart. You can make it free-form on a baking sheet, as I did for my Rustic Peach Tart, or make it in a 9-inch glass pie plate.

Just make the same amount of dough you would for any 9-inch single-crust pie, but roll it a bit larger to about 14 inches. Center it in the pie plate, not worrying about evening up the ragged edges, pour in the filling, and then bring that raggedy overhanging pastry up over the apples.

I hope you'll leave a comment, enter the giveaway, and perhaps explore more of Delightful Repast while you're here. If you see something you like, be sure to Pin it, tweet it, whatever-social-media-you-have it.


Apple Galette - Rustic Apple Tart (this image, my watercolor sketch of apples on branch) / www.delightfulrepast.com
My watercolor version of a beautiful pencil drawing by UK artist Valerie Callen


The ThermoWorks TimeStack

Even though I had read about the TimeStack, I was shocked when it arrived. This thing is like the grandfather clock of kitchen timers! It's more than 6 inches tall and 4 inches wide, and it needs to be because it has four separate (independent) timers, each with four separate huge-digit, easy-to-read displays (no toggling).

Why do I need a four-channel timer in my home kitchen? Because we use a timer for everything: brewing tea several times a day, checking the rising bread dough, baking, getting the laundry out of the dryer, watering the fruit trees for a certain length of time. We even use a timer as an alarm clock on those rare occasions when we need one.

With four timers set, how do you know what each one is for? With this magnificent instrument, you can record a message for each one! 1. Check the dough. 2. Move the hose. 3. Take the casserole out. 4. Leave for appointment. No more sticky notes!

See the giveaway info below the recipe.


Apple Galette - ThermoWorks TimeStack Giveaway / www.delightfulrepast.com

If you like it, please Pin it and share it!

Apple Galette - Rustic Apple Tart


(Makes one 8.5-inch round tart, 6 servings)

Sour Cream Pastry

1 1/4 dip-and-sweep cups (6.25 ounces/177 grams) unbleached all-purpose flour
1/4 teaspoon salt
1/4 teaspoon baking powder
1 stick (4 ounces/113 grams) very cold unsalted butter
1/2 cup sour cream (4 ounces/113 grams), plus a little more if needed

Apple Filling

1 1/2 pounds (about 4 medium) apples* (by volume, about 4 cups/1 litre)
1/4 cup (1.75 ounces/50 grams) sugar
1 tablespoon (0.31 ounce/9 grams) unbleached all-purpose flour
1/2 teaspoon cinnamon
Pinch salt 

* I usually use half each of two varieties; such as, Fuji and Pink Lady, Granny Smith and Golden Delicious, or Braeburn and Pippin.

1 In medium bowl, whisk together flour, salt and baking powder. With coarse grater over bowl, shred the butter over the flour. (Don't try to shred the very last—you'll shred your fingers; just cut it up.) Stir with a large dinner fork, making sure all the shredded butter is coated with flour. Mixture should be very chunky.

2 With the fork, stir in the sour cream. If you pinch some of the crumbly dough and it holds together and there isn't a lot of dry flour in the bowl, you've used enough sour cream. If not, either add a bit more or sprinkle on up to a tablespoon or so of cold milk, a teaspoon at a time.

3 Turn the crumbly dough out onto a square of plastic wrap and shape it into a 5-inch disk. Wrap tightly in the plastic wrap and chill in the refrigerator for at least 30 minutes or up to 3 days.

4 If you've chilled the dough for just 30 minutes or so, you can roll it out without waiting. You'll need to let thoroughly chilled dough stand at room temperature for 10 to 20 minutes before rolling. Save the square of plastic wrap; you'll be using it again. (I'm very sparing in my use of plastic wrap and like to get as much use out of a piece as possible!)

5 Preheat oven to 425F/220C/Gas7. Prepare the filling just before you roll out the pastry. In tiny bowl, whisk together sugar, flour, cinnamon and salt. Peel (or not—sometimes I don't) and core the apples, and slice them into a medium bowl. I slice them like this: Peel the apples, cut them in half through the stem end. With a melon baller, remove the core from each half; with paring knife, trim away the peel from the ends. Cut each half in half lengthwise and slice thinly crosswise. You should have about 4 cups. Stir in the sugar mixture.

6 Lightly flour a square of parchment paper on the counter. Place the disk of dough in the center and sprinkle it lightly with flour. If you like, place the reserved piece of plastic wrap on top of the dough. With floured rolling pin, roll out the disk, rolling from center to edge and rotating by quarter-turns to make a round shape, to a 14-inch circle. Don't worry about ragged edges; this is a rustic tart.

7 Butter a 9-inch glass pie plate, using about 1/2 teaspoon of butter. Transfer dough to pie plate, paper side up; remove paper. Press dough into the pie plate without stretching, leaving the raggedy-edged overhang untrimmed.

8 Pour in the apple filling in an even layer. Bring the overhang up over the apples a little at a time, sort of "pleating" as you go. Don't try to be cute—we're going for rustic here! Bake for 20 minutes; reduce heat to 350F/180C/Gas4 and continue baking for about 45 to 50 minutes, until crust is golden brown and juices are bubbling. Can be served from the pie plate or lifted out and placed on a serving plate.


Apple Galette - ThermoWorks TimeStack Giveaway (this photo, the TimeStack) / www.delightfulrepast.com

ThermoWorks TimeStack Giveaway


This giveaway is open to readers in the US* who are 18 years of age or older. To enter, leave a comment below (one entry per person). Tell me why you want a TimeStack. Please include your email address in the body of your comment. If your name is drawn and I have no way to contact you, you will be disqualified. Must enter by 11:59 p.m. Eastern time Wednesday July 7.

* If you are outside the US but would like to have this sent to someone you know in the US (you would have to send them a gift card separately on your own), go ahead and enter!

Winner will be chosen by random drawing and be announced here in the comments before noon Eastern time on Thursday July 8. If I don't hear back from the winner of the random drawing by noon Eastern time Saturday July 10, a new winner will be selected from the original entrants (those who commented before the giveaway deadline).

Disclosure: ThermoWorks provided a TimeStack for review purposes and one for the giveaway. The views expressed here are entirely my own. I always tell my readers what I really think!

Disclosure: We are a participant in the Amazon Services LLC Associates Program, an affiliate advertising program designed to provide a means for us to earn fees by linking to Amazon .com and affiliated sites. We are a ThermoWorks affiliate, earning a small commission at no cost to you on purchases made through our links. This helps cover some of the costs of running the blog. Thank you for your support.

Jean

09 April 2020

Sheet Pan Home Fries - New West KnifeWorks Review and Giveaway

Sheet Pan Home Fries - No Muss No Fuss - soooo much easier, you'll never make them in a skillet again / www.delightfulrepast.com


We all need comfort food, like my Sheet Pan Home Fries, now. And I thought giving away a really good knife would be a real perkative in the midst of all this this. But first ...


The Sheet Pan Home Fries


While there's nothing difficult about making home fries, it's more trouble (and mess) than it needs to be when you're in the middle of making other things as well. Too much checking and turning, and I always end up using too much oil to keep them from sticking. 

It took me a long time, but I finally wised up and haven't looked back since. I thought, why not just throw them on a sheet pan and put them in the oven? I didn't want to get fussy about that either. I know a lot of people roast vegetables in the oven and do a lot of turning, and I didn't want to be bothered with turning.

So I lined a quarter sheet pan with parchment paper to prevent sticking problems, tossed my potato chunks with a few simple ingredients (you can season them however you like) and just a modest amount of oil, popped it in the oven and just let it go. Fabulous! All part of my streamlined cooking strategy to save time.

It also saves time on cleaning because there are no grease splatters on the stove to clean up. No skillet with stuck-on bits to soak and scrub. And, even more important for those of us who really care about making every simple dish as good as it can possibly be, the potatoes are perfectly cooked, evenly cooked.

And if what you're looking for is Roasted Potatoes for Sunday Lunch, just hit that link and make a batch of the most perfect Roasties. Are you a home fries person or a hash browns person? If the latter, you must try my Pomme Rosti.


Sheet Pan Home Fries - New West KnifeWorks Review and Giveaway / www.delightfulrepast.com

The New West KnifeWorks Knife


I grew up with a mother who was a world-class cook with the worst --THE WORST--knives in the world, so I was determined that when I grew up I would have good knives. And I gradually acquired very good knives. But a couple of years ago I discovered the truly remarkable knives made by New West KnifeWorks (NWKW).

The NWKW knives are as beautiful as they are useful and a joy to work with. Call me shallow, but the first thing I noticed about the Ironwood 5-Inch Chopper was that it is the most gorgeous knife I've ever seen. That desert ironwood handle is beautiful. It is a richly textured, incredibly dense hardwood that with minimal care will last forever, making this an heirloom.

The handle is ergonomic, the blade is razor-sharp, and together they make a well-balanced knife that is just big enough to be my go-to "chef" knife for most of my cutting board work. For the tasks that require a bigger blade, I can pull out a chef knife; but this should take care of about 90 percent of my slicing and chopping. It cuts through tough potatoes, broccoli and cauliflower like butter. Chopping chocolate and nuts is effortless.

Go to the section below the recipe for details on this very generous giveaway. If you don’t happen to need a knife, you know someone who does; and this knife would make a great and generous gift.


Sheet Pan Home Fries - No Muss No Fuss - soooo much easier, you'll never make them in a skillet again / www.delightfulrepast.com

Sheet Pan Home Fries


(Serves 4 or 5, can be easily doubled*)

2 to 2.2 pounds (32 to 35.27 ounces/0.9 to 1 kilogram) russet potatoes
2 tablespoons (1 fluid ounce/ml) extra virgin olive oil
1/2 teaspoon salt
1/2 teaspoon coarsely ground black pepper
1/4 teaspoon marjoram

1/4 teaspoon thyme


* To serve a crowd, double ingredients and bake on 18x13x1-inch half sheet pan.

1 Preheat oven to 400F/205C/Gas6. Line a 13x9x1-inch quarter sheet pan with baking parchment paper.

2 Peel potatoes and cut into roughly 3/4-inch (2 cm) cubes. In 1.5- to 2-quart bowl, toss potatoes with olive oil, salt, pepper, marjoram and thyme. Spread in a single layer on parchment-lined quarter sheet pan.

3 Bake for 45 to 55 minutes, or until tender and golden brown.

New West KnifeWorks Review and Giveaway / www.delightfulrepast.com


New West KnifeWorks Knife Giveaway


This giveaway is open to readers in the US* who are 18 years of age or older. To enter, leave a comment below (one entry per person). Tell me the first thing you'd make with the knife. Please include your email address in the body of your comment. Must enter by 11:59 p.m. Eastern time Wednesday April 22.

* If you are outside the US but would like to have this sent to someone you know in the US (you would have to send them a gift card separately on your own), go ahead and enter!

Winner will be chosen by random drawing and be announced here in the comments before noon Eastern time on Thursday April 23. If I don't hear back from the winner of the random drawing by noon Eastern time Sunday April 26, a new winner will be selected from the original entrants (those who commented before the giveaway deadline). 

Disclosure: New West KnifeWorks provided a knife for review purposes and one for the giveaway. The views expressed here are entirely my own. I always tell my readers what I really think!

Disclosure: We are a participant in the Amazon Services LLC Associates Program, an affiliate advertising program designed to provide a means for us to earn fees by linking to Amazon .com and affiliated sites. We are a ThermoWorks affiliate, earning a small commission at no cost to you on purchases made through our links. This helps cover some of the costs of running the blog. Thank you for your support. 

Jean

07 February 2019

Tahini Chicken Tea Sandwiches - New West KnifeWorks Review and Giveaway

Tahini Chicken Tea Sandwiches - New West KnifeWorks Review and Giveaway / www.delightfulrepast.com

This batch of Tahini Chicken Tea Sandwiches was made for a little casual afternoon tea, but it will be on the menu at my next proper afternoon tea party, along with Cucumber Sandwiches and Sliced Egg and Dill Sandwiches. 

But before I go on (and on) about tea sandwiches, I want all of you who are not into that sort of thing to know that this knife we’re giving away is not just for tea sandwiches, so don’t click away! 

The New West KnifeWorks G-Fusion Petty Utility Knife is probably the most versatile knife in my collection. For this recipe alone, I used it for butterflying chicken breasts; chopping onion, fennel and cooked chicken; and cutting sandwiches. 

And it does so much more. It’s big enough and the right shape to use as a small chef’s knife and small enough that some cooks even use it as a paring knife. The razor-thin blade makes it great for filleting, boning and trimming silverskin.

For nearly a year, i
t’s been my go-to knife for shallots, onions, tomatoes, bell peppers, small fruits and vegetables, chopping or chiffonading herbs, supreming citrus, cutting and trimming raw meat and carving cooked meat. But back to the tea sandwiches …


Tahini Chicken Tea Sandwiches - New West KnifeWorks Review and Giveaway / www.delightfulrepast.com


I have wasted so much tahini over the years. Love that stuff! And I use a lot of it in my Hummus and Baba Ghanoush (pardon those pictures, by the way, I was just starting out!), but then there’s always some left over. 

What else can I do with it? Mr Delightful is not a fan of dips, so I wanted to use it in a way he would enjoy, too. He likes chicken salad sandwiches, so there you go.

He’s not fussy about his sandwiches being perfectly cut, but (and now I’m talking to my Tea People) tea sandwiches must look as good as they taste. They must be cut very cleanly; squished sandwiches and ragged edges are simply not the done thing. 

So tell me, what is your favorite tea sandwich? And be sure to go to the section below the recipe for details on this very generous giveaway. If you don’t happen to need a knife, you know someone who does; and this knife would make a great and generous gift.


Tahini Chicken Tea Sandwiches - New West KnifeWorks Review and Giveaway / www.delightfulrepast.com
Blade Length 5.5 inches, Overall Length 11 inches, Max Blade With 1.187 inches


Tahini Chicken Tea Sandwiches


(Makes 32)

2
tablespoons sesame seeds
1 1/2 tablespoons extra virgin olive oil
1 pound (16 ounces/454 grams) boneless skinless chicken breasts
3/8 teaspoon salt, divided
3/8 teaspoon coarsely ground black pepper, divided
2 tablespoons minced onion

1/2 cup shredded carrot
1/2 cup minced fennel or celery
1/2 cup unsalted tahini
2 tablespoons (1 fluid ounce/30 ml) freshly squeezed lemon juice
1/4 teaspoon curry powder
16 slices potato or buttermilk bread (or other soft, "wide" bread)
1 stick (4 ounces/113 grams) unsalted butter, very soft


1 In dry skillet, toast the sesame seeds over medium heat, stirring frequently. Remove to 1.5-quart bowl to cool.

2 In same skillet, still hot, heat the olive oil. Add the chicken breasts and cook, loosely covered, over medium-low heat about 15 minutes on each side, depending on the thickness of the pieces. Season each side of chicken with up to 1/8 teaspoon each salt and pepper. Remove to plate to cool.

Tahini Chicken Tea Sandwiches - New West KnifeWorks Review and Giveaway / www.delightfulrepast.com


Note: I used the New West KnifeWorks Petty to butterfly the chicken breasts, so they needed just 10 minutes on each side. Set aside to cool.

3 Add onion to skillet and cook until very soft, about 5 minutes, deglazing the pan with the onion juices, scraping up any brown bits. Add the onion and oil to bowl with sesame seeds.

4 Chop the cooled chicken and add it to the bowl. Stir in the carrots, fennel or celery, tahini and lemon juice. Add the curry powder and remaining salt and pepper. Taste and adjust seasoning. Cover and chill for at least an hour before assembling sandwiches.

Tahini Chicken Tea Sandwiches - New West KnifeWorks Review and Giveaway / www.delightfulrepast.com

5 Spread each slice of bread thinly with softened butter. Divide the chicken salad (about 1/4 cup each) among the 8 bottom bread slices. Top with remaining buttered bread slices. Trim off crusts and cut each sandwich into four fingers or rectangles, arranging on a plate in about three layers. 

6 Lay a good-quality un-dyed paper towel on top of the sandwiches. Wet and wring out well another paper towel; lay the damp paper towel on top of the dry paper towel. Never place the damp paper towel directly on top of the sandwiches or they will become soggy. Wrap rather snugly with plastic wrap; refrigerate for at least an hour or up to several hours. This will make your sandwiches “hold together” and keep them from drying out. Remove from refrigerator and uncover sandwiches just before serving.

Tahini Chicken Tea Sandwiches - New West KnifeWorks Review and Giveaway / www.delightfulrepast.com


New West KnifeWorks Petty Knife Giveaway


I chose the all black knife, but it comes in 7 other beautiful and unique New West color combinations you must check out. The knife comes with a beautiful leather blade protector.

This giveaway is open to readers in the US* who are 18 years of age or older. To enter, leave a comment below (one entry per person). Tell me the first thing you'd make with the knife and/or which color you'd choose. Please include your email address in the body of your comment. Must enter by 11:59 p.m. Eastern time Wednesday February 13.


* If you are outside the US but would like to have this sent to someone you know in the US (you would have to send them a gift card separately on your own), go ahead and enter!


Winner will be chosen by random drawing and be announced here in the comments before noon Eastern time on Thursday February 14. If I don't hear back from the winner of the random drawing by noon Eastern time Sunday February 17, a new winner will be selected from the original entrants (those who commented before the giveaway deadline). 

Disclosure: New West KnifeWorks provided a knife for review purposes and one for the giveaway. The views expressed here are entirely my own. I always tell my readers what I really think!

Jean

21 June 2018

Stamped Shortbread Cookies - Rycraft Cookie Stamp Giveaway

Stamped Shortbread Cookies - Rycraft Cookie Stamps / www.delightfulrepast.com

Stamped shortbread cookies may not actually taste better than unstamped cookies, but it seems like they do! And there are so many occasions that call for that extra little effort in the cookie department: weddings, showers, parties, afternoon tea. And a box of stamped cookies, along with the stamp, makes a wonderful host/ess gift.

Stamped shortbread cookies are so much fun to make! Especially with the gorgeous designs of the family-owned Rycraft company. Established in 1968 (50 years ago) by the current owner’s parents, the self-described mom-and-pop company is now based in Idaho where the beautiful terra cotta cookie stamps are still handmade.

Check out the Rycraft designs, more than 400 in this Heirloom Collection. I have nine, three I've had for ages and the six we're giving away here: Tea Time, Cat with a Bow, Snowflake, Home Sweet Home, Rocking Horse and Treble Clef.

Whatever the occasion, holiday or season, whatever hobby or interest you have, there's sure to be a stamp for it!


Stamped Shortbread Cookies - Rycraft Cookie Stamp Giveaway / www.delightfulrepast.com


Today I used my basic shortbread recipe, and it worked beautifully. I’ve also made my Chocolate Shortbread as stamped cookies (above). I used a 2-teaspoon measuring spoon that day, but I decided this time to use a 1-tablespoon measuring spoon; and I think I like the larger amount better.

Have you used cookie stamps before? The stamped cookies do taste better, amiright? Enter the giveaway below and have fun looking at all the different Rycraft designs.

Update 07/12/18: Just added another stamped (or not!) cookie, Ginger Snaps.


Stamped Shortbread Cookies - Rycraft Cookie Stamp Giveaway / www.delightfulrepast.com


Stamped Shortbread Cookies


(Makes about 19 2-inch cookies)

1 stick (4 ounces/113 grams) unsalted butter, room temperature
1/3 cup (2.33 ounces/66 grams) sugar
1/4 teaspoon salt
3/4 teaspoon vanilla extract
1 1/4 dip-and-sweep cup (6.25 ounces/177 grams) unbleached all-purpose flour
1 teaspoon water, if needed

1 In 1.5-quart mixing bowl, by hand or with electric hand mixer on lowest speed, cream the butter, sugar, salt and vanilla extract just until smooth.

2 Add flour and mix well without beating a lot of air into it. If mixture is too dry to form a dough, mix in the teaspoon of water. Wrap dough in plastic wrap, forming a 4-inch disk; refrigerate for 20 to 30 minutes. If you overchill the dough, it will be difficult to work with.

3 Using a measuring tablespoon, measure out level tablespoons of dough onto parchment-lined baking sheet. Roll the scoops into smooth balls. Cover and chill in the refrigerator for 15 minutes or so. This will make them easy to stamp, and the design will be very sharp. But if you overchill the dough balls, they will be difficult to stamp.

4 To stamp, with dough ball in the center of the stamp, press the stamp evenly till the dough reaches the edge of the stamp. Gently lift the stamp away. Repeat. My technique is to lift the stamp with the dough attached and gently peel away at the edge. This works very well with the chilled dough. If you find the dough balls getting too warm before you’re finished stamping, put the baking sheet back in the refrigerator for 15 minutes.

5 Cover and refrigerate for 30 minutes to 1 hour. About 15 minutes before you’d like to bake the cookies, preheat the oven to 325F/165C/Gas3.

6 Bake for 20 to 25 minutes, until quite firm and edges are starting to brown. Cool on baking sheet for 5 minutes. Then transfer to wire rack to cool completely.


Stamped Shortbread Cookies - Rycraft Cookie Stamp Giveaway / www.delightfulrepast.com


The Rycraft Ceramic Cookie Stamps Giveaway


This giveaway is open to US residents* 18 years of age or older. Leave a comment below (one entry per person). Tell me the first stamp you'll use and for what occasion. Please include your email address in the body of your comment. Must enter by 11:59 p.m. Eastern time Wednesday June 27.

* If you are outside the US but would like to have this sent to someone you know in the US (you would have to send them a gift card separately on your own), go ahead and enter! Also, Rycraft does ship internationally, so feel free to place an order wherever you are.

Winner will be chosen by random drawing and be announced here in the comments before noon Eastern time on Thursday June 28. If I don't hear back from the winner of the random drawing by noon Eastern time Sunday July 1, another drawing will be held and a new winner selected from the original entrants (those who commented before the giveaway deadline). 

Disclosure: Rycraft provided a set of cookie stamps for review purposes and one set for the giveaway. The views expressed here are entirely my own. I always tell my readers what I really think!

Jean