Showing posts with label afternoon tea. Show all posts

16 January 2025

Classic Deviled Eggs - Party Food

Classic Deviled Eggs - Party Food / www.delightfulrepast.com

Deviled eggs (or devilled if you're in the UK) are a classic party food. Have you ever been to a barbecue, picnic or potluck that didn't have at least a few batches of deviled eggs? There's a reason for that: everybody loves them! Some people say, it's not a party until you break out the deviled eggs!

And over the years I've filled, transported, and served deviled eggs many ways. I think I've got it down now! I used to get out the pastry bag and tips and get really fancy when I was filling them. I'm so over that! So I switched to a spoon a few years ago and then, just lately, to a perfect small scoop! Yes, that's the way to go! 

I use the lovely glass egg plate pictured here to serve them at home or to take to a more formal event, but gone are the days when I transport them in a storage container then transfer them to an egg plate when I get there. When I found this clear "egg organizer" online, I knew this was the answer!

Just used it to take 2 dozen deviled eggs to a casual gathering. It was perfect. Just pop the lid off and set it on the table, and it looks fine. Sorry I didn't get a photo, but I had a lot going on that day and just couldn't be bothered. Check out the link and see it there. One of the photos shows it on a table and you can see how unobtrusive the container looks. 

There are several ways to boil (hard-cook) the eggs, some of which are supposed to be vastly superior to the others; but I'm not even going there, except to say that the best way is whatever works for you. I'm just including one method, in the directions, and leaving it up to you to sort out.

I'm only going to comment on the degree of doneness because, well, they need to be actually done. As you may know, I adore Jacques Pepin, but he and I don't see eye to eye on this subject. I say a hard-cooked egg yolk should be yellow and matte, and he says it should be orange and shiny. That's just wrong!

What's your favorite thing to take to a bring-a-dish sort of gathering? (Mr Delightful would say, "My cavernous appetite!")


Classic Deviled Eggs - Party Food / www.delightfulrepast.com

If you like this post, please Pin it and share it!

Classic Deviled Eggs

(Makes 24)

12 large eggs
1/2 cup mayonnaise
2 teaspoons country Dijon mustard
1/4 teaspoon salt
1/8 teaspoon coarsely ground black pepper
1/8 teaspoon curry powder
1/8 teaspoon dill
Garnishes (fresh dill, pimiento slivers, stuffed olive slices, minced parsley or paprika)

1 Place eggs in a single layer in large pan. Add enough room temperature water to cover eggs completely and an inch or two over. Bring to a boil over high heat. As soon as water is bubbling enough to make even one egg rattle, remove pan from the heat and cover tightly with the lid. Let stand for 14 minutes. Drain and add cold water to pan; repeat twice. Leave eggs to cool for 15 minutes in cold water. Drain, and proceed with recipe or refrigerate until ready to use.

2 Peel the eggs, cut them in half lengthwise and remove the yolks. Place egg whites on a plate and yolks in a 1-quart bowl.

Note: Here is a link to my Tahini Chicken Tea Sandwiches post about the very best knife for cleanly cutting hard-boiled eggs in half (and many, many more things!).

3 With a fork, mash yolks well. Add mayonnaise, mustard and seasonings; mix well. Taste and adjust seasoning. The filling needs to be more strongly flavored than you might think because the egg white is not. I'm thinking of salting the egg white halves next time. Does anyone do that?

4 Using a spoon or a pastry bag (Pfft!) or small scoop (Yay!) fill the egg halves. Garnish. Chill until serving time in a handy-dandy clear egg organizer!

Disclosure: We are a participant in the Amazon Services LLC Associates Program, an affiliate advertising program designed to provide a means for us to earn fees by linking to Amazon .com at no cost to you on purchases made through our links. This helps cover some of the costs of running the blog. Thank you for your support. 

Jean

23 May 2024

Dundee Cake - Scottish Teatime Classic

Dundee Cake - Scottish Teatime Classic / www.delightfulrepast.com

Dundee Cake is one of those recipes with lots of lore attached. As with all lore, much of it is inaccurate. Was it really created at the end of the 18th century by Janet Keiller of the Dundee marmalade family? Or was it first made in the 16th century for Mary Queen of Scots, who purportedly did not like cherries which usually featured in fruit cake? 

Which of the so-called must-have ingredients must one really have? Some insist on a bit of whisky from Scotland, or Seville orange marmalade, or ground almonds. The list goes on. So ... what to do? Professional bakers of the cake actually applied for protected status, but the government chose not to award the cake protected geographical indication (PGI) because "the name Dundee Cake is generic."

The application for PGI status specified certain ingredients, including sultanas, Amontillado sherry, candied orange peel, dried vine fruits, and a pattern of whole blanched almonds on top. Not even a wee dram of Scotland's finest! Good, because I've always preferred sherry (though not necessarily Amontillado). 


Dundee Cake - Scottish Teatime Classic / www.delightfulrepast.com

Please Pin it and share it!

I abhor store-bought candied orange peel, so unless I have a batch of my homemade candied orange peel on hand, I prefer to use fresh orange zest and perhaps a bit of juice. The main thing is that the predominant flavors be orange and almond. And I do hold with the PGI applicants' insistence on an arrangement of whole blanched almonds on the top.

Unfortunately, for some reason none of the stores around here had whole blanched almonds in stock, which I found surprising. Perhaps they consider them a "seasonal" item? Anyway ... I decided to proceed with the whole raw unblanched almonds I always have on hand. Perhaps not as pretty to some, or not "authentic" to others, but it will have to do! Blanching them myself would likely have been simple, but I wasn't in the mood to experiment with it just then.

When developing a recipe I always try to make it as "authentic" as possible, but not being a Dundonian myself, I don't wish to be dogmatic about any of this. But if you are a member of the Baker Trade of Dundee or just have set ideas about Dundee cake, do let me know in the comments!


Dundee Cake - Scottish Teatime Classic / www.delightfulrepast.com

 Please Pin it and share it!

Dundee Cake   


(Makes one 3-inch/8cm deep 7-inch/18cm round cake)

1 1/4 packed cups (6.25 ounces/177 grams) sultanas, currants, or other dried vine fruits
Finely grated zest of 2 medium organic or unsprayed and unwaxed oranges
1/4 cup (2 fluid ounces/59 ml) fresh orange juice
1 tablespoon (0.5 fluid ounce/15 ml) sherry
1 1/2 dip-and-sweep cups (7.5 ounces/213 grams) unbleached all-purpose flour*
3/4 cup (5.25 ounces/149 grams) sugar
1 1/2 teaspoons non-GMO baking powder
1/2 teaspoon mixed spice**
1/4 teaspoon salt
10 tablespoons (5 ounces/142 grams) unsalted butter, softened***
2 large (medium, in UK and some other places) eggs, room temperature
About 34 whole blanched almonds

* Many British recipes call for self-raising flour, but mine will always call for plain flour. I prefer to be in control of the amount of baking powder and salt I use. 

** Since the mixed spice, a ready-made blend popular in the UK, is not readily available elsewhere (not the same as US pumpkin pie spice), you may have to make your own. The amount to make depends on how frequently you’ll be using it. I usually stir up just a tablespoon at a time, but multiply these amounts if you’d like to make more: 3/4 teaspoon each allspice and cinnamon, 1/2 teaspoon mace or nutmeg, 1/4 teaspoon each cardamom, cloves, coriander and ginger.

*** Let butter stand at room temperature for 30 to 60 minutes. Butter needs to be a little softer for a hand mixer than for a stand mixer. It should be squishable, but not melting or greasy/oily.

1 About 12 to 24 hours before mixing cake, stir together fruit, zest, juice and sherry in a small bowl. Cover tightly and let stand for about 12 to 24 hours.

2 Preheat oven to 300F/150C/Gas2. Prepare baking tin. Butter the inside of a 3-inch deep 7-inch/18cm pan. Line the bottom with a circle of parchment paper. Turn the parchment over so that both sides are buttered. Lightly flour the tin and set it on a quarter sheet pan for baking.

3 In 2 to 2.5-quart bowl, vigorously whisk together the flour, sugar, baking powder, mixed spice, and salt to aerate as well as combine. With electric hand mixer, mix the softened butter into the flour mixture until it resembles crumbs. Drain the fruit and zest, reserving the liquid. On low setting, mix in the eggs and the reserved juice; beat on medium to high speed for 1 minute. Gently stir in the drained fruit. The batter is quite stiff and should just drop slowly off a spoon when nudged. If it is too stiff, add a tablespoon of milk or another tablespoon of orange juice or sherry, if you like.

4 Scrape batter into prepared tin and smooth the top. Arrange the whole blanched almonds in 3 concentric circles on the top, starting on the outside—20 almonds, then 11, then 3. Bake until golden brown and cake springs back when pressed lightly in the center or when a skewer inserted in the center comes out clean, about 1 1/4 to 1 1/2 hours.

5 Leave in tin on wire rack for 10 minutes before removing from tin. Peel away the parchment on the bottom and set right side up on rack to cool completely. 

Disclosure: We are a participant in the Amazon Services LLC Associates Program, an affiliate advertising program designed to provide a means for us to earn fees by linking to Amazon .com and affiliated sites. This helps cover some of the costs of running the blog. Thank you for your support. 

Jean

If you liked this post, please Pin it and share it!

12 January 2023

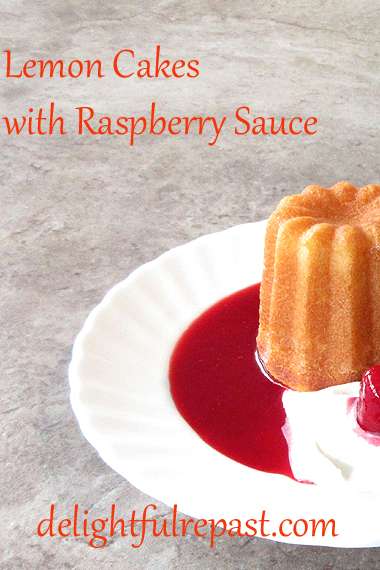
Lemon Cakes with Raspberry Sauce

Lemon Cakes with Raspberry Sauce / www.delightfulrepast.com

Lemon Cakes—or Lemon Cupcakes, if you don't have the 
cannelés pan—look a little "dressy" without having to go to the mess and bother of making icing and getting out the piping bag and all that. Making a little batch of raspberry sauce is a doddle.

I was in the mood for Lemon Drizzle Cake, but I wanted to experiment with other uses for my new cannelés pan that has barely had time to cool off in the month I've had it. It has turned out batch after batch of perfect Cannelés

Anticipating my 13th blogiversary next month here at Delightful Repast, I was in the mood for something a little special, a little festive. Lemon Cakes with Raspberry Sauce and Whipped Cream filled the bill nicely. I hope you'll make them soon.


Lemon Cakes with Raspberry Sauce / www.delightfulrepast.com


For the first ten years of Delightful Repast, I posted every Thursday. Then I went to every other Thursday, then every third Thursday. Well, I'm going to reward myself for keeping this lark going for 13 years by going to monthly posting, the second Thursday of every month. 

I hope you'll carry on with me monthly, marking it on your calendar or however you remind yourself of things. Or just come back every week and read one of more than 600 posts. Wishing you a delightful 2023!


Lemon Cakes with Raspberry Sauce / www.delightfulrepast.com

If you like it, please Pin it and share it!


Lemon Cakes


(Makes 12)

1 large egg, room temperature
1 large egg white, room temperature
1/2 cup (4 fluid ounces/118 ml) milk, divided
1 teaspoon vanilla extract
1 dip-and-sweep cup (5 ounces/142 grams) unbleached all-purpose flour
3/4 cup (5.25 ounces/149 grams) sugar
2 teaspoons baking powder
1/4 teaspoon salt
5 tablespoons (2.5 ounces/71 grams) unsalted butter, room temperature
1 1/2 teaspoons freshly squeezed lemon juice
1 1/2 teaspoons grated lemon zest

1 Preheat oven to 350F/180C/Gas4. Prepare* the cannelés pan. Or put 2½-inch paper bake cups in a standard muffin tin. In small bowl, lightly combine the egg and yolk, a quarter of the milk, and the vanilla extract.

* You can use a baking spray—not a cooking spray—that contains flour or do what I do: grease (with Crisco shortening) and flour each of the 12 molds. Cooking sprays cause a gummy film to eventually build up on nonstick pans and ruins them. 

2 In medium mixing bowl, combine all the dry ingredients and mix on low speed for a minute to "sift." Add the softened butter and remaining milk. Mix on low speed until combined. With mixer on medium-high speed, beat for a minute and a half. Scrape the bowl.

3 Beat in the egg mixture in three batches, beating for 20 seconds after each addition. Scrape the bowl and, with spatula, stir in lemon juice and zest (I do it by hand because zest tends to get tangled up in the beaters).

4 Using a 1/4-cup measure as a scoop, divide the batter evenly among the 12 molds. Fill each with a scant (or level) 1/4 cup of batter, then scrape the bowl and spoon it in. Bake for about 20 to 22 minutes or until they are golden and one in the center tests done with a toothpick.

5 Cool in the cannelés pan for 5 minutes before turning them out to cool completely on a wire rack for an hour.


Raspberry Sauce


(Makes about 3/4 cup)

1 10-ounce package frozen whole raspberries unsweetened
1/4 cup (1.75 ounces/50 grams) sugar
1/4 cup (2 fluid ounces/59 ml) water
1 tablespoon (0.5 fluid ounce/15 ml) freshly squeezed lemon juice

1 In a small saucepan over medium heat, bring all the ingredients to a boil for 2 minutes, then reduce heat and simmer for 10 minutes, all the while stirring frequently.

2 With a silicone spatula, press the sauce through a fine-mesh strainer to remove the seeds. Cover and cool to room temperature, then refrigerate for at least an hour.

Disclosure: We are a participant in the Amazon Services LLC Associates Program, an affiliate advertising program designed to provide a means for us to earn fees by linking to Amazon .com and affiliated sites. We are a ThermoWorks affiliate, earning a small commission at no cost to you on purchases made through our links. This helps cover some of the costs of running the blog. Thank you for your support.

Jean

If you liked this post, please Pin it and share it! 

25 November 2021

Malt Loaf - A British Teatime Classic

Malt Loaf - A British Teatime Classic / www.delightfulrepast.com

Malt Loaf originated in 19th century Scotland and was featured in this season's first episode, Cake Week, of The Great British Bake Off (GBBO), called The Great British Baking Show in the US. 

I hadn't thought about malt loaf in years, but after seeing episode one, I began digging through my old recipes. It's not a light and airy cake; more of a dense and squidgy tea bread. Not too sweet, and served with soft butter.

All malt loaf recipes are very similar. Two of the ways mine differs from Prue's GBBO loaf, besides different amounts, are:  1. I skip the black treacle so as not to detract from the flavor of the malt extract.

And 2. I drain the soaked fruit and coat it with flour before adding the wet ingredients, a step that helps keep the fruit from clumping together and sinking to the bottom of the loaf.

If you like a sweeter loaf, use 1/2 packed cup (3.5 ounces/99 grams) dark brown sugar rather than my 1/3 cup. But do try it my way!

So ... now that the season has ended, and long after all those who like to "bake along" with GBBO have baked it, here is my recipe for Malt Loaf. 

Do you make malt loaf? Or did you try it for the first time with "bake along" fans? If not, maybe you'll be inspired to try it now! Do let me know.  

Malt Loaf - A British Teatime Classic / www.delightfulrepast.com

If you like it, please Pin it and share it!

Malt Loaf

(Makes one 2-pound/900 gram/9x4x4-inch loaf)

3/4 cup (6 fluid ounces/177 ml) just-boiled water
1 teaspoon (or 1 tea bag) strong black tea
1 packed cup (5 ounces/142 grams) raisins
1/2 packed cup (2.5 ounces/71 grams) soft pitted prunes, chopped to raisin size
1/2 cup (6 ounces/170 grams) malt extract*
1/3 firmly packed cup (2.33 ounces/66 grams) dark brown sugar
1 3/4 dip-and-sweep cups (8.75 ounces/248 grams) unbleached all-purpose flour
1 teaspoon baking powder
1/2 teaspoon baking soda
1/2 teaspoon salt
2 large eggs (medium, in UK), lightly beaten


1 Pour boiling water over the tea. Let steep for 5 minutes; strain. Pour over raisins and prunes in a bowl. Partially cover and microwave for about 2 minutes, or bring to a simmer in a small pan on the stove and then turn off heat. Let stand, covered, for 10 minutes, then drain, reserving the liquid.

2 Grease (and sometimes I also line bottom and ends, but not the sides, with a piece of baking parchment) a 9x4x4-inch loaf pan or 9x5x3-inch loaf pan. Preheat oven to 325F/165C/Gas3. 

Note: I love the square shape of the 9x4x4-inch loaf pan that I initially got for baking my gluten-free yeast breads but use (without its lid) for nearly everything that calls for a 9x5x3-inch pan. 

3 In a 1-quart saucepan over low heat, cook the malt extract and brown sugar together, stirring constantly until the sugar is dissolved, about 3 minutes. Remove from heat and cool for 5 minutes.

4 In 2- to 3-quart mixing bowl, whisk together the flour, baking powder, baking soda, and salt. Whisking vigorously for a half minute or so is what passes for sifting around here on most days. Put the thoroughly drained fruit on top of the flour, and stir gently until the pieces are coated with the flour and not clumped together. This keeps the fruit from sinking to the bottom of the loaf.

5 Make a well in the center; pour in the malt mixture, eggs, and reserved liquid from the fruit (about 1/3 cup), breaking up the eggs and mixing them with the malt and liquid. Then bring in the flour from the sides, and stir gently until well combined, about 1 minute. Scrape into prepared loaf tin. Bake for about 50 to 60 minutes, until skewer inserted in center comes out with just a few soft crumbs (but not raw batter).

6 Cool in pan on wire rack for 10 minutes before turning out onto wire rack. Continue cooling on wire rack until completely cool, an hour and a half or so. Wrap tightly in foil and let it mellow for a day or two. Cut the loaf into slices and serve with soft butter.

Note: Some people brush the top of the hot loaf with about a tablespoon of malt extract as it cools. Some brush the top and sides. I usually skip that step, but did the top this time.

Disclosure: We are a participant in the Amazon Services LLC Associates Program, an affiliate advertising program designed to provide a means for us to earn fees by linking to Amazon .com and affiliated sites. We are a ThermoWorks affiliate, earning a small commission at no cost to you on purchases made through our links. This helps cover some of the costs of running the blog. Thank you for your support. 

Jean

If you liked this post, please Pin it and share it!

29 April 2021

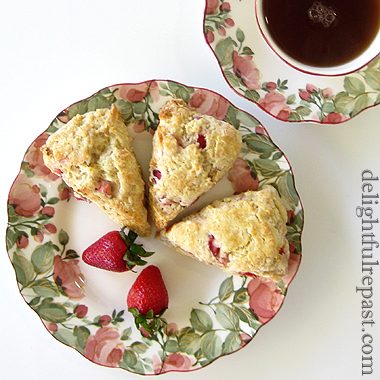
Fresh Strawberry Scones

Fresh Strawberry Scones / www.delightfulrepast.com

Fresh strawberry scones popped into my head when I realized it was nearly May, the official, or traditional, start of Strawberry Season in the UK.

It will soon be time for tea in the garden, and these will be on the menu often. I'm dreaming of afternoon tea parties when we're able to do that once again.

Don't use frozen strawberries for this as there is too much liquid, and don't put any sugar on the fresh berries as that will draw out the juices.

If your strawberries seem especially juicy, place the diced berries between two layers of paper towels for about 20 minutes to prevent soggy scones.

Fresh Strawberry Scones (this photo, my watercolor sketch of two strawberries) / www.delightfulrepast.com

If you're one of those people who like a glaze on their scones, you're on your own for that because I am one of those people who don't!

You may or may not want to put a bit of strawberry jam on your Fresh Strawberry Scones—for me, that would be "gilding the lily," as Jacques Pepin would say—but a little Clotted Cream is always in order!

Fresh Strawberry Scones / www.delightfulrepast.com
If you like it, please Pin it and share it!

Fresh Strawberry Scones


(Makes 16 scones)

1 to 1 1/2 cups (5.75 to 8.625 ounces/163 to 245 grams) diced fresh strawberries (1/4-inch dice)
Finely grated zest of a medium orange
3/4 cup (6 fluid ounces/177 ml) milk
2 teaspoons cider vinegar
2 1/2 dip-and-sweep cups (12.5 ounces/354 grams) unbleached all-purpose flour
1/3 cup (2.33 ounces/66 grams) sugar
2 teaspoons baking powder
1/2 teaspoon baking soda
1/2 teaspoon salt
8 tablespoons (4 ounces/113 grams) cold unsalted butter, coarsely shredded or cut into little cubes
1 large egg (medium, if you're in the UK)*
1 teaspoon vanilla extract

* Pay attention to step 3 if you don't want to be one of those people who wastes an egg for the egg wash.

1 Wash and dice the strawberries. Zest the orange. Preheat oven to 500F/260C/Gas10.

2 In 1-cup glass measuring cup stir together milk and cider vinegar; let stand to thicken a bit for 5 minutes or so as you proceed. Line a large baking sheet with parchment and sprinkle a bit of flour lightly in two 6-inch circles.

Tip: My OXO Good Grips bench scraper has a 6-inch ruler on the edge of its stainless steel blade, making it a perfect multi-use tool for making scones.

3 In medium mixing bowl whisk together the flour, sugar, baking powder, baking soda and salt. With your fingers, rub the butter (shredded with the Microplane extra coarse grater) into the flour mixture until it resembles coarse meal or fine breadcrumbs. Mix in the orange zest and diced strawberries to coat and separate. Add the egg to the soured milk and whisk together; remove 1 tablespoon of the mixture to use as an egg wash. Add the vanilla extract to the measuring cup.

Tip: It’s best to keep ingredients cool. If it’s a hot day, or your hot little hands are making the butter melt, pop your mixing bowl in the fridge or freezer for a few minutes.

4 With a large fork stir the wet mixture, a little at a time, into the dry mixture and gently mix until just combined. You may not need to use all of it (or you might need to add a bit more milk); use just enough to make a soft, but not wet or sticky, dough. Do the final mixing with your hand; the dough should not be sticking to your hand or the bowl. Do not knead; there's no need to knead!

5 Divide the dough into two roughly equal smooth balls (no need to weigh, but I love my food scale and know that each half weighs a pound!) and place them on the floured circles and gently pat the dough, dusting with flour as needed, into two 6- to 6.25-inch (15 to 16 cm) rounds. Take a moment to make sure your discs are smooth and flat, almost 1-inch (2.5 cm) thick, and have smooth, straight edges. With a bench scraper or long sharp knife, cut each round into 8 wedges. Pull the wedges out and space them an inch or two apart.

Tip: Again, if it’s a hot day, or the heat of your hands has softened the dough, pop your baking sheet in the fridge to cool the discs off before cutting them into wedges.

6 With silicone pastry brush, brush tops only with the reserved tablespoon of milk-egg mixture. Place in oven, and immediately reduce oven temperature to 400F/205C/Gas6. Bake for about 18 to 20 minutes or until lightly golden brown. Serve with Clotted Cream (or Clotted Cream - Stovetop Method) and Strawberry Jam.

Note: If you are one who prefers your tea in a mug, I recommend a mug with a lid and stainless steel infuser. Makes using loose leaf tea just as easy and convenient as using tea bags.


Disclosure: We are a participant in the Amazon Services LLC Associates Program, an affiliate advertising program designed to provide a means for us to earn fees by linking to Amazon .com and affiliated sites. We are a ThermoWorks affiliate, earning a small commission at no cost to you on purchases made through our links. This helps cover some of the costs of running the blog. Thank you for your support.

Jean

18 March 2021

Clotted Cream - Stovetop Method

Clotted Cream - Stovetop Method - An Afternoon Tea Essential / www.delightfulrepast.com

As I pointed out in my
Clotted Cream Tutorial, clotted cream, which doesn't sound that appealing to the uninitiated, is the delectable accompaniment to scones that elevates that simple bake to an Occasion. And, of course, it has other delicious applications.

While I couldn't be happier with my Clotted Cream - Oven Method, I have friends whose oven either does not have that low of a temperature setting or does not hold a very steady temperature or will time out before 12 hours is up. I even have friends in studio apartments without an oven. So I wanted to come up with a good and easy stovetop method.

As with the oven method, this does not require your standing at the stove for hours on end. Once you get it going, you can pretty much just go about your business. This must not be stirred or jostled, so it benefits from benign neglect once you have your just-barely-a-simmer temperature established.

Do you love clotted cream as much as I do?


Clotted Cream - Stovetop Method - An Afternoon Tea Essential / www.delightfulrepast.com

If you like it, please Pin it and share it!

Clotted Cream – Stovetop Method


(Makes about 1 cup)

1 pint (16 fluid ounces/473 ml) heavy whipping cream


1 Fill base of double boiler with water to about 1.5 inches (in mine, that means 1 quart). Bring to barely a simmer. Place double boiler insert over the water. It must not touch the simmering water.

Tip: If you don’t have a double boiler, you can use a stainless steel or glass mixing bowl over a large saucepan.

2 Pour 2 cups (16 fluid ounces/473 ml) of heavy whipping cream into top of double boiler. The cream should not be more than 1 inch deep. Leave the lid off. Check by ear every once in a while to make sure the water is barely simmering. If you have an instant-read thermometer, it should register somewhere in the 185F/85C to 200F/94C range.

3 Gently heat the cream at barely a simmer, uncovered, never stirring, for 4 hours. Being careful to not slosh the cream around, remove the top pan from the base and set it on a wire rack to cool at room temperature for 1 hour. Then cover and refrigerate for 12 hours.

4 Lift up a "corner" of the chilled clotted cream and pour off the liquid* underneath into a 1-cup glass measure; use it in your next batch of scones, pancakes, or whatever you happen to be making. Scoop up layer of clotted cream into jar or serving dish. Keeps for several days, covered and refrigerated. Or you can freeze it

* When you pour off that liquid, you don't have to get every last drop out. Usually the underside of the clotted cream layer is quite wet and might actually drip as you spoon it into a container. The contents of the container can seem quite wet, but it all melds together in the refrigerator.

Note: These cute little 4-ounce freezer-safe canning/storage jars with plastic caps are perfect for clotted cream. One recipe makes two jars. 

Disclosure: We are a participant in the Amazon Services LLC Associates Program, an affiliate advertising program designed to provide a means for us to earn fees by linking to Amazon .com and affiliated sites. We are a ThermoWorks affiliate, earning a small commission at no cost to you on purchases made through our links. This helps cover some of the costs of running the blog. Thank you for your support.

Jean

24 December 2020

Cherry Almond Tea Loaf

Cherry Almond Tea Loaf / www.delightfulrepast.com


Cherry Almond Tea Loaf is a recipe I developed when I found myself with too many dried cherries on hand—a nice problem to have!—and almond flour that needed to be used before it expired.

If you've had more than enough super sweet treats this month, you'll enjoy this not-too-sweet cake with its slightly tart cherries. Be sure to use plain dried cherries rather than sugary glacé cherries.

And if you're one of those people who doesn't like dried fruits, trust me, these dried cherries plumped for a short time in a bit of hot water do not seem at all like your usual dried fruit.

I want to bake it in a 3-inch deep 7-inch round pan next time, for serving on my little clear glass pedestal cake plate. Yes, I'm still thinking "tea party" after ten months of no such thing! I hope you are doing well. See you next year!

Cherry Almond Tea Loaf / www.delightfulrepast.com


Cherry Almond Tea Loaf


(Makes 1 9x9x4-inch or 9x5x3-inch loaf cake) 

2 packed cups (10 ounces/283 grams) dried cherries
1/2 cup (4 fluid ounces/118 ml) boiling water
1 1/2 dip-and-sweep cups (7.5 ounces/213 grams) unbleached all-purpose flour
1/2 firmly packed cup (2 ounces/57 grams) super-fine almond flour (ground almonds)
1 1/2 teaspoons baking powder
1/2 teaspoon salt
1 3/4 sticks (7 ounces/198 grams) unsalted butter, room temperature
1 cup (7 ounces/198 grams) sugar 
3 large eggs, room temperature
1 teaspoon vanilla extract 
1/2 teaspoon almond extract


1 In a 3-cup shallow bowl, pour 1/2 cup boiling water over the dried cherries. Cover and let stand for 20 minutes, stirring once halfway through, then drain thoroughly, reserving the liquid. Maybe give it 15 seconds or so in the microwave at that halfway point (sometimes I do, sometimes I don't). 

2 Grease and flour, or spray with cooking spray, a 9x4x4-inch loaf pan or 9x5x3-inch loaf pan. I use a teaspoon of softened butter and 1 tablespoon of flour. Preheat oven to 350F/180C/Gas4. 

Note: I love the square shape of the 9x4x4-inch loaf pan that I initially got for baking my gluten-free yeast breads but use (without its lid) for nearly everything that calls for a 9x5x3-inch pan. 

3 In 2-quart glass measure or mixing bowl, whisk together flour, almond flour, baking powder and salt. Whisking the daylights out of the dry ingredients takes the place of sifting. 

4 In 2.5- to 3-quart bowl, cream the softened butter and sugar until light and fluffy. Beat in the eggs one at a time, adding in just a spoonful of the flour mixture if needed to keep the mixture from curdling. Stir in the vanilla and almond extracts.

5 Dump the flour mixture on top of the creamed mixture, then put the thoroughly drained cherries on top of the flour, and kind of dust the cherries with the flour. Then stir gently just until mixed. This keeps the cherries from sinking to the bottom of the loaf.

6 Stir in 1/4 cup (2 fluid ounces/59 ml) of the reserved liquid. 

7 Scrape into prepared loaf pan and bake for 15 minutes. Reduce oven temperature to 325F/165C/Gas3 and continue baking for about 50 to 60 minutes. 

8 Cool in pan on wire rack for 10 minutes before turning out onto wire rack. Continue cooling for an hour.

Disclosure: We are a participant in the Amazon Services LLC Associates Program, an affiliate advertising program designed to provide a means for us to earn fees by linking to Amazon .com and affiliated sites. We are a ThermoWorks affiliate, earning a small commission at no cost to you on purchases made through our links. This helps cover some of the costs of running the blog. Thank you for your support. 

Jean

27 February 2020

Cornish Splits - Devonshire Splits

Cornish Splits - Devonshire Splits - A British West Country Classic / www.delightfulrepast.com

A Cornish Split - or Devonshire Split - was the original star of the famous "cream teas": of Cornwall and Devon. Though you'll more often find a cream tea with scones, the split is a classic as well.


Cornish or Devonshire Splits - A British West Country "Cream Tea" Classic / www.delightfulrepast.com


No one appreciates a good scone more than I, but this week I was in the mood for a lovely yeast bun for my cream tea, so here they are! Not a crusty bun, it is neither egg-washed nor well-browned. In fact, a tea towel is spread over them as they cool so as to keep them soft.


Cornish Splits - Devonshire Splits - A British West Country Classic / www.delightfulrepast.com
Of course, I had to make a batch of Strawberry Jam and a batch of Clotted Cream 
to fill the splits. But I could spare two berries to "model" for me for this little
watercolor sketch. 


Unlike scones, which are served alongside the accompanying clotted cream and jam (or lemon curd), Splits are served, well, split, and filled with the cream and jam and given a dusting of icing sugar (powdered sugar).

These were so delicious with a pot of Rishi Tea organic loose leaf Earl Grey. Have you ever had Cornish or Devonshire Splits?

Cornish Splits - Devonshire Splits - A British West Country Classic / www.delightfulrepast.com


Cornish Splits - Devonshire Splits


(Makes 18 buns)

The Buns

3 3/4 dip-and-sweep cups (18.75 ounces/532 grams) unbleached all-purpose flour
1/4 cup (1.75 ounces/50 grams) sugar
2 1/4 teaspoons (1 package/0.25 ounce/7 grams) instant yeast
1 1/4 teaspoons (0.25 ounce/7 grams) salt
6 tablespoons (3 ounces/85 grams) unsalted butter
3/4 cup (6 fluid ounces/177 ml) milk
3/4 cup (6 fluid ounces/177 ml) water

1 large egg (medium in UK), lightly beaten

The Filling

Strawberry Jam 
Clotted Cream

1 In large bowl, whisk together flour, sugar, yeast and salt. In small saucepan, heat together butter, milk and water until butter is melted and mixture is very warm, but not more than 130F/54C on an instant-read thermometer. Line two baking sheets with parchment. I use one half sheet pan and one quarter sheet pan for this recipe. Lightly oil a 2-quart bowl for proofing the dough. I use a 2-quart glass measure, which makes it very easy to tell when the dough has doubled. 

2 With dough whisk or large wooden spoon, stir warm liquid and beaten egg into flour mixture until blended. The dough will be very sticky.

3 Measure out 1/2 dip-and-sweep cup (2.5 ounces/71 grams) of unbleached all-purpose flour to work from while kneading the dough. This will keep you from the common problem of adding too much flour and ruining your dough. Lightly flour the countertop and scrape the dough onto it. Lightly flour the top of the dough and knead for 10 minutes, adding just a bit of flour as needed. You will likely need anywhere from 1/4 cup to slightly less than 1/2 cup.

4 Shape the dough into a smooth ball and place it in a lightly oiled bowl (I use a 2-quart glass measure), cover with lid or plastic wrap, and let rise until doubled, about an hour or so.

5 Deflate the risen dough by pressing your fist into the middle of it. Turn the dough out onto the counter, no need for flour. Divide the dough into 18 equal pieces. I'm pretty particular about my buns and rolls being identical, so I weigh the dough (in this case, my dough was 2 pounds 7 ounces/1106 grams) on my OXO Good Grips digital food scale, divide the grams by 18 (in this case, coming out to be about 61 grams per bun), then I weigh each little hunk of dough as I go. Roll the piece of dough between your palms until smooth, then do this to shape it into a nice round bun. Cup your hand over it like a "cage" and move your hand rapidly in an outward motion.


6 Place the buns on the parchment-lined baking sheets and cover with lids or plastic wrap. I don't like using plastic wrap, so I have rimmed baking sheets that come with lids! Let rise until doubled, about 45 minutes or so. During the last 15 minutes, preheat oven to 375F/190C/Gas5.


Cornish Splits - Devonshire Splits - A British West Country Classic (this photo, buns rising on lidded baking sheet) / www.delightfulrepast.com


7 I bake one sheet at a time. Bake for about 15 minutes (you know your oven), until buns are just golden brown and sound hollow when tapped. Transfer to wire cooling rack and cover with a tea towel. Cool completely.

8 When ready to serve, slice the buns diagonally from about a third of the way down in the front to about two-thirds of the way down in the back, but do not slice all the way through. Put in a spoonful of strawberry jam (about 2 level teaspoons works for me) and spread it over both the top and bottom. Then put in a spoonful of clotted cream (about the same amount). Arrange the filled splits on a serving platter or tray, and dust with a little icing sugar.

Disclosure: We are a participant in the Amazon Services LLC Associates Program, an affiliate advertising program designed to provide a means for us to earn fees by linking to Amazon .com at no cost to you on purchases made through our links. This helps cover some of the costs of running the blog. Thank you for your support. 

Jean