Showing posts with label vintage heritage or historical. Show all posts

23 May 2024

Dundee Cake - Scottish Teatime Classic

Dundee Cake - Scottish Teatime Classic / www.delightfulrepast.com

Dundee Cake is one of those recipes with lots of lore attached. As with all lore, much of it is inaccurate. Was it really created at the end of the 18th century by Janet Keiller of the Dundee marmalade family? Or was it first made in the 16th century for Mary Queen of Scots, who purportedly did not like cherries which usually featured in fruit cake? 

Which of the so-called must-have ingredients must one really have? Some insist on a bit of whisky from Scotland, or Seville orange marmalade, or ground almonds. The list goes on. So ... what to do? Professional bakers of the cake actually applied for protected status, but the government chose not to award the cake protected geographical indication (PGI) because "the name Dundee Cake is generic."

The application for PGI status specified certain ingredients, including sultanas, Amontillado sherry, candied orange peel, dried vine fruits, and a pattern of whole blanched almonds on top. Not even a wee dram of Scotland's finest! Good, because I've always preferred sherry (though not necessarily Amontillado). 


Dundee Cake - Scottish Teatime Classic / www.delightfulrepast.com

Please Pin it and share it!

I abhor store-bought candied orange peel, so unless I have a batch of my homemade candied orange peel on hand, I prefer to use fresh orange zest and perhaps a bit of juice. The main thing is that the predominant flavors be orange and almond. And I do hold with the PGI applicants' insistence on an arrangement of whole blanched almonds on the top.

Unfortunately, for some reason none of the stores around here had whole blanched almonds in stock, which I found surprising. Perhaps they consider them a "seasonal" item? Anyway ... I decided to proceed with the whole raw unblanched almonds I always have on hand. Perhaps not as pretty to some, or not "authentic" to others, but it will have to do! Blanching them myself would likely have been simple, but I wasn't in the mood to experiment with it just then.

When developing a recipe I always try to make it as "authentic" as possible, but not being a Dundonian myself, I don't wish to be dogmatic about any of this. But if you are a member of the Baker Trade of Dundee or just have set ideas about Dundee cake, do let me know in the comments!


Dundee Cake - Scottish Teatime Classic / www.delightfulrepast.com

 Please Pin it and share it!

Dundee Cake   


(Makes one 3-inch/8cm deep 7-inch/18cm round cake)

1 1/4 packed cups (6.25 ounces/177 grams) sultanas, currants, or other dried vine fruits
Finely grated zest of 2 medium organic or unsprayed and unwaxed oranges
1/4 cup (2 fluid ounces/59 ml) fresh orange juice
1 tablespoon (0.5 fluid ounce/15 ml) sherry
1 1/2 dip-and-sweep cups (7.5 ounces/213 grams) unbleached all-purpose flour*
3/4 cup (5.25 ounces/149 grams) sugar
1 1/2 teaspoons non-GMO baking powder
1/2 teaspoon mixed spice**
1/4 teaspoon salt
10 tablespoons (5 ounces/142 grams) unsalted butter, softened***
2 large (medium, in UK and some other places) eggs, room temperature
About 34 whole blanched almonds

* Many British recipes call for self-raising flour, but mine will always call for plain flour. I prefer to be in control of the amount of baking powder and salt I use. 

** Since the mixed spice, a ready-made blend popular in the UK, is not readily available elsewhere (not the same as US pumpkin pie spice), you may have to make your own. The amount to make depends on how frequently you’ll be using it. I usually stir up just a tablespoon at a time, but multiply these amounts if you’d like to make more: 3/4 teaspoon each allspice and cinnamon, 1/2 teaspoon mace or nutmeg, 1/4 teaspoon each cardamom, cloves, coriander and ginger.

*** Let butter stand at room temperature for 30 to 60 minutes. Butter needs to be a little softer for a hand mixer than for a stand mixer. It should be squishable, but not melting or greasy/oily.

1 About 12 to 24 hours before mixing cake, stir together fruit, zest, juice and sherry in a small bowl. Cover tightly and let stand for about 12 to 24 hours.

2 Preheat oven to 300F/150C/Gas2. Prepare baking tin. Butter the inside of a 3-inch deep 7-inch/18cm pan. Line the bottom with a circle of parchment paper. Turn the parchment over so that both sides are buttered. Lightly flour the tin and set it on a quarter sheet pan for baking.

3 In 2 to 2.5-quart bowl, vigorously whisk together the flour, sugar, baking powder, mixed spice, and salt to aerate as well as combine. With electric hand mixer, mix the softened butter into the flour mixture until it resembles crumbs. Drain the fruit and zest, reserving the liquid. On low setting, mix in the eggs and the reserved juice; beat on medium to high speed for 1 minute. Gently stir in the drained fruit. The batter is quite stiff and should just drop slowly off a spoon when nudged. If it is too stiff, add a tablespoon of milk or another tablespoon of orange juice or sherry, if you like.

4 Scrape batter into prepared tin and smooth the top. Arrange the whole blanched almonds in 3 concentric circles on the top, starting on the outside—20 almonds, then 11, then 3. Bake until golden brown and cake springs back when pressed lightly in the center or when a skewer inserted in the center comes out clean, about 1 1/4 to 1 1/2 hours.

5 Leave in tin on wire rack for 10 minutes before removing from tin. Peel away the parchment on the bottom and set right side up on rack to cool completely. 

Disclosure: We are a participant in the Amazon Services LLC Associates Program, an affiliate advertising program designed to provide a means for us to earn fees by linking to Amazon .com and affiliated sites. This helps cover some of the costs of running the blog. Thank you for your support. 

Jean

If you liked this post, please Pin it and share it!

16 November 2023

Bolton Buns - From Jane Austen's Kitchen

Bolton Buns - Currant Buns - From Jane Austen's Kitchen / www.delightfulrepast.com

Bolton Buns, or Currant Buns, were inspired by recent travels. Sort of. My cousin Paula went to England in September; and I went with her, vicariously! She visited sites connected to our Mayflower ancestors on her mother's and my father's side of our families. She sent many lovely photos for my archives. She also visited and sent photos of Chawton House in Hampshire. If you are a Jane Austen fan, I don't have to tell you who lived there from 1809 to 1817.

Then in October Paula sent me a wonderful book for those interested in Jane Austen and/or Regency cooking and life in a "middling" household. The book, Martha Lloyd's Household Book, with annotated transcription by Julienne Gehrer and foreward by Deirdre Le Faye, is an excellent window—kitchen window—into the everyday life of Jane Austen's all-female household at Chawton Cottage. 

More than a cookbook—but if a cookbook is what you like, well, there you go!—it tells us more about our Jane through the eyes of her dear friend, member of her household, and eventually (after Jane's death) sister-in-law. Martha Lloyd, ten years older than Jane, was a remarkable woman in her own right, so one can enjoy this book from several different angles.


Bolton Buns - Currant Buns - From Jane Austen's Kitchen / www.delightfulrepast.com


The recipes are written as one does when writing down the bare bones for one's own use. Just the ingredients, no need for all the details. So I've taken one recipe, Bolton Buns—written Bolton Bunns by Martha—and given you all the details you need to make them. I've halved the recipe and translated all the weights and measures to measures, ounces, and grams so that whether you're in the US or the UK or anywhere at all, you can make the buns. 

The one measure in this recipe that took a bit of interpreting was "a handful of currants." Martha's hands might have been larger or smaller than mine, so her idea of "a handful of currants" might be different from mine. After some deliberation and weighing and measuring, I decided to translate "a handful" to 1/4 cup/1.25 ounces/35 grams—more than a handful in my hand, but anything less seemed pointless.

During that era, rich yeast breads were a popular breakfast item and would likely be seen again at teatime as well.

Do you enjoy making vintage recipes? Do leave a comment and tell me your thoughts. And if anyone has ever heard of Bolton Buns anyplace besides Martha Lloyd's Household Book, let me know. I'm thinking it must have been her own name for her currant buns.  

 
Bolton Buns - Currant Buns - From Jane Austen's Kitchen / www.delightfulrepast.com

If you like it, please Pin it and share it!
 

Bolton Buns - Currant Buns


(Makes 20)

1 1/4 cups (10 fluid ounces/296 ml) milk
4 tablespoons (2 ounces/57 grams) cold unsalted butter
3 dip-and-sweep cups (15 ounces/425 grams) unbleached all-purpose flour, divided
1/4 cup (1.75 ounces/50 grams) sugar
2 teaspoons (0.25 ounce/7 grams) instant yeast
1/2 to 3/4 teaspoon salt
1/4 cup (1.25 ounces/35 grams) currants
1 large egg yolk, room temperature, beaten


1 In 1-quart saucepan (or a 2-cup glass measure in the microwave), heat the milk just until tiny bubbles start to form around the edge of the pan. Add the chunk of cold butter and stir until melted. 

2 In 2- to 2.5-quart mixing bowl (I use this 2-quart glass measure—makes it easy to see when the dough has doubled), measure/weigh the flour, sugar, yeast, and salt. Make a well in the center and add the currants, using your fingers to separate any that are stuck together. Mix them in and make a well in the center again. 

Note: While measuring/weighing the flour, also measure/weigh about 1/4 cup (1.25 ounces/35 grams) of flour separately and set aside for kneading and shaping. You won't need it all, but it's good to have out just in case, so you never have to go back into the cupboard for more when your hands are all floury. Use just enough flour to keep the dough from sticking too much to your hands and counter; a little sticking is fine. Adding too much flour is the ruin of bread.

3 Pour the warm milk mixture and beaten egg yolk into the well. Mix the flour in to form a soft, but not overly wet, dough. The dough should not be sticking to the bowl too much, but come away fairly cleanly.

Clean out the bowl (no need to wash it) and lightly oil it. Knead the dough, using flour from the 1/4 cup, until it is very smooth and silky, about 8 to 10 minutes. Put the dough into the lightly oiled bowl, cover,* let rise until at least doubled, about 2 to 3 hours.

* If you're using plastic wrap, tear off an 18-inch long piece so that you can use it again to cover the shaped buns. I use a silicone lid or mixing bowl lid to cover my 2-quart glass measure and this half sheet pan cover for proofing the buns.

5 Line baking sheet (I use this heavy-duty half sheet pan) with parchment paper. Divide the dough into 20 equal pieces--I, being who I am, 😁 weigh the batch of dough in grams (on this food scale) and divide by 20 (making each bun 45 grams). Shape each piece into a ball. Give it a little roll on the unfloured counter, a motion sort of like moving a computer mouse around, to make a smooth ball. If you used flour, you would not be able to get the needed traction.

6 Place in 4 rows of 5 on prepared baking tray. If using plastic wrap, spray with cooking spray the same piece of plastic wrap you used to cover dough, cover buns lightly and let rise about 1 hour or so. They will not be doubled, just puffy. 

7 During the last 15 or 20 minutes (depending on your oven), preheat oven to 400F/205C/Gas6.

8 Bake for about 13 to 15 minutes, or until golden brown. Let cool slightly for a few minutes before serving. If you want the crust to be its softest, lay a pristine kitchen towel over the buns. 

Disclosure: We are a participant in the Amazon Services LLC Associates Program, an affiliate advertising program designed to provide a means for us to earn fees at no cost to you by linking to Amazon .com and affiliated sites. This helps cover some of the costs of running the blog. Thank you for your support. 

Jean

If you liked this post, please Pin it and share it!


08 June 2023

Pain Perdu - French Toast - Eggy Bread

Pain Perdu - French Toast - Eggy Bread / www.delightfulrepast.com


My family called it French Toast. Though my English grandmother might have known it first as Eggy Bread, she would have quickly adopted French Toast since she was a fervid Francophile. Mr Delightful's family from Québec probably called it Pain Doré (golden bread).

Whatever you call it, it is at once simple and basic and rather elegant and special. It is best made with a sturdy bread that is not too fresh. Fresh bread does not stand up well to soaking. If your bread is fresh, lay the slices on a plate the night before and leave them uncovered in your cold oven overnight.

I make a couple of homemade breads that are especially good for Pain Perdu - French Toast: Fallue - The Traditional Norman Brioche and Classic White Sandwich Bread, and also a variation of it about which I will post next time. 

French Toast is all about the texture—and it's easy to get it wrong—dry with crispy edges on the outside and soft and creamy, but never soggy, on the inside. Time and temperature are the two keys to the proper texture. Doing it properly only takes about 15 minutes, so don't rush it.

And resist the temptation to overdo the sugar and flavorings. This is breakfast, not dessert. I just use the teaspoon of sugar to moosh up the spices so they blend in. If you just add them to the batter, they will float on top. 

What did your family call this popular brunch dish?

Update 07/13/23: Here is my favorite bread for French Toast, the bread used in these photos, Pullman Loaf - Pain de Mie.
 

Pain Perdu - French Toast - Eggy Bread / www.delightfulrepast.com

If you like it, please Pin it and share it!


Pain Perdu - French Toast


(Makes 4 slices)

1 teaspoon sugar
1/4 teaspoon cinnamon
1/8 teaspoon salt
1/8 teaspoon nutmeg, mace, or cardamom
2 large eggs (medium in UK and some other places)
1/2 cup (4 fluid ounces/118 ml) whole or 2% milk*
1/4 teaspoon vanilla extract
4 3/4-inch (2 cm) slices of brioche or challah or other good bread a few days old (I used a homemade white bread)
1 tablespoon unsalted butter


1 In a tiny bowl, combine well the sugar, cinnamon, salt, and spices (this helps prevent the spices floating on top of the batter). In dish large enough to hold the four slices of bread, thoroughly whisk together the eggs and sugar mixture; then whisk in the milk and vanilla extract. But don't soak the bread yet.

2 Lightly oil the griddle (I use about 1/2 teaspoon extra virgin olive oil on my All-Clad 11-inch nonstick griddle) and heat over medium heat. As with pancakes, preheating the griddle properly is a must; it takes about 5 minutes, not a minute less. Don't try to speed it up by turning the heat on high, especially if you're using a nonstick griddle. And I give it an extra minute when the bread I use takes 6 minutes to soak.

Note: Unlike with other pans, never preheat a nonstick pan empty or over high heat. Rub a little oil or butter (I use about 1/2 teaspoon) onto the cold pan—don’t use cooking spray—and heat over low to moderate heat. With proper care, a good nonstick pan can last for many years. My griddle is more than ten years old and gets used every week, but due to proper use and care is just like new.

3 During the 5- or 6-minute preheating, whisk the egg mixture again and add the bread slices to the dish. Soak the bread for 3 minutes* on each side. Nearly all of the liquid will be absorbed.

Note: As I said in the post, that time is for the specific bread I used. If you're using a different bread, you'll have to experiment and see what works best for that bread. 

4 Put the butter on the griddle and brush to cover the surface. Place the soaked bread slices on the griddle and cook until golden brown on the bottom, about 3 minutes. Use a pastry brush to redistribute the butter on the pan again as you turn each slice. Turn the heat down to medium-low and cook the second side until golden brown, about 3 minutes. Lower the heat even more if they are browning too quickly because you want to get the inside of the toast cooked well.

Note: Test a "corner" and see if the inside is properly cooked. If not, you can finish off over very low heat or in the oven; and you'll know for next time to adjust your soaking time and cooking time and temperature accordingly for that particular bread.

5 Serve with more butter (or not) and warmed real maple syrup or jam. 

Disclosure: We are a participant in the Amazon Services LLC Associates Program, an affiliate advertising program designed to provide a means for us to earn fees at no cost to you by linking to Amazon .com and affiliated sites. This helps cover some of the costs of running the blog. Thank you for your support. 


Jean

If you liked this post, please Pin it and share it!

20 January 2022

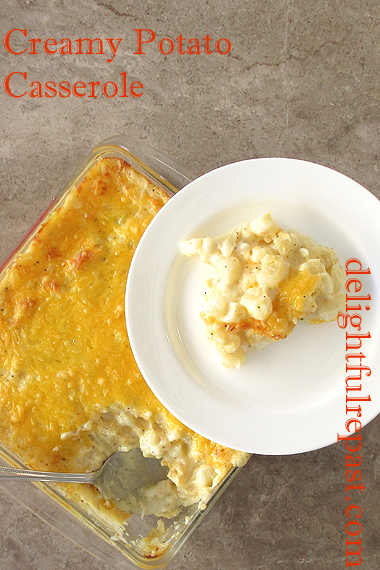
Creamy Potato Casserole - also known as Funeral Potatoes

Creamy Potato Casserole - also known as Funeral Potatoes / www.delightfulrepast.com

Versions of this Creamy Potato Casserole have been around since before I was born and seem to enjoy a "revival" or surge in popularity every so many years. In some cultures and regions, the dish is called Funeral Potatoes because they are an absolute must at every funeral reception.

Many recipes call for frozen hash browns, which certainly would be a timesaver, but I've always made them with fresh potatoes. Most recipes call for a can of condensed cream of chicken, or cream of mushroom, soup. That's not something I ever buy, but I always have organic chicken broth on hand and so make up a sauce with that.

Super easy, and open to many variations, it's always a crowd pleaser at any event, not just funeral luncheons. So perhaps a more pleasant name for the dish would be Party Potatoes. But we just call it Potato Casserole. Instead of making it in a 13x9x2-inch baking dish, I used two smaller ones this time.

I meant to make one and freeze one so that I could tell you how well the dish freezes, but we ended up devouring both, so maybe you can tell me how well it freezes!


Creamy Potato Casserole - also known as Funeral Potatoes / www.delightfulrepast.com

If you like it, please Pin it and share it!


Creamy Potato Casserole


(Serves 12 to 16)

The Potatoes

4 pounds (1.8 kg) russet potatoes

The Sauce

4 tablespoons (2 ounces/57 grams) unsalted butter
1/4 cup finely chopped onion
1/4 cup (1.25 ounces/35 grams) unbleached all-purpose flour
1 cup (8 fluid ounces/237 ml) milk
1 cup (8 fluid ounces/237 ml) chicken broth
1/4 teaspoon salt
1/4 teaspoon coarsely ground black pepper
1/4 teaspoon marjoram
1/4 teaspoon thyme leaves
1/4 teaspoon nutmeg

The Assembly

1 8-ounce (227 grams) container sour cream
1/2 teaspoon salt
1/2 teaspoon coarsely ground pepper
1 packed cup (4 ounces/113 grams) shredded Monterey jack cheese
1 packed cup (4 ounces/113 grams) shredded cheddar cheese


1 In 5- to 6-quart Dutch oven, cook well scrubbed (but not peeled—they are much easier to peel after cooking) potatoes in boiling salted (1 teaspoon salt) water until tender but not overly so, about 30 minutes for large potatoes. Drain, remove from pan, and let cool a bit.

Note: My 5.5-quart Le Creuset enameled cast iron Dutch oven is too heavy for things like this that need draining. A lighter weight stainless steel 6-quart pot makes draining the potatoes so much easier.

2 While potatoes are cooling, make the sauce in the same pan the potatoes were cooked in. Melt the butter, cook the onions for about 5 minutes, stir in the flour, cook the flour for a minute or so. Stir in the milk, broth, and seasonings; cook, stirring frequently, until thickened.

Note: I know that seems like such a tiny amount of onion, but don't be tempted to increase it. It's supposed to add a subtle hint of onion to the dish, not completely take it over.

3 When potatoes are cool enough to handle, peel (or not) and cut into small cubes. Add to the sauce. Stir in the sour cream, salt and pepper, and shredded Monterey jack cheese until well combined. Taste and adjust seasoning. Turn into greased 13x9x2-inch baking dish. Top with shredded cheddar. Refrigerate until 1 hour before serving.

4 Preheat oven to 350F/180C/Gas4. Bake uncovered until hot and bubbly, about 55 minutes, if chilled, or 45 minutes, if baking right after preparation.

Disclosure: We are a participant in the Amazon Services LLC Associates Program, an affiliate advertising program designed to provide a means for us to earn fees by linking to Amazon .com and affiliated sites. We are a ThermoWorks affiliate, earning a small commission at no cost to you on purchases made through our links. This helps cover some of the costs of running the blog. Thank you for your support. 

Jean

If you liked this post, please Pin it and share it!

27 May 2021

Classic Pot Roast

Classic Pot Roast - One-Pot Comfort Food Dinner / www.delightfulrepast.com

Why am I blogging about pot roast when everyone else is talking summer dishes? Two reasons.

One: Because, though it's nearly June, many parts of the country/world are still experiencing some cold days that call for traditional comfort food like this Classic Pot Roast.

When you make this satisfying one-pot meal for people, they are transported back to their childhoods when mothers and grandmothers cooked things many people now feel they haven't the time to cook themselves.

Although this recipe takes time, most of it is unattended. There are no tricky techniques, but you'll find that careful browning brings out the fullest flavor of these subtly seasoned simple ingredients.

Two: Another reason for posting this now is the recent social media kerfuffle about a popular food website that had stopped adding beef recipes to the site last year and were now formally announcing it, saying "our shift is solely about sustainability, about not giving airtime to one of the world’s worst climate offenders. We think of this decision as not anti-beef but rather pro-planet."

Well, I don't get involved in the politics of food—and I don't get self-righteous about my food choices or look down on anyone who doesn't feel the same—but I do give consideration to all that putting food on the table involves.

Classic Pot Roast - One-Pot Comfort Food Dinner / www.delightfulrepast.com


Knowing full well that this is a topic that won't win me any popularity contests—from those who for whatever reason aren't into organic, sustainable, etc, to those who are vegan—I'll repeat here something I wrote years ago:

Though I feel an organic, mostly plant-based diet is more healthful and earth-friendly, I occasionally indulge in a little carefully sourced grass-fed/grass-finished meat from ranches as close to local as possible that practice environmentally friendly agriculture methods and the ethical treatment of animals.

Yes, it is more expensive than conventional supermarket meat, but here are some ways I've found to better afford it:
  • By cutting our meat consumption in half. Most Americans eat more meat than is good for them, so I figure eating the good stuff in smaller portions or less frequently is better for us anyway!
  • I don't buy many "empty calorie" snacks and convenience foods, so more of the grocery budget can go toward whole ingredients.
  • I try very hard not to waste food and have gradually gotten to where I actually waste very little now. And, out of respect for the animals, I make a point to never waste meat.
Anyway ... I'm not here to tell you how or what to eat. You do you, as the saying goes. I'm just here to tell you about what I eat, and how I make it, in case you want to make it too. And if you have me over for dinner, I'm not going to sneer or lecture if you serve me conventional supermarket beef or non-organic imported fruit. You're probably doing other "healthy" or "pro-planet" things that I'm not!

I'd love to get your thoughts on any of this or just about pot roast and comfort food in general. What is your favorite comfort food meal? Is it the same as the one when you were a child?

Classic Pot Roast - One-Pot Comfort Food Dinner / www.delightfulrepast.com

If you like it, please Pin it and share it!

Classic Pot Roast


(Serves 6 to 8)

1 3- to 4-pound (1.36 to 1.81 kg) boneless chuck roast
1 1/4 teaspoon salt, divided
1 teaspoon coarsely ground black pepper, divided
1/2 teaspoon sugar
2 tablespoons (1 fluid ounce/30 ml) extra-virgin olive oil
1 large (12 ounces/340 grams) yellow onion, quartered and separated
1 cup (8 fluid ounces/237 ml) lower-sodium chicken broth
1/4 cup (2 fluid ounces/59 ml) water, wine, or broth
1 tablespoon Worcestershire sauce
1 tablespoon tomato paste or ketchup
1 bay leaf
3/4 teaspoon marjoram
1 pound (16 ounces/454 grams) baby carrots (or 6 carrots, quartered)
6 medium unpeeled potatoes, quartered (or 8 small, halved)
(I used 16 tiny Yukon golds that averaged 2 ounces each)
4 stalks celery, cut in 2-inch diagonal pieces
Optional: Turnips, rutabagas, parsnips in place of some of the potatoes
(I used a 12-ounce rutabaga*, cut into 8 equal pieces)

* Rutabagas are called swedes in England and neeps, I'm told, in Scotland.

1 Heat 5.5-quart (or larger) Dutch oven; heat oil. Pat beef dry and coat beef with 3/4 teaspoon salt, 1/2 teaspoon coarsely ground black pepper, and 1/2 teaspoon sugar. Brown well on all sides in hot oil, taking about 15 to 25 minutes; transfer to plate. Preheat oven to 300F/150C/Gas2. Add the onion to the pan and cook until browned, about 15 minutes. Add broth, other liquid, Worcestershire sauce, tomato paste or ketchup, bay leaf, and marjoram; bring to a boil. Put the meat back in the pan.

2 Cover pan with foil and lid, and simmer in preheated oven for 2 hours.

3 Stir in 1/2 teaspoon each salt and pepper, and add vegetables. Cover as before and return to oven for 2 hours. Discard bay leaf. Remove meat and vegetables to serving platter; cover. Thicken the sauce with a little slurry of water and flour or by just reducing it (boiling it down) to your preferred thickness.

Note: Sometimes I make this several hours or a day ahead so that I can chill the sauce thoroughly until the fat rises to the top, remove most of the fat, and then thicken the sauce. The fat could be used in the baking of Yorkshire Pudding.

Disclosure: We are a participant in the Amazon Services LLC Associates Program, an affiliate advertising program designed to provide a means for us to earn fees by linking to Amazon .com and affiliated sites. We are a ThermoWorks affiliate, earning a small commission at no cost to you on purchases made through our links. This helps cover some of the costs of running the blog. Thank you for your support.

Jean

18 February 2021

Chocolate Tapioca Pudding - Made with Cocoa

Chocolate Tapioca Pudding - Made with Cocoa / www.delightfulrepast.com


Thought of making a cake this week in celebration of the 11th blogiversary of Delightful Repast, but Mr Delightful requested tapioca pudding, vanilla or chocolate, so I decided to make chocolate since I had already posted my Vanilla Tapioca Pudding.

Tapioca pudding was one of the delicious treats my grandmother made for all her grandchildren. My cousin Denise reminded me several years ago about Ma (that's what we all called her) having mixed results with her tapioca. One time it would be heavenly, and the next time gluey. I thought it odd that Ma would have had difficulty with something so simple, but then I figured it out.

Reading. My grandmother (like her daughters and granddaughters who followed) was addicted to reading. Growing up in a very large family in the Lake District (northwest England), her favorite task was making all the beds. Not because she especially liked making beds, but that chore gave her the opportunity to be alone upstairs and get a lot of reading done. Can't do much harm there, but ... stuff happens when you're cooking and you can't put your book down.

So I imagine on those gluey pudding days, the plot was thickening and so was the tapioca!

Now I'm not touting tapioca pudding as a health food, but I would like to point out for those of you who are watching out for such things that it is grain-free and gluten-free and can easily be made dairy-free. 

Also, since we live in an increasingly carb-wary culture, I should add that, though pure starch, tapioca is a natural source of resistant starch, the good starch that is resistant to digestion and feeds the friendly bacteria in the gut and can improve insulin sensitivity and blood glucose control. All of which I am no expert on, but this is simply by way of letting you know there is information out there.

Anyway ... tapioca pudding, chocolate or vanilla, is classic comfort food. And don't we all need a little comfort right now! Are you a tapioca pudding fan?


Chocolate Tapioca Pudding - Made with Cocoa / www.delightfulrepast.com

If you like it, please Pin it and share it!

Chocolate Tapioca Pudding


(Makes a little over 5 cups, 8 to 10 servings)

1/2 cup (3.25 ounces/92 grams) small pearl tapioca (not instant tapioca)
1 cup (8 fluid ounces/237 ml) very warm water
1/2 to 3/4 cup* (3.5 ounces/99 grams to 5.25 ounces/149 grams) sugar
1/4 cup (0.75 ounces/21 grams) natural unsweetened cocoa powder
1/4 teaspoon salt
3 1/4 cups (26 fluid ounces/769 ml) organic milk
3 large organic eggs
1 teaspoon vanilla extract
Garnish: Whipped cream

* We use the lower amount of sugar and think that's perfect, but you might like a bit more.

1 In heavy-bottomed 2-quart saucepan, soak small pearl tapioca in very warm water for 30 minutes. In small bowl, whisk together sugar, cocoa, and salt. 

2 Stir the cocoa mixture and the milk into the soaked tapioca. Cook over medium* heat, stirring until sugar is dissolved. Bring to a boil, stirring occasionally, then reduce heat. Simmer uncovered, stirring frequently (and then constantly as it gets thicker) for 12 to 15 minutes.

* And I do mean medium. No matter how heavy your saucepan, if you try to hurry it along by cranking up the heat you'll scorch it. Then as you stir, the scorched patch will come off in shreds and be all mixed in with the pudding. Not good. (You may ask, Hmm ... wonder how she knows that? I'll tell you--the same way I know that stuff happens when you're cooking and you can't put your book down!)

3 In 1-quart bowl, lightly beat the eggs. Gradually stir about a cup of the hot mixture into the lightly beaten eggs, then pour back into the saucepan. The eggs will thin out the pudding. Cook, stirring, over low heat (do not boil) until the pudding thickens, several minutes. Remove from heat, then stir in vanilla extract.

4 Pour into 1.5-quart bowl; cover with lid. Let stand at room temperature for 20 minutes, give it a stir, then place in refrigerator for at least 3 hours or up to 3 days. 

Disclosure: We are a participant in the Amazon Services LLC Associates Program, an affiliate advertising program designed to provide a means for us to earn fees by linking to Amazon .com and affiliated sites. We are a ThermoWorks affiliate, earning a small commission at no cost to you on purchases made through our links. This helps cover some of the costs of running the blog. Thank you for your support.

Jean

04 June 2020

Fig Rolls - Fig Newtons

Fig Rolls - Classic British Biscuit - In US, Fig Newtons / www.delightfulrepast.com

Fig Rolls were something I hadn't made since I was a teenager, and they popped into my head one day when I was painting a pair of figs. But I didn't want to "waste" my fresh figs on a recipe that is best made with dried figs, so it went on the backburner for a while.


Fig Rolls - Fig Newtons (this photo - my watercolor sketch of two figs) / www.delightfulrepast.com

In recent months, during "all this" (and that's all I'm going to say about the pan*em*c), many grocery items have been hard to find. I was so happy to get my hands on some lovely organic soft dried figs last week, so at last, fig rolls. 

So many recipes out there have grossly mismatched amounts of dough and filling. What's the point of having massive amounts of filling left over? My recipe uses all the filling, and I make three round cookies out of the pastry trimmings, so there's no waste.


Fig Rolls - Classic British Biscuit - In US, Fig Newtons (in a lovely tin)  / www.delightfulrepast.com


My dough recipe is adapted from Paul Hollywood's, but I was on my own for the filling because his and so many other recipes make too much for the amount of dough and are not to my taste in one way or another

If you're used to Fig Newtons, you'll find these are not quite as sweet (and they have no corn syrup, high fructose corn syrup, unhealthy oils or additives). A trivia question for you: Were Fig Newtons named after a) Sir Isaac Newton, b) another person named Newton, c) a town in Massachusetts?


Fig Rolls - Classic British Biscuit - In US, Fig Newtons / www,delightfulrepast.com

Please Pin it and share it!

Fig Rolls - Fig Newtons


(Makes 12)

The Dough

1 1/4 dip-and-sweep cups (6.25 ounces/177 grams) unbleached all-purpose flour
1/4 teaspoon non-GMO baking powder
1/8 teaspoon salt
4 tablespoons (2 ounces/57 grams) unsalted butter, softened
3 firmly packed tablespoons (1.31 ounces/37 grams) dark brown sugar
1 large egg, beaten (medium in UK)

1/2 teaspoon vanilla extract

The Filling

3/4 packed cup (5 ounces/142 grams) coarsely chopped soft dried figs
1 firmly packed tablespoon (0.44 ounces/12 grams) dark brown sugar
1/4 teaspoon cinnamon
1/4 teaspoon cardamom
1/3 cup (2.67 fluid ounces/79 ml) water

1 tablespoon lemon juice


1 In small bowl, whisk together flour, baking powder and salt.

2 In medium mixing bowl with electric hand mixer, cream butter and brown sugar well, about 2 minutes. Mix in the egg and vanilla extract until combined; it will look curdled. 

3 On low speed, add the flour mixture in two or three batches until thoroughly combined. Scrape dough out onto a square of plastic wrap (clingfilm), forming it into a smooth square as you wrap it. Chill until firm, about 30 minutes.

4 Make the filling. In a 1-quart heavy-bottomed saucepan, bring chopped figs, brown sugar, cinnamon, cardamom and water to a boil. Reduce heat, cover (lid slightly ajar) and simmer for 10 minutes, until mixture is thick and water is absorbed. Transfer* to a 2-cup glass measure, use an immersion blender to make a paste, stir in lemon juice, and let cool.

* The mixture will not be sufficiently deep even in the small saucepan to use the immersion blender, so you need to transfer it to a deeper, narrower container, such as the 2-cup glass measure. 

5 Preheat oven to 375F/190C/Gas5. On a lightly floured piece of baking parchment paper, roll out chilled dough to a rectangle over 10x8 inches (25x20 cm) and 1/8 inch (1/3 cm) thick. Trim* rectangle to 10x8 inches (25x20 cm). Cut in half lengthwise to make two 10x4-inch (25x10 cm) strips of dough. Also, cut the parchment paper in half because you'll be using it to help you fold over the dough after filling. 

* I save the trimmings and make them into 3 round cookies.

6 Spread half the fig filling down the center of each dough strip and carefully fold in one side of the dough, using the parchment to help you; run a wet finger over the edge of the dough over the filling. Using the parchment, fold over the other side of the dough, overlapping the first side a bit and pressing to seal. Turn the two logs over, seam-side down. Trim the ends and cut each into 6 equal slices. Place them on the baking sheet on their parchment. Bake for 12 to 15 minutes.

Note: Before trimming the ends and cutting the slices, you can press the two logs down a bit to make a flat top, as I do, or leave them round as some do. 


Disclosure: We are a participant in the Amazon Services LLC Associates Program, an affiliate advertising program designed to provide a means for us to earn fees by linking to Amazon .com and affiliated sites. We are a ThermoWorks affiliate, earning a small commission at no cost to you on purchases made through our links. This helps cover some of the costs of running the blog. Thank you for your support. 

Jean