Showing posts with label elevenses. Show all posts

16 November 2023

Bolton Buns - From Jane Austen's Kitchen

Bolton Buns - Currant Buns - From Jane Austen's Kitchen / www.delightfulrepast.com

Bolton Buns, or Currant Buns, were inspired by recent travels. Sort of. My cousin Paula went to England in September; and I went with her, vicariously! She visited sites connected to our Mayflower ancestors on her mother's and my father's side of our families. She sent many lovely photos for my archives. She also visited and sent photos of Chawton House in Hampshire. If you are a Jane Austen fan, I don't have to tell you who lived there from 1809 to 1817.

Then in October Paula sent me a wonderful book for those interested in Jane Austen and/or Regency cooking and life in a "middling" household. The book, Martha Lloyd's Household Book, with annotated transcription by Julienne Gehrer and foreward by Deirdre Le Faye, is an excellent window—kitchen window—into the everyday life of Jane Austen's all-female household at Chawton Cottage. 

More than a cookbook—but if a cookbook is what you like, well, there you go!—it tells us more about our Jane through the eyes of her dear friend, member of her household, and eventually (after Jane's death) sister-in-law. Martha Lloyd, ten years older than Jane, was a remarkable woman in her own right, so one can enjoy this book from several different angles.


Bolton Buns - Currant Buns - From Jane Austen's Kitchen / www.delightfulrepast.com


The recipes are written as one does when writing down the bare bones for one's own use. Just the ingredients, no need for all the details. So I've taken one recipe, Bolton Buns—written Bolton Bunns by Martha—and given you all the details you need to make them. I've halved the recipe and translated all the weights and measures to measures, ounces, and grams so that whether you're in the US or the UK or anywhere at all, you can make the buns. 

The one measure in this recipe that took a bit of interpreting was "a handful of currants." Martha's hands might have been larger or smaller than mine, so her idea of "a handful of currants" might be different from mine. After some deliberation and weighing and measuring, I decided to translate "a handful" to 1/4 cup/1.25 ounces/35 grams—more than a handful in my hand, but anything less seemed pointless.

During that era, rich yeast breads were a popular breakfast item and would likely be seen again at teatime as well.

Do you enjoy making vintage recipes? Do leave a comment and tell me your thoughts. And if anyone has ever heard of Bolton Buns anyplace besides Martha Lloyd's Household Book, let me know. I'm thinking it must have been her own name for her currant buns.  

 
Bolton Buns - Currant Buns - From Jane Austen's Kitchen / www.delightfulrepast.com

If you like it, please Pin it and share it!
 

Bolton Buns - Currant Buns


(Makes 20)

1 1/4 cups (10 fluid ounces/296 ml) milk
4 tablespoons (2 ounces/57 grams) cold unsalted butter
3 dip-and-sweep cups (15 ounces/425 grams) unbleached all-purpose flour, divided
1/4 cup (1.75 ounces/50 grams) sugar
2 teaspoons (0.25 ounce/7 grams) instant yeast
1/2 to 3/4 teaspoon salt
1/4 cup (1.25 ounces/35 grams) currants
1 large egg yolk, room temperature, beaten


1 In 1-quart saucepan (or a 2-cup glass measure in the microwave), heat the milk just until tiny bubbles start to form around the edge of the pan. Add the chunk of cold butter and stir until melted. 

2 In 2- to 2.5-quart mixing bowl (I use this 2-quart glass measure—makes it easy to see when the dough has doubled), measure/weigh the flour, sugar, yeast, and salt. Make a well in the center and add the currants, using your fingers to separate any that are stuck together. Mix them in and make a well in the center again. 

Note: While measuring/weighing the flour, also measure/weigh about 1/4 cup (1.25 ounces/35 grams) of flour separately and set aside for kneading and shaping. You won't need it all, but it's good to have out just in case, so you never have to go back into the cupboard for more when your hands are all floury. Use just enough flour to keep the dough from sticking too much to your hands and counter; a little sticking is fine. Adding too much flour is the ruin of bread.

3 Pour the warm milk mixture and beaten egg yolk into the well. Mix the flour in to form a soft, but not overly wet, dough. The dough should not be sticking to the bowl too much, but come away fairly cleanly.

Clean out the bowl (no need to wash it) and lightly oil it. Knead the dough, using flour from the 1/4 cup, until it is very smooth and silky, about 8 to 10 minutes. Put the dough into the lightly oiled bowl, cover,* let rise until at least doubled, about 2 to 3 hours.

* If you're using plastic wrap, tear off an 18-inch long piece so that you can use it again to cover the shaped buns. I use a silicone lid or mixing bowl lid to cover my 2-quart glass measure and this half sheet pan cover for proofing the buns.

5 Line baking sheet (I use this heavy-duty half sheet pan) with parchment paper. Divide the dough into 20 equal pieces--I, being who I am, 😁 weigh the batch of dough in grams (on this food scale) and divide by 20 (making each bun 45 grams). Shape each piece into a ball. Give it a little roll on the unfloured counter, a motion sort of like moving a computer mouse around, to make a smooth ball. If you used flour, you would not be able to get the needed traction.

6 Place in 4 rows of 5 on prepared baking tray. If using plastic wrap, spray with cooking spray the same piece of plastic wrap you used to cover dough, cover buns lightly and let rise about 1 hour or so. They will not be doubled, just puffy. 

7 During the last 15 or 20 minutes (depending on your oven), preheat oven to 400F/205C/Gas6.

8 Bake for about 13 to 15 minutes, or until golden brown. Let cool slightly for a few minutes before serving. If you want the crust to be its softest, lay a pristine kitchen towel over the buns. 

Disclosure: We are a participant in the Amazon Services LLC Associates Program, an affiliate advertising program designed to provide a means for us to earn fees at no cost to you by linking to Amazon .com and affiliated sites. This helps cover some of the costs of running the blog. Thank you for your support. 

Jean

If you liked this post, please Pin it and share it!


13 October 2022

Chewy Ginger Treacle Cookies

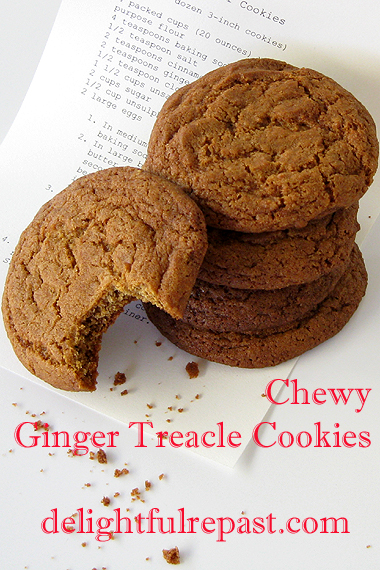
Chewy Ginger Treacle Cookies - Molasses Ginger Cookies / www.delightfulrepast.com


Chewy Ginger Treacle Cookies are just the thing to bake on a brisk autumn day. The spicy aromas wafting around create instant hygge. If you're in the US, you might know these as Ginger Molasses Cookies.

Whatever you call them, they will no doubt evoke cozy feelings and nostalgia, even if you've never had them before. They're an annual tradition in some homes, but they're delightful all year round.

Wonderful with a glass of cold milk or a cup of coffee, they go especially well, I think, with a nice cup of tea. I hope you'll try them soon and let me know what you think in the comments below. Happy Autumn! 
   

Chewy Ginger Treacle Cookies - Molasses Ginger Cookies / www.delightfulrepast.com

If you like it, please Pin it and share it!


Chewy Ginger Treacle Cookies


(Makes 4 dozen 3-inch cookies)

4 dip-and-sweep cups (20 ounces/567 grams) unbleached all-purpose flour
4 teaspoons baking soda
1/2 teaspoon salt
2 teaspoons cinnamon
2 teaspoons ginger
1/2 teaspoon cloves
1 1/2 cups (12 ounces/340 grams) unsalted butter, room temperature
2 cups (14 ounces/397 grams) sugar
1/2 cup (4 fluid ounces/118 ml/5.73 ounces/162 grams) black treacle or unsulphured molasses
2 eggs (medium in UK, large in US)

1 In medium bowl, whisk together flour, baking soda, salt and spices.

2 In large bowl of electric mixer, beat butter and sugar on medium speed for 30 seconds. Add molasses, then eggs, and beat until light and fluffy. Slowly beat in flour mixture. Cover and refrigerate for an hour.

3 Preheat oven to 375F/190C/Gas5. Place #40 scoops* (1.5-tablespoon 1.25-inch balls) 3 inches apart on parchment-lined baking sheets. Bake for about 10 to 12 minutes. For crisp cookies, bake a bit longer, watching carefully so that they don't burn.

Note: Of course, if you want to get really persnickety about the cookies being exactly the same size, you can weigh the dough in grams and divide by 48 and come up with something like 35 grams each.

4 Cool on baking sheet for 1 minute, then remove to wire racks to cool completely. Store in airtight container.

* If you don't have a Number 40 Squeeze Disher Scoop, you need to get one now! I don't know how people make cookies without it! And here is my favorite kitchen timer; since I got this ThermoWorks TimeStack, I haven't looked back!

Disclosure: We are a participant in the Amazon Services LLC Associates Program, an affiliate advertising program designed to provide a means for us to earn fees by linking to Amazon .com and affiliated sites. We are a ThermoWorks affiliate, earning a small commission at no cost to you on purchases made through our links. This helps cover some of the costs of running the blog. Thank you for your support.

Jean

If you liked this post, please Pin it and share it!

05 August 2021

Summer Peach Cake

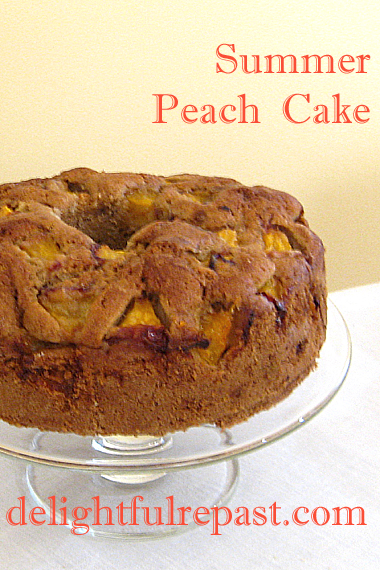
Summer Peach Cake / www.delightfulrepast.com

It's the height of summer, it's hot, but bake I must! After being out of commission following hand surgery, I simply had to bake at the first opportunity. And what better to bake than something with peaches (or nectarines), my favorite summer fruit.

But I needed to break-in the hand with something easy-breezy, no-muss-no-fuss, which means no machines, no peeling, no laborious whisking, just stir up the simple ingredients and throw it in the oven!

The only thing I really like about summer is the summer fruit! And, while I might occasionally enjoy the mild flavor of a white peach or nectarine on its own, the yellow varieties are much better in cakes and pies. And please don't peel them. The peel adds color and makes it even prettier.


Summer Peach Cake (this image, my original watercolor of a yellow peach) / www.delightfulrepast.com
Loved painting this perfectly ripe yellow peach; it smelled soooo good!


I developed this recipe for a 7-inch springform or push-bottom pan (also called a cheesecake pan). And I use an Ateco Stainless Steel 2x3-inches-high Round Form that turns any pan into a tube pan to prevent those center-of-the-cake baking challenges of deep pans and/or heavy batters, but I've also made the cake without it.

Thank you for all your good wishes on my hand surgery. I hope you're enjoying a beautiful summer and will make this, or something peachy, before they're gone. I love peach anything, but I am particularly fond of Peach Pie with Lattice Crust. How about you?


Summer Peach Cake / www.delightfulrepast.com

If you like it, please Pin it and share it!

Summer Peach Cake


(Makes one 7-inch cake)

1 stick (4 ounces/113 grams) unsalted butter, melted
1 1/4 dip-and-sweep cups (6.25 ounces/177 grams) unbleached all-purpose flour
2/3 cup (4.67 ounces/132 grams) sugar
1 teaspoon non-GMO baking powder
1/2 teaspoon baking soda
1/2 teaspoon salt
3/4 teaspoon cinnamon
1/8 teaspoon mace or nutmeg
2 large eggs, room temperature
1 pound (16 ounces/454 grams/2 large) yellow peaches or nectarines, cut into 1/2-inch chunks
1 tablespoon dark brown sugar

1 Grease well and flour a 7-inch springform or push-bottom pan. I use my Ateco Stainless Steel 2x3-inches-high Round Form to turn my 3-inch deep 7-inch pan into a tube pan to prevent those center-of-the-cake baking challenges of deep pans and/or heavy batters like this. Just grease and flour it and center it in the pan and hold it steady while you fill in the batter around it. Preheat oven to 350F/180C/Gas4. Melt the butter and set aside to cool. 

Tip: A circle of baking parchment in the bottom of the pan is always good, though I forgot to do it today.

2 In 2- to 3-quart bowl, combine flour, sugar, baking powder, baking soda, salt, cinnamon, and mace or nutmeg. Whisk together well to "sift."

3 Scrub well—don't peel—and dice the ripe but firm peaches or nectarines into a small mixing bowl; set aside. You'll have about 3 cups. Take out 1 cup of the fruit to put on the top.

Note: I almost never peel organic peaches. I just wash them very well and rub off the fuzz. The colorful skin adds nutrition and a beautiful color to whatever you're making.

4 Add the eggs and cooled melted butter to the flour mixture. With a large spoon, beat well until thoroughly combined. Stir the fruit (except the 1 cup) into the batter.

5 Scrape the thick batter into prepared pan, press down and smooth the top, and press the reserved cup of diced fruit into the top of the batter. Sprinkle with the brown sugar. Bake for about 65 to 75 minutes, until it passes "the toothpick test" or is pulling away from the sides of the pan a bit. Do not underbake!

Note: I love this TimeStack quad timer sooooo much!

6 Cool in pan on wire rack for 10 minutes, then turn cake out of pan right side up and continue cooling on wire rack for 2 hours. If you remembered to use a circle of parchment, it will be much easier to lift the cake off the springform pan bottom! Before serving, you might give it a dusting of powdered sugar. And a little whipped cream is never a bad idea.

Disclosure: We are a participant in the Amazon Services LLC Associates Program, an affiliate advertising program designed to provide a means for us to earn fees by linking to Amazon .com and affiliated sites. We are a ThermoWorks affiliate, earning a small commission at no cost to you on purchases made through our links. This helps cover some of the costs of running the blog. Thank you for your support.

Jean

29 April 2021

Fresh Strawberry Scones

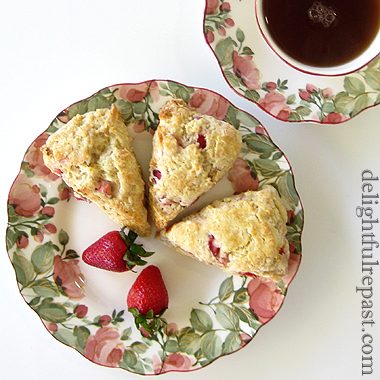
Fresh Strawberry Scones / www.delightfulrepast.com

Fresh strawberry scones popped into my head when I realized it was nearly May, the official, or traditional, start of Strawberry Season in the UK.

It will soon be time for tea in the garden, and these will be on the menu often. I'm dreaming of afternoon tea parties when we're able to do that once again.

Don't use frozen strawberries for this as there is too much liquid, and don't put any sugar on the fresh berries as that will draw out the juices.

If your strawberries seem especially juicy, place the diced berries between two layers of paper towels for about 20 minutes to prevent soggy scones.

Fresh Strawberry Scones (this photo, my watercolor sketch of two strawberries) / www.delightfulrepast.com

If you're one of those people who like a glaze on their scones, you're on your own for that because I am one of those people who don't!

You may or may not want to put a bit of strawberry jam on your Fresh Strawberry Scones—for me, that would be "gilding the lily," as Jacques Pepin would say—but a little Clotted Cream is always in order!

Fresh Strawberry Scones / www.delightfulrepast.com
If you like it, please Pin it and share it!

Fresh Strawberry Scones


(Makes 16 scones)

1 to 1 1/2 cups (5.75 to 8.625 ounces/163 to 245 grams) diced fresh strawberries (1/4-inch dice)
Finely grated zest of a medium orange
3/4 cup (6 fluid ounces/177 ml) milk
2 teaspoons cider vinegar
2 1/2 dip-and-sweep cups (12.5 ounces/354 grams) unbleached all-purpose flour
1/3 cup (2.33 ounces/66 grams) sugar
2 teaspoons baking powder
1/2 teaspoon baking soda
1/2 teaspoon salt
8 tablespoons (4 ounces/113 grams) cold unsalted butter, coarsely shredded or cut into little cubes
1 large egg (medium, if you're in the UK)*
1 teaspoon vanilla extract

* Pay attention to step 3 if you don't want to be one of those people who wastes an egg for the egg wash.

1 Wash and dice the strawberries. Zest the orange. Preheat oven to 500F/260C/Gas10.

2 In 1-cup glass measuring cup stir together milk and cider vinegar; let stand to thicken a bit for 5 minutes or so as you proceed. Line a large baking sheet with parchment and sprinkle a bit of flour lightly in two 6-inch circles.

Tip: My OXO Good Grips bench scraper has a 6-inch ruler on the edge of its stainless steel blade, making it a perfect multi-use tool for making scones.

3 In medium mixing bowl whisk together the flour, sugar, baking powder, baking soda and salt. With your fingers, rub the butter (shredded with the Microplane extra coarse grater) into the flour mixture until it resembles coarse meal or fine breadcrumbs. Mix in the orange zest and diced strawberries to coat and separate. Add the egg to the soured milk and whisk together; remove 1 tablespoon of the mixture to use as an egg wash. Add the vanilla extract to the measuring cup.

Tip: It’s best to keep ingredients cool. If it’s a hot day, or your hot little hands are making the butter melt, pop your mixing bowl in the fridge or freezer for a few minutes.

4 With a large fork stir the wet mixture, a little at a time, into the dry mixture and gently mix until just combined. You may not need to use all of it (or you might need to add a bit more milk); use just enough to make a soft, but not wet or sticky, dough. Do the final mixing with your hand; the dough should not be sticking to your hand or the bowl. Do not knead; there's no need to knead!

5 Divide the dough into two roughly equal smooth balls (no need to weigh, but I love my food scale and know that each half weighs a pound!) and place them on the floured circles and gently pat the dough, dusting with flour as needed, into two 6- to 6.25-inch (15 to 16 cm) rounds. Take a moment to make sure your discs are smooth and flat, almost 1-inch (2.5 cm) thick, and have smooth, straight edges. With a bench scraper or long sharp knife, cut each round into 8 wedges. Pull the wedges out and space them an inch or two apart.

Tip: Again, if it’s a hot day, or the heat of your hands has softened the dough, pop your baking sheet in the fridge to cool the discs off before cutting them into wedges.

6 With silicone pastry brush, brush tops only with the reserved tablespoon of milk-egg mixture. Place in oven, and immediately reduce oven temperature to 400F/205C/Gas6. Bake for about 18 to 20 minutes or until lightly golden brown. Serve with Clotted Cream (or Clotted Cream - Stovetop Method) and Strawberry Jam.

Note: If you are one who prefers your tea in a mug, I recommend a mug with a lid and stainless steel infuser. Makes using loose leaf tea just as easy and convenient as using tea bags.


Disclosure: We are a participant in the Amazon Services LLC Associates Program, an affiliate advertising program designed to provide a means for us to earn fees by linking to Amazon .com and affiliated sites. We are a ThermoWorks affiliate, earning a small commission at no cost to you on purchases made through our links. This helps cover some of the costs of running the blog. Thank you for your support.

Jean

18 March 2021

Clotted Cream - Stovetop Method

Clotted Cream - Stovetop Method - An Afternoon Tea Essential / www.delightfulrepast.com

As I pointed out in my
Clotted Cream Tutorial, clotted cream, which doesn't sound that appealing to the uninitiated, is the delectable accompaniment to scones that elevates that simple bake to an Occasion. And, of course, it has other delicious applications.

While I couldn't be happier with my Clotted Cream - Oven Method, I have friends whose oven either does not have that low of a temperature setting or does not hold a very steady temperature or will time out before 12 hours is up. I even have friends in studio apartments without an oven. So I wanted to come up with a good and easy stovetop method.

As with the oven method, this does not require your standing at the stove for hours on end. Once you get it going, you can pretty much just go about your business. This must not be stirred or jostled, so it benefits from benign neglect once you have your just-barely-a-simmer temperature established.

Do you love clotted cream as much as I do?


Clotted Cream - Stovetop Method - An Afternoon Tea Essential / www.delightfulrepast.com

If you like it, please Pin it and share it!

Clotted Cream – Stovetop Method


(Makes about 1 cup)

1 pint (16 fluid ounces/473 ml) heavy whipping cream


1 Fill base of double boiler with water to about 1.5 inches (in mine, that means 1 quart). Bring to barely a simmer. Place double boiler insert over the water. It must not touch the simmering water.

Tip: If you don’t have a double boiler, you can use a stainless steel or glass mixing bowl over a large saucepan.

2 Pour 2 cups (16 fluid ounces/473 ml) of heavy whipping cream into top of double boiler. The cream should not be more than 1 inch deep. Leave the lid off. Check by ear every once in a while to make sure the water is barely simmering. If you have an instant-read thermometer, it should register somewhere in the 185F/85C to 200F/94C range.

3 Gently heat the cream at barely a simmer, uncovered, never stirring, for 4 hours. Being careful to not slosh the cream around, remove the top pan from the base and set it on a wire rack to cool at room temperature for 1 hour. Then cover and refrigerate for 12 hours.

4 Lift up a "corner" of the chilled clotted cream and pour off the liquid* underneath into a 1-cup glass measure; use it in your next batch of scones, pancakes, or whatever you happen to be making. Scoop up layer of clotted cream into jar or serving dish. Keeps for several days, covered and refrigerated. Or you can freeze it

* When you pour off that liquid, you don't have to get every last drop out. Usually the underside of the clotted cream layer is quite wet and might actually drip as you spoon it into a container. The contents of the container can seem quite wet, but it all melds together in the refrigerator.

Note: These cute little 4-ounce freezer-safe canning/storage jars with plastic caps are perfect for clotted cream. One recipe makes two jars. 

Disclosure: We are a participant in the Amazon Services LLC Associates Program, an affiliate advertising program designed to provide a means for us to earn fees by linking to Amazon .com and affiliated sites. We are a ThermoWorks affiliate, earning a small commission at no cost to you on purchases made through our links. This helps cover some of the costs of running the blog. Thank you for your support.

Jean

24 December 2020

Cherry Almond Tea Loaf

Cherry Almond Tea Loaf / www.delightfulrepast.com


Cherry Almond Tea Loaf is a recipe I developed when I found myself with too many dried cherries on hand—a nice problem to have!—and almond flour that needed to be used before it expired.

If you've had more than enough super sweet treats this month, you'll enjoy this not-too-sweet cake with its slightly tart cherries. Be sure to use plain dried cherries rather than sugary glacé cherries.

And if you're one of those people who doesn't like dried fruits, trust me, these dried cherries plumped for a short time in a bit of hot water do not seem at all like your usual dried fruit.

I want to bake it in a 3-inch deep 7-inch round pan next time, for serving on my little clear glass pedestal cake plate. Yes, I'm still thinking "tea party" after ten months of no such thing! I hope you are doing well. See you next year!

Cherry Almond Tea Loaf / www.delightfulrepast.com


Cherry Almond Tea Loaf


(Makes 1 9x9x4-inch or 9x5x3-inch loaf cake) 

2 packed cups (10 ounces/283 grams) dried cherries
1/2 cup (4 fluid ounces/118 ml) boiling water
1 1/2 dip-and-sweep cups (7.5 ounces/213 grams) unbleached all-purpose flour
1/2 firmly packed cup (2 ounces/57 grams) super-fine almond flour (ground almonds)
1 1/2 teaspoons baking powder
1/2 teaspoon salt
1 3/4 sticks (7 ounces/198 grams) unsalted butter, room temperature
1 cup (7 ounces/198 grams) sugar 
3 large eggs, room temperature
1 teaspoon vanilla extract 
1/2 teaspoon almond extract


1 In a 3-cup shallow bowl, pour 1/2 cup boiling water over the dried cherries. Cover and let stand for 20 minutes, stirring once halfway through, then drain thoroughly, reserving the liquid. Maybe give it 15 seconds or so in the microwave at that halfway point (sometimes I do, sometimes I don't). 

2 Grease and flour, or spray with cooking spray, a 9x4x4-inch loaf pan or 9x5x3-inch loaf pan. I use a teaspoon of softened butter and 1 tablespoon of flour. Preheat oven to 350F/180C/Gas4. 

Note: I love the square shape of the 9x4x4-inch loaf pan that I initially got for baking my gluten-free yeast breads but use (without its lid) for nearly everything that calls for a 9x5x3-inch pan. 

3 In 2-quart glass measure or mixing bowl, whisk together flour, almond flour, baking powder and salt. Whisking the daylights out of the dry ingredients takes the place of sifting. 

4 In 2.5- to 3-quart bowl, cream the softened butter and sugar until light and fluffy. Beat in the eggs one at a time, adding in just a spoonful of the flour mixture if needed to keep the mixture from curdling. Stir in the vanilla and almond extracts.

5 Dump the flour mixture on top of the creamed mixture, then put the thoroughly drained cherries on top of the flour, and kind of dust the cherries with the flour. Then stir gently just until mixed. This keeps the cherries from sinking to the bottom of the loaf.

6 Stir in 1/4 cup (2 fluid ounces/59 ml) of the reserved liquid. 

7 Scrape into prepared loaf pan and bake for 15 minutes. Reduce oven temperature to 325F/165C/Gas3 and continue baking for about 50 to 60 minutes. 

8 Cool in pan on wire rack for 10 minutes before turning out onto wire rack. Continue cooling for an hour.

Disclosure: We are a participant in the Amazon Services LLC Associates Program, an affiliate advertising program designed to provide a means for us to earn fees by linking to Amazon .com and affiliated sites. We are a ThermoWorks affiliate, earning a small commission at no cost to you on purchases made through our links. This helps cover some of the costs of running the blog. Thank you for your support. 

Jean

23 July 2020

Banana Nut Cookies

Banana Nut Cookies - Banana Nut Oatmeal Cookies / www.delightfulrepast.com

Banana nut cookies, or more specifically, banana nut oatmeal cookies, popped into my head a few days ago when I noticed the bananas ripening much faster than usual. So I quickly mashed them, measured them into portions for this recipe, and popped the half-pint jars in the freezer. 

Then I moved a jar from freezer to refrigerator the night before to thaw. I always bring out the cold bananas along with the eggs and butter an hour before making the dough so that all ingredients are at cool room temperature.

Banana Nut Cookies (this is my watercolor painting of the bananas) / www.delightfulrepast.com
I've been painting the groceries again!


Mr Delightful, who also loves my regular Oatmeal Cookies, says these are the best cookies he's ever had in his whole life! So I hope you'll give them a try and let me know what you think.

Pairing beautifully with a cup of tea, they are perfect for elevenses; with coffee, for a coffee break; with milk, for a more-wholesome-than-most lunchbox or afternoon snack. 

Banana Nut Cookies - Banana Nut Oatmeal Cookies / www.delightfulrepast.com

Banana Nut Oatmeal Cookies


(Makes 3 1/2 dozen)

1 1/2 dip-and-sweep cups (7.5 ounces/213 grams) unbleached all-purpose flour
1 teaspoon baking soda
1/2 teaspoon salt
1/2 teaspoon cinnamon
1/4 teaspoon nutmeg
3 cups (10.5 ounces/300 grams) old-fashioned rolled oats
1 cup (4 ounces/113 grams) chopped walnuts or pecans
1 stick (4 ounces/113 grams) unsalted butter, cool room temperature
3/4 firmly packed cup (5.25 ounces/149 grams) dark brown sugar
1/2 cup (3.5 ounces/99 grams) sugar
2 large eggs (medium in UK)
1 teaspoon vanilla extract
3/4 cup (6.5 ounces/184 grams) mashed very ripe bananas

1 In medium bowl, whisk together flour, baking soda, cinnamon, nutmeg and salt. Stir in oats and nuts.

2 In large bowl with electric hand mixer, beat butter on medium speed for 30 seconds. Add sugars and beat until light and fluffy. Use a wooden spoon if you need to; mixture must be smooth and well creamed. Beat in eggs and vanilla, then the mashed banana. Stir in the flour-oat mixture. Cover and refrigerate for 1 hour or up to a few days. (Very cold dough will need to sit at room temperature for a bit to become more scoopable.)

3 Preheat oven to 350F/180C/Gas4. Drop #40 scoops* (0.8 ounces or approximately 1.5 tablespoons) of dough 3 inches apart on parchment-lined cookie sheets. With a glass (I use a 2 1/4-inch diameter flat-bottomed 1/3-cup from my stainless steel measuring cup sets), press each scoop into a 2 1/4-inch round. Bake for about 13 to 15 minutes, or until brown around the edges but still a little soft in the center.

Banana Nut Cookies - Banana Nut Oatmeal Cookies / www.delightfulrepast.com

4 Remove to wire racks to cool completely. Store in airtight container. I use these Pyrex 11-cup rectangular storage dishes with lids as cookie jars, among other things. One holds half a batch of these cookies.

* If you don't have one of these #40 scoops, you need to get one now! How do people make cookies without it!

To freeze dough: Drop scoops of dough on foil-lined cookie sheet and flatten slightly, as directed above. Freeze, then wrap.

Disclosure: We are a participant in the Amazon Services LLC Associates Program, an affiliate advertising program designed to provide a means for us to earn fees by linking to Amazon .com and affiliated sites. We are a ThermoWorks affiliate, earning a small commission at no cost to you on purchases made through our links. This helps cover some of the costs of running the blog. Thank you for your support. 

Jean

21 May 2020

Easy Yeasted Cinnamon-Nut Coffee Cake

Easy Yeasted Cinnamon-Nut Coffee Cake / www.delightfulrepast.com

This easy yeasted cinnamon-nut coffee cake is what I had in mind last month when I said about my Pan Bread recipe: You can even turn it into a coffee cake by using melted butter instead of olive oil and giving it a swirl of cinnamon sugar and a streusel topping. 

And you can certainly do just that, but this recipe takes it just a step further, while still keeping it super easy. I've enriched the dough with an egg, milk and a bit more butter. And I have you easily shaping the dough on the countertop before plopping it unceremoniously into the pan.

Still no need to knead or drag out the heavy-duty stand mixer; just stir it with the handle of a sturdy wooden spoon. I'll be making this again soon. And as soon as I can get my hands on some good yellow peaches, I'll be making Peach Kuchen, another easy coffee cake.

Of course, I eat it with tea. How about you?

Easy Yeasted Cinnamon-Nut Coffee Cake / www.delightfulrepast.com

Easy Yeasted Cinnamon-Nut Coffee Cake


(Makes one 13x9-inch coffee cake)

The Dough


3 1/4 dip-and-sweep cups (16.25 ounces/461 grams) unbleached all-purpose flour
1/4 dip-and-sweep cup (1.25 ounces/35 grams) unbleached all-purpose flour, set aside for shaping 
1/4 cup (1.75 ounces/50 grams) sugar
2 1/4 teaspoons (1 package/0.25 ounce/7 grams) instant yeast
1 1/4 teaspoons (0.25 ounce/7 grams) salt
1 1/4 teaspoons cardamom
2/3 cup (5.33 fluid ounces/158 ml) milk plus 2/3 cup water, heated to very warm (120 to 130F/49 to 54C)
6 tablespoons (3 ounces/85 grams) unsalted butter, melted, divided

1 large egg

The Filling


1/4 cup (1.75 ounces/50 grams) sugar
2 teaspoons cinnamon

The Cinnamon-Nut Topping 

1 cup (4 ounces/113 grams) finely chopped pecans or walnuts 
2 tablespoons unbleached all-purpose flour
1/4 cup (1.75 ounces/50 grams) sugar
2 teaspoons cinnamon
Pinch of salt


The Glaze 


1/2 packed cup (2 ounces/57 grams) unsifted powdered sugar
1 tablespoon water, milk, juice or brandy
1/4 teaspoon vanilla extract 

1 Start dough 3 hours before you plan to serve the coffee cake. In large bowl, whisk together flour, sugar, yeast, salt and cardamom. Add heated milk and water, egg and all but 2 tablespoons of the melted butter and stir vigorously with dough whisk or large spoon until combined and then for one minute. Cover and let rest for about 20 minutes while you make the filling and topping and prepare the baking dish.

Note: I always use one of my ThermoWorks thermometers (Thermapen or ThermoPop) to check the temperature. It's important that the temperature be in the given range. If the liquid is too hot, it can kill the yeast.

2 Make the filling; in small bowl, stir together sugar and cinnamon. Make the topping; in small bowl, stir together nuts, flour, sugar, cinnamon and salt.

3 Spray sides and bottom of a 13x9x2-inch baking dish or pan with cooking spray. Line bottom with a sheet of parchment paper long enough to go up the short sides of the pan. Spread 1 tablespoon of the oil or melted butter over the parchment. 

4 Working from the reserved 1/4 cup of flour, lightly flour work surface. Scrape the sticky dough onto the flour. Lightly flour the dough and press it into roughly a 13x9-inch rectangle. Spread cinnamon-sugar mixture over the dough. Starting at one of the short ends, roll the dough loosely and place it lengthwise in the prepared baking dish. Press the dough down to fit the dish. 

5 With fingers, rub on the remaining melted butter. Sprinkle the nut topping evenly over the buttered dough. With buttery fingers, press the nut topping into the dough. Cover loosely and let rise for about 1 to 1 1/2 hours.

6 During last 15 minutes, preheat oven to 375F/190C/Gas5. Bake for 30 to 35 minutes, or until golden brown. 

7 Let stand 5 minutes before turning out onto wire rack (This is when you'll be so happy that you used the parchment paper!) or leave it in the pan.

8 Let the coffee cake cool about 20 minutes; make glaze. Whisk together powdered sugar, liquid and vanilla extract. Drizzle over lukewarm cake. Cut into 15 or more squares.


Disclosure: We are a participant in the Amazon Services LLC Associates Program, an affiliate advertising program designed to provide a means for us to earn fees by linking to Amazon .com and affiliated sites. We are a ThermoWorks affiliate, earning a small commission at no cost to you on purchases made through our links. This helps cover some of the costs of running the blog. Thank you for your support. 

Jean

27 February 2020

Cornish Splits - Devonshire Splits

Cornish Splits - Devonshire Splits - A British West Country Classic / www.delightfulrepast.com

A Cornish Split - or Devonshire Split - was the original star of the famous "cream teas": of Cornwall and Devon. Though you'll more often find a cream tea with scones, the split is a classic as well.


Cornish or Devonshire Splits - A British West Country "Cream Tea" Classic / www.delightfulrepast.com


No one appreciates a good scone more than I, but this week I was in the mood for a lovely yeast bun for my cream tea, so here they are! Not a crusty bun, it is neither egg-washed nor well-browned. In fact, a tea towel is spread over them as they cool so as to keep them soft.


Cornish Splits - Devonshire Splits - A British West Country Classic / www.delightfulrepast.com
Of course, I had to make a batch of Strawberry Jam and a batch of Clotted Cream 
to fill the splits. But I could spare two berries to "model" for me for this little
watercolor sketch. 


Unlike scones, which are served alongside the accompanying clotted cream and jam (or lemon curd), Splits are served, well, split, and filled with the cream and jam and given a dusting of icing sugar (powdered sugar).

These were so delicious with a pot of Rishi Tea organic loose leaf Earl Grey. Have you ever had Cornish or Devonshire Splits?

Cornish Splits - Devonshire Splits - A British West Country Classic / www.delightfulrepast.com


Cornish Splits - Devonshire Splits


(Makes 18 buns)

The Buns

3 3/4 dip-and-sweep cups (18.75 ounces/532 grams) unbleached all-purpose flour
1/4 cup (1.75 ounces/50 grams) sugar
2 1/4 teaspoons (1 package/0.25 ounce/7 grams) instant yeast
1 1/4 teaspoons (0.25 ounce/7 grams) salt
6 tablespoons (3 ounces/85 grams) unsalted butter
3/4 cup (6 fluid ounces/177 ml) milk
3/4 cup (6 fluid ounces/177 ml) water

1 large egg (medium in UK), lightly beaten

The Filling

Strawberry Jam 
Clotted Cream

1 In large bowl, whisk together flour, sugar, yeast and salt. In small saucepan, heat together butter, milk and water until butter is melted and mixture is very warm, but not more than 130F/54C on an instant-read thermometer. Line two baking sheets with parchment. I use one half sheet pan and one quarter sheet pan for this recipe. Lightly oil a 2-quart bowl for proofing the dough. I use a 2-quart glass measure, which makes it very easy to tell when the dough has doubled. 

2 With dough whisk or large wooden spoon, stir warm liquid and beaten egg into flour mixture until blended. The dough will be very sticky.

3 Measure out 1/2 dip-and-sweep cup (2.5 ounces/71 grams) of unbleached all-purpose flour to work from while kneading the dough. This will keep you from the common problem of adding too much flour and ruining your dough. Lightly flour the countertop and scrape the dough onto it. Lightly flour the top of the dough and knead for 10 minutes, adding just a bit of flour as needed. You will likely need anywhere from 1/4 cup to slightly less than 1/2 cup.

4 Shape the dough into a smooth ball and place it in a lightly oiled bowl (I use a 2-quart glass measure), cover with lid or plastic wrap, and let rise until doubled, about an hour or so.

5 Deflate the risen dough by pressing your fist into the middle of it. Turn the dough out onto the counter, no need for flour. Divide the dough into 18 equal pieces. I'm pretty particular about my buns and rolls being identical, so I weigh the dough (in this case, my dough was 2 pounds 7 ounces/1106 grams) on my OXO Good Grips digital food scale, divide the grams by 18 (in this case, coming out to be about 61 grams per bun), then I weigh each little hunk of dough as I go. Roll the piece of dough between your palms until smooth, then do this to shape it into a nice round bun. Cup your hand over it like a "cage" and move your hand rapidly in an outward motion.


6 Place the buns on the parchment-lined baking sheets and cover with lids or plastic wrap. I don't like using plastic wrap, so I have rimmed baking sheets that come with lids! Let rise until doubled, about 45 minutes or so. During the last 15 minutes, preheat oven to 375F/190C/Gas5.


Cornish Splits - Devonshire Splits - A British West Country Classic (this photo, buns rising on lidded baking sheet) / www.delightfulrepast.com


7 I bake one sheet at a time. Bake for about 15 minutes (you know your oven), until buns are just golden brown and sound hollow when tapped. Transfer to wire cooling rack and cover with a tea towel. Cool completely.

8 When ready to serve, slice the buns diagonally from about a third of the way down in the front to about two-thirds of the way down in the back, but do not slice all the way through. Put in a spoonful of strawberry jam (about 2 level teaspoons works for me) and spread it over both the top and bottom. Then put in a spoonful of clotted cream (about the same amount). Arrange the filled splits on a serving platter or tray, and dust with a little icing sugar.

Disclosure: We are a participant in the Amazon Services LLC Associates Program, an affiliate advertising program designed to provide a means for us to earn fees by linking to Amazon .com at no cost to you on purchases made through our links. This helps cover some of the costs of running the blog. Thank you for your support. 

Jean