Showing posts with label tutorial. Show all posts

21 December 2023

Wild Yeast Sourdough Simplified - A Tutorial

Wild Yeast Sourdough Simplified - A Tutorial / www.delightfulrepast.com

I developed my simplified sourdough a few years ago to shorten the process from the typical way I used to make sourdough bread, which was either a 28- or 36-hour process (from first feeding of the starter to time to shape the loaf). That was fine for me at that time, but when that became inconvenient I came up with my Sourdough Simplified method.

For quite some time, that was wonderful. Still is, but as my starter matured and the two rise times shortened, the bread was just not the same. While still good, it lost most of its characteristic tang and chewiness. And I'm afraid Mr Delightful has gotten spoiled with his homemade sourdough toast every morning of his life and has gotten quite particular!

Well, I was not inclined to go back to the original process, so I added a step—a pre-ferment—to my simplified sourdough process. And it worked! So I wanted to write up this postscript for you so that if you are working with a mature starter but want to speed things up as much as you can without sacrificing flavor and texture, you can. This shortens the usual method by 10 to 18 hours from start to shaping.

If you think sourdough is too much trouble, you will be amazed at how trouble-free this method really is. There is none of that annoying feeding and discarding, no having to cater to your starter to keep it going. Just put your little pint jar in the refrigerator and neglect it for weeks or months at a time until you want to make bread. Then stir it up, take out what you need, replenish it, and forget about it until next time.

The following schedule is my schedule. You can pick any time you want. And these times are approximate because there are many variables. The main thing is that you pick a time, probably in the morning, on a day that you want to make the bread; subtract 12 hours from that and start your pre-ferment at that time.

My schedule for this is: 
Day 1 —  6:00pm Make the pre-ferment and let rise for 12 hours. Replenish the jar of starter.
Day 2 —  6:00am Make the dough. Let rise until doubled (variable, but mine currently takes 5 1/2 hours). 
Day 2 —11:30am (variable) Shape the loaf. Let rise until doubled (variable, but mine currently takes 2 hours).
Day 2 —  1:30pm (variable) Bake.

For me, this schedule means I can stir up the pre-ferment after dinner (I do Intermittent Fasting and don't eat after 6:00pm) and forget about it till I get up the next morning and make the dough. Then I have several hours to myself before it's time to shape the loaf and then 2 hours till I need to preheat the oven, bake, and take it out of the oven. So by 2:15pm, the finished loaf is cooling off and so am I!


Wild Yeast Sourdough Simplified - Sandwich Loaf - A Tutorial / www.delightfulrepast.com


If you're new to wild yeast (no added commercial yeast) sourdough baking or you just don't currently have a starter, I've outlined my streamlined starting a starter process in the Sourdough Simplified post. If you already have a starter but want to learn how to maintain it in a pint canning jar with no discarding or other faffing about (basically, just ignoring it!), see the directions below. Happy baking! 


Wild Yeast Sourdough Simplified - Boule - A Tutorial / www.delightfulrepast.com

 If you like this post, please Pin it and share it!


Sourdough Sandwich Loaf or Boule


(Makes one large loaf)

The Pre-Ferment

1/2 cup (4.5 ounces/128 grams) mature stirred-down 100% hydration starter
5.5 fluid ounces (163 grams or ml) room temperature water
1 dip-and-sweep cup (5 ounces/142 grams) unbleached all-purpose flour 

The Dough

7 fluid ounces (207 grams or ml) room temperature water
1 1/2 teaspoons to 1 3/4 teaspoons (0.35 ounce/10 grams) salt (I use 1 1/2 teaspoons)
3 dip-and-sweep cups (15 ounces/425 grams) unbleached all-purpose flour

Note: Before we get started, let me say one more thing. If you do not have a kitchen scale, get one. It is something else that will simplify your life. I've used one for decades, probably because I grew up with English cookery books, and switched to this digital one, OXO Good Grips 11-pound digital scale (pictured below), when I found it years ago.

1 For the pre-ferment: At 6:00 pm (or whatever your chosen time is), in 2-quart glass measure, stir together the starter and water, then flour. Cover loosely and let stand at room temperature for 12 hours. Replenish the starter.

Maintaining Starter: Unless you're baking bread every day or two, keep the starter in the refrigerator and feed only to replenish. I keep about 3/4 cup (6.75 ounces/192 grams) of starter in a pint canning jar. Though I won't be feeding the starter, after taking out 1/2 cup (4.5 ounces/128 grams) for the loaf, I need to replenish the starter in the jar and so feed it with 2.25 ounces (64 grams) each flour and water, stir it vigorously and let stand at room temperature for about 1 to 4 hours (you should see some bubbles, but not too many), then refrigerate until the next bake.


Wild Yeast Sourdough Simplified - Starter / www.delightfulrepast.com


2 At 6:00 am (or 12 hours after your chosen start time), make the dough. Stir water and salt into the pre-ferment, then the flour. Cover loosely with lid or lightly oiled plastic wrap and let stand at room temperature about 6 hours, or until the dough has doubled. It all depends on variables like your starter and the temperature of your kitchen.

As the starter matures, the rise time shortens. At some point, the first rise might take only 5 hours and the second, less than 2 hours. If longer rise times better suit your schedule, you can reduce the amount of starter used in the dough.

Wild Yeast Sourdough Simplified - A Tutorial / www.delightfulrepast.com

  
3a For Sandwich Loaf: Grease the bread pan. I use a 9x4x4-inch (1.5-pound) pullman pan. It's about the same capacity as a 9x5x3-inch loaf pan. Using no more than 1/8 cup altogether, sprinkle countertop with some flour. Gently scrape the dough onto the floured countertop. Sprinkle with flour. Press gently into a roughly 12-by-8-inch rectangle. Using a bench scraper, fold one third of the rectangle toward the center, then fold the other end to the center, like a letter. With the bench scraper, place folded dough in the pan, pressing it into the corners. Brush on a little water. Cover it loosely with an oiled or cooking-sprayed piece of plastic wrap.

3b For Boule: Place a square of parchment paper on a rimless baking sheet (which will act as a "peel" later). Sprinkle 1/2 teaspoon of flour in a 9-inch circle in the center of the parchment and 2 tablespoons of flour on your work surface. Scrape the dough out onto the work surface. Put a little of the flour on top of the dough and with floured hands, press dough lightly into a 10-inch square. Fold it in thirds like a letter; then fold that rectangle into thirds, forming a square. Tuck the edges under, working the dough into a smooth round. Place the dough on the parchment. Turn a large glass bowl over it, or cover it loosely with an oiled or cooking-sprayed piece of plastic wrap.

4a Let rise until doubled. If using 9x5x3-inch loaf pan, it should rise an inch or two above the rim of the pan. If using the 9x4x4-inch pullman pan (minus its lid), the dough should rise to below or just even with the top of pan. This can take anywhere from 2 to 5 hours. The dough needs to rise until the dough doesn't quickly spring back when poked with a floured finger or knuckle. 

4b The boule will spread as well as rise and not appear to rise very high. Not to worry! It will rise in the oven (called oven spring) and be a lovely, well-risen loaf. 

Tip: Check on the dough's progress regularly. After making it a few times, you'll have a better idea of how long it will take. And that will change as the weather changes.

5a Toward the end of the rising time, preheat oven to 450F/230C/Gas8. Just before baking, brush the loaf with a little water. Bake for 10 minutes. Reduce heat to 400F/205C/Gas6 and continue baking for about 30 minutes or until crust is beautifully golden and middle of loaf registers 210F/99C on instant-read thermometer. Remove from pan immediately and let cool on wire rack for 1 1/2 to 2 hours before slicing.

5b When you’ve got about 30 to 45 minutes left, place oven rack in lower-middle position and place pizza stone or Lodge Pro-Logic 14-Inch Cast Iron Pizza Pan on rack. Preheat oven to 475F/245C/Gas9 for at least 30 minutes. With a sharp blade, cut a "+" about 1/4-inch deep on the top and slide the boule on its parchment square onto the hot stone. Reduce temperature to 425F/220C/Gas7. Bake for about 45 minutes, or until crust is beautifully golden and middle of loaf is 210F/99C. If it's getting too brown, cover loosely with foil. Remove from oven, using the rimless baking sheet or pizza peel to lift the boule off the pizza stone. Let cool on wire rack for 1 1/2 to 2 hours. 

PS For those who care about such things, this is a 69% hydration dough. 

Disclosure: We are a participant in the Amazon Services LLC Associates Program, an affiliate advertising program designed to provide a means for us to earn fees at no cost to you by linking to Amazon .com and affiliated sites. This helps cover some of the costs of running the blog. Thank you for your support.

Jean

If you liked this post, please Pin it and share it! 

03 February 2022

Naan - Classic Yeasted Flatbread of India and Beyond

Naan - Classic Yeasted Flatbread of India and Beyond / www.delightfulrepast.com

Naan is India's, and other parts of Asia's, classic yeasted flatbread that I love so much! Not that I'm an expert, but it's my understanding that yeast is traditional, but you'll see baking powder and/or baking soda in more modern variations.

I will likely never try those variations because I like the yeasted version so much. The bread is soft and pillowy and, at the same time, chewy. I like to spread the top with unsalted butter and sprinkle it with finely chopped fresh cilantro leaves. You might like a sprinkle of finely minced garlic as well, but I'm allergic and must refrain. 

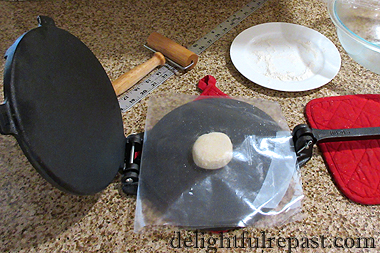
You know how much I've been enjoying my cast iron tortilla press, making batch after batch of both corn and flour tortillas. So, naturally, I was going to try pressing the naan. And I am thrilled to report that it worked beautifully! But you can also roll them out with a rolling pin as most people do.

I did a lot of research on this and saw much disagreement on how thick/thin to roll the dough. Most said 1/8 to 1/4 inch. While that might be fine for non-yeasted versions, I found that the yeasted dough starts puffing up right after rolling so needs to be rolled as thin as possible, certainly no more than 1/8 inch (3 mm). 


Naan - Classic Yeasted Flatbread of India and Beyond / www.delightfulrepast.com


Naan can be any shape. To mimic the shape they might naturally assume hanging on the sides of a tandoor (cylindrical oven), you can roll them into ovals or teardrop shapes. I just make mine round because everybody's going to know I don't have a tandoor anyway!

Roll them out or press them one at a time. While the first one is cooking, roll out the second one, and so on. Since the yeast dough rises quickly, give each a final roll/press just before cooking. So easy because you get into a real rhythm. I've put cooking tips for both stainless steel and cast iron pans in step 5 of the directions.

In my research, I found all kinds of tips that different cooks swear by. Cover the pan with a lid for cooking the first side only, cover with lid for cooking the second side only, grease the pan, don't grease the pan. I tried it all. The only one that made a difference to me was this: Rub water on one side before placing it in the hot pan water side down. Doing that and then tapping fingertips over the surface right away really increased the bubbling.

These will be great with my limited repertoire of Indian dishes: Chicken Tikka Masala, Slow Cooker Chicken Tikka Masala, and Dal Makhani. And being such a bread lover, the naan will inspire me to try more Indian recipes. And I look forward to working up a gluten-free naan for my GF friends.

Are you a bread fan? Have you made naan or other flatbreads? Tell me all about it in the comments below.


Naan - Classic Yeasted Flatbread of India and Beyond / www.delightfulrepast.com

If you like it, please Pin it and share it!


Naan - Classic Yeasted Flatbread

(Makes 8)

2 dip-and-sweep cups (10 ounces/283 grams) unbleached all-purpose flour
2 teaspoons (8 grams) sugar
1 teaspoon (4 grams) instant yeast
1 teaspoon (5 grams) salt
3/4 cup (6 fluid ounces/177 ml or grams) hot but not boiling water
1/4 cup (2.16 ounces/61 grams) plain yogurt
2 tablespoons (1 fluid ounce/30 ml/25 grams) extra virgin olive oil
For kneading and shaping: Up to 1/3 dip-and-sweep cup (1.67 ounces/47 grams) unbleached all-purpose flour


1 In a 1.5- to 2.5-quart mixing bowl (I like to use the Pyrex 2-quart glass measure), measure or weigh the flour. Whisk in the sugar, yeast and salt. 

2 In a 2-cup glass measure, measure the water; heat in the microwave until very hot but not boiling. Whisk in the yogurt and oil. Check that the temperature of the mixture is very warm (120 to 130F/49 to 54C).

3 Make a well in the center of the flour, then add the warm liquid to the well. With a spoon, slowly stir until soft, shaggy dough comes together. Turn out onto lightly floured (from that 1/3 cup) counter for about 5 minutes, adding only enough flour to keep it from sticking a great deal to your hands. (Set aside the remainder of that flour; you'll need it.) With very lightly oiled hands, make a ball of the soft, tacky dough. Place it in the bowl and cover the bowl with a lid, plate, or wrap. Let dough rise until doubled, about 1 to 1.5 hours.

Note: Naan can be made ahead up to this point (step 3). Just pop the risen dough into the refrigerator for up to 24 hours. Bring out of the refrigerator 2 to 3 hours ahead of the time you want to be shaping the dough for its second brief rise (actually just a 20-minute rest).

4 On lightly floured surface (from that 1/3 cup), shape the dough into a rectangle and cut the dough into 8 fairly equal parts. (I, of course, am so persnickety that I weigh the dough, divide by 8, and have realllly equal parts! These were 69 grams each.) Shape each into a smooth little 2-inch disk. Place on lightly floured plate and sprinkle lightly with flour. Cover and let rest for 20 minutes. 

5 Cast iron: Preheat cast iron pan gradually until it is super-hot (see Note); I use the Lodge Pre-Seasoned 14-Inch Cast Iron Baking Pan with Loop Handles that has lived in my oven for more than 12 years now. To preheat cast iron pan evenly, place over medium heat for 10 minutes, rotating every once in a while. Then wipe on a teaspoon of olive oil with a paper towel and continue heating for 2 minutes. 

Stainless steel: Preheat heavy-bottomed 12-inch stainless steel skillet over medium-high heat until very hot, about 3 to 5 minutes.

6 Naan can be any shape. To mimic the shape they would naturally assume hanging on the sides of a tandoor (cylindrical oven), you can roll them into ovals or teardrop shapes. I make mine round. They should be rolled or pressed very thin, not more than 1/8 inch (3 mm).


Naan - Classic Yeasted Flatbread of India and Beyond / www.delightfulrepast.com


If using a tortilla press, place a very lightly floured disk of dough between the two layers of plastic* in the center of the tortilla press. Then gently press the dough ball. Turn it 90 degrees and press again. Press and turn until it is about 7 inches (18 cm) in diameter. 

* I use a 1-gallon zip-top bag cut into an open-on-three sides 8-inch square "folder" to line the press. Wash and save the bag for next time; it will last for many, many batches.

7 Peel back the top layer of plastic, turn it on your hand, and peel back the other layer; or pick up the rolled naan and lay it over your non-dominant hand. Brush, or with your fingertips rub, water on one side of the dough. Lay it on the hot pan, water side down, and press the surface all over with your fingertips. Cook for about a minute when the naan gets bubbles on top and is well browned on the underside. Turn and repeat. You can give it another turn, if you like. Put on a plate and cover with a kitchen towel to keep warm.

8 If serving right away, brush the top of each naan with butter and sprinkle on a little chopped cilantro. If serving later, do that after reheating the naan. 

9 The naan reheats beautifully. Wrap the completely cooled naan in foil and store at room temperature for a day or two. 

Disclosure: We are a participant in the Amazon Services LLC Associates Program, an affiliate advertising program designed to provide a means for us to earn fees by linking to Amazon .com and affiliated sites. We are a ThermoWorks affiliate, earning a small commission at no cost to you on purchases made through our links. This helps cover some of the costs of running the blog. Thank you for your support. 

Jean

If you liked this post, please Pin it and share it!

16 September 2021

Oven-Dried Figs

Oven-Dried Figs - How to Dry Fruit in Your Conventional Oven / www.delightfulrepast.com

Fresh figs are a favorite of mine, but not all of my friends share that opinion. Yesterday a friend brought me a huge bowl of fresh figs and hinted broadly about what I might do with them, saying another friend of ours only likes figs in fig newtons (fig rolls in UK).

I have several projects going this week and have no time for extra baking, and I always make my Fig Rolls - Fig Newtons with dried figs. So I thought I'd just dry these figs for a future baking day.


Oven-Dried Figs - How to Dry Fruit in Your Conventional Oven (this photo, Fig Rolls - Fig Newtons) / www.delightfulrepast.com


I've never had a dehydrator, and have turned down one or two that have been offered to me, since I wouldn't use it often enough. It would just be taking up space 364 days a year. My toaster oven does convection, which would be great for this, and I could probably do two quarter sheet pans in it, but I don't have wire racks for that size pan.

So here's how I did it in the regular oven. At a "cool oven" temperature of 200F/95C/Gas1/8. No special equipment. Just a half sheet pan and a wire cooling rack.


Oven-Dried Figs - How to Dry Fruit in Your Conventional Oven / www.delightfulrepast.com


You can find all sorts of methods for doing this, everything from quickly at higher temperatures to 36 hours at extremely low temperatures. The former made no sense to me, and the latter seemed unnecessarily slow and would tie up my oven for far too long. Some recommend propping the oven door open a bit to let out moisture. No, I wasn't going to be doing that.

The reason I chose to store the dried figs in half-pint jars (tightly packed) is because that is the amount needed for a batch of Fig Rolls - Fig Newtons, which I'll be making in a couple weeks for a small autumn tea party in the gazebo. Might use the other jar for a batch of Homemade Granola. 


Oven-Dried Figs - How to Dry Fruit in Your Conventional Oven / www.delightfulrepast.com

If you like it, please Pin it and share it! 

Oven-Dried Figs


(Makes 2 half-pint jars with a bit leftover)

Up to about 2 3/4 pounds fresh figs (however many will fit, halved, on the rack)

1 Preheat oven to 200F/95C/Gas1/8.

2 Line an 18x13x1-inch half sheet pan with baking parchment paper, then set a wire cooling rack on top of the paper.

3 Wash and dry the figs. Cut off the top stem and trim away any bad spots. Cut in half lengthwise.

4 Place the halves cut side up on the wire rack.

5 Bake in the center of the oven for about 6 hours. This will vary, depending on the size and juiciness of the figs and the peculiarities of your oven. Check at 5 hours, then maybe every 20 minutes after that until they are done. The figs are done when they are quite dry, but not hard, and still a bit sticky to the touch in the center.

6 Cool completely and put in canning jar(s). Refrigerate for short-term storage or freeze for up to several months. I chose half-pint jars because they held, tightly packed, the amount (5 ounces) needed for a batch of fig rolls.


Oven-Dried Figs - How to Dry Fruit in Your Conventional Oven (this image, my original watercolor of a fig) / www.delightfulrepast.com


Disclosure: We are a participant in the Amazon Services LLC Associates Program, an affiliate advertising program designed to provide a means for us to earn fees by linking to Amazon .com and affiliated sites. We are a ThermoWorks affiliate, earning a small commission at no cost to you on purchases made through our links. This helps cover some of the costs of running the blog. Thank you for your support.

Jean


If you liked this post, please Pin it and share it!

04 February 2021

Sourdough Simplified - A Tutorial

Sourdough Simplified - A Tutorial (this photo, first rise in 2-quart Pyrex measure) / www.delightfulrepast.com


Sourdough bread is something I made once or twice a week for years, then got out of the habit of for about a year (yes, the same year, the pandemic year, masses of other people were taking it up for the first time!). 

Then I decided to make another starter and get back into it. This time I was going to simplify it even more than I already had and experiment with not feeding the starter other than when the starter was nearly gone and needed replenishing.

So I started my starter, as always with a view to wasting as little flour as possible in the discards that are part of the process of building a starter. Since I only plan to bake one loaf at a time, I only need to keep enough starter to make a loaf with a little left to replenish. 

So I decided to keep about 3/4 cup (6.75 ounces/192 grams) of the stirred-down starter in a pint canning jar and placed it in the refrigerator for the next baking day.

I use grams and a digital scale myself, but I've given the directions in ounces as well for those with analog scales and in cups and tablespoons for those who measure. 

The measures are not exact equivalents to the weights, so don't mix methods. For those interested in such things, this is a 100% hydration starter, meaning it has equal weights of flour (I use organic) and water.

And the idea (which I won't be able to report on for several months) is to be able to leave the starter, once it has matured for three months, in the refrigerator for two months or more without any attention and then take it out, stir it up, and use it as is (unfed) to make a loaf. Simplified! 

Update 04/19/21: I just left the starter in the refrigerator untouched for 3 weeks, and used it unfed like always, and it worked beautifully, just like when I was using it every week. In fact, the final rise, which was taking 3 hours, took just 2 hours.

Starting the Sourdough Starter


When starting a sourdough starter, the starter can pass one or both of the typical "tests" (doubling and floating) to determine whether the starter is ready to use but still not be ready to use, leading to a failed loaf, so I decided to give it 23 days to develop. It will continue to "mature" for 3 months. 

By making up your mind at the outset to let your starter develop over that time instead of getting in a hurry to bake a loaf, you won't risk wasting an entire batch of dough on a loaf that fails because the starter was not really ready despite indications to the contrary.

Using just minimal quantities of flour for the 23 days means the discarding will only amount to about two cups of flour. And not feeding the starter after that, simply adding more flour and water when replenishing the starter, means no discarding ever. Here's the simple plan, given in measures as well as ounces and grams:

Sourdough Simplified - A Tutorial (this photo, starter in pint canning jar) / www.delightfulrepast.com


Days 1 to 21 - In glass or ceramic 1-pint container, stir 2 level tablespoons unbleached flour and 1 1/2 tablespoons water (or 0.5 ounce/14 grams of each) until smooth. Cover loosely with plastic wrap or a slightly ajar lid. Each day, stir vigorously and then discard all but 1 tablespoon (or 0.5 ounce/14 grams) of the starter and add 2 tablespoons unbleached flour and 1 1/2 tablespoons water (or 0.5 ounce/14 grams of each); stir vigorously until smooth. Cover loosely with plastic wrap or slightly ajar lid and let stand at room temperature.

Day 22 - Stir vigorously and then discard all but 2 tablespoons (or 1 ounce/28 grams) of the starter and add 1/4 cup unbleached flour and 3 tablespoons water (or 1 ounce/28 grams of each); stir vigorously until smooth. Cover loosely. 

Day 23 - Stir vigorously and then discard all but 1/4 cup (or 2.25 ounces/64 grams) of the starter add 1/2 cup unbleached flour and 1/3 cup water (or 2.25 ounces/64 grams of each); stir vigorously until smooth. Cover loosely. 

Day 24 - Use 1/2 cup (4.5 ounces/128 grams) for a loaf. Replenish the remaining 1/4 cup (or 2.25 ounces/64 grams) of the starter with 1/2 cup unbleached flour and 1/3 cup water (or 2.25 ounces/64 grams of each); stir vigorously until smooth. Cover loosely and let stand at room temperature for 1 to 4 hours (as soon as some bubbles are forming, then put it in the refrigerator until next week.

If you've had difficulty in the past with a young starter not performing well and don't want to chance it, you can use a small amount of instant yeast (1/2 teaspoon)—in your dough only, never in your starter—until your starter has matured.

Now let's bake a loaf! You can use the same recipe to make a round boule, but I most often make a sandwich loaf. For a round boule, follow the shaping directions for Sourdough Artisan Bread.

Sourdough Simplified - A Tutorial (this photo, sandwich loaf rising) / www.delightfulrepast.com

If you like it, please Pin it and share it!

Sourdough Sandwich Loaf


(Makes one large loaf)

1/2 cup (4.5 ounces/128 grams) stirred-down 100% hydration starter
1 5/8 cups (13 fluid ounces/384 ml or grams) room temperature water
1 3/4 teaspoons (0.35 ounce/10 grams) salt
4 dip-and-sweep cups (20 ounces/567 grams) unbleached all-purpose flour (I use organic)

1 Stir down the starter and weigh or measure it into 2-quart glass measure. With a dough whisk or a large dinner knife, stir in water, then salt and flour. The dough will be fairly stiff, but still sticky. With one hand, knead the dough right in the bowl, just enough to incorporate all the flour, maybe about 10 to 20 times in all. Cover loosely with lid or lightly oiled plastic wrap and let stand at room temperature about 12 to 24 hours. At any point that the dough has doubled, it's good to go. It all depends on variables like your starter and the temperature of your kitchen. As the starter matures, the rise time shortens.

At some point, the first rise might take only 5 hours and the second, 2 hours. If longer rise times better suit your schedule, you can reduce the amount of starter used in the dough.  

Maintaining Starter: Unless you're baking bread every day or two, keep the starter in the refrigerator and feed only when you don't have enough starter left to make another loaf. I keep about 3/4 cup (6.75 ounces/192 grams) of starter in a pint canning jar. Though I won't be feeding the starter, after taking out 1/2 cup (4.5 ounces/128 grams) for the loaf, I need to replenish the starter in the jar and so feed it with 2.25 ounces (64 grams) each flour and water, stir it vigorously and let stand at room temperature for about 1 to 4 hours (you should see some bubbles, but not too many), then refrigerate until the next bake.

2 Grease bread pan. I use a 9x4x4-inch (1.5-pound) pullman pan. It's about the same capacity as a 9x5x3-inch loaf pan. 

3 Using no more than 1/8 cup altogether, sprinkle countertop with some flour. Gently scrape the dough onto the floured countertop. Sprinkle with flour. Press gently into a roughly 12-by-8-inch rectangle. Using a bench scraper, fold one third of the rectangle toward the center, then fold the other end to the center, like a letter. With the bench scraper, place folded dough in the pan, pressing it into the corners. Brush on a little water. Cover it loosely with an oiled or cooking-sprayed piece of plastic wrap. 

4 Let rise until doubled. If using 9x5x3-inch loaf pan, it should rise an inch or two above the rim of the pan. If using the 9x4x4-inch pullman pan, the dough should rise to below or just even with the top of pan. This can take anywhere from 2 to 5 hours. The dough needs to rise until the dough doesn't quickly spring back when poked with a floured finger or knuckle.

Tip: Check on the dough's progress regularly. After making it a few times, you'll have a better idea of how long it will take. And that will change as the weather changes. I keep my house rather cool in winter, so sourdough bread takes much longer to rise now than it does in summer.

5 Toward the end of the rising time, preheat oven to 450F/230C/Gas8. Just before baking, brush the loaf with a little water. If you add 1/8 teaspoon baking soda to 2 tablespoons water and brush the loaf with it, it will aid in browning.

6 Bake for 10 minutes. Reduce heat to 400F/205C/Gas6 and continue baking for about 30 minutes or until crust is beautifully golden and middle of loaf registers 210F/99C on instant-read thermometer.

7 Remove from pan and let cool on wire rack for 1 1/2 to 2 hours before slicing.

Disclosure: We are a participant in the Amazon Services LLC Associates Program, an affiliate advertising program designed to provide a means for us to earn fees by linking to Amazon .com and affiliated sites. We are a ThermoWorks affiliate, earning a small commission at no cost to you on purchases made through our links. This helps cover some of the costs of running the blog. Thank you for your support. 

Jean

03 September 2020

Simple Roasted Tomatoes for the Freezer

Simple Roasted Tomatoes for the Freezer / www.delightfulrepast.com

Freezing oven-roasted tomatoes is one way to take advantage of a bumper crop. Of course, if you're growing a lot of tomatoes, you might need to can them. 

Simple Roasted Tomatoes for the Freezer (this image, a watercolor sketch) / www.delightfulrepast.com
My watercolor sketch of a tomato from the garden

But for me it was just a matter of having several pounds more than I needed all ripe at the same time. So early this morning before it got hot, I preheated the oven and roasted two half sheet pans of tomatoes yielding 5 half-pint jars. I'll likely be doing another batch in a few days.

You can freeze the roasted tomatoes in whatever size portion you need for the recipes you make. In my case, I went with half-pint jars. Whatever size you choose, be sure they are straight-sided jars. Jars with "shoulders" are more prone to breaking in the freezer.

Why nothing more than extra virgin olive oil, salt and coarsely ground pepper on the tomatoes? Because I'll be using them in American, British, Indian, Italian and Mexican dishes, each requiring different aromatics, herbs and spices. So just keeping it simple! 

Simple Roasted Tomatoes for the Freezer / www.delightfulrepast.com
Please Pin it and share it!

Oven-Roasted Tomatoes


(Makes 1 half sheet pan, 2 or 3 half-pint jars)

2 tablespoons (1 fluid ounce/30 ml) extra-virgin olive oil, divided
About 2.5 to 2.75 pounds/1.13 to 1.25 kg ripe tomatoes
1/8 teaspoon or more salt
1/8 teaspoon or more coarsely ground black pepper

1 Line a half sheet pan with parchment paper. Brush with 1 tablespoon of olive oil. Preheat oven to 400F/205C/Gas6.

2 Wash and dry tomatoes, cut away the stem and stem scar. Slice tomatoes about 1/3 inch/1 cm thick. Place in a single layer on the parchment-lined and oiled half sheet pan. Drizzle 1 tablespoon of olive oil over the tomatoes, rubbing it around with your fingers, or brush it on. Sprinkle with salt and pepper.

3 Place in preheated oven for about 45 minutes or more, depending on the thickness and juiciness of the tomato slices. When they are done to your liking, at least shrunken and a bit shriveled, let them cool on the pan for a few minutes. Spoon them into jars, leaving about 1/2 inch of headroom, put on the lids.

Simple Roasted Tomatoes for the Freezer / www.delightfulrepast.com


Disclosure: We are a participant in the Amazon Services LLC Associates Program, an affiliate advertising program designed to provide a means for us to earn fees by linking to Amazon .com and affiliated sites. We are a ThermoWorks affiliate, earning a small commission at no cost to you on purchases made through our links. This helps cover some of the costs of running the blog. Thank you for your support. 

Jean

31 October 2019

Make-Ahead Turkey Gravy and Broth

Make-Ahead Turkey Gravy and Broth / www.delightfulrepast.com

Turkey Gravy is the highlight of any turkey dinner. Whether you're hosting a turkey dinner or doing a make-and-take side for dinner at someone else's house, you can be in charge of the gravy!

(I first posted this three years ago, though I've been making it for decades. If you read it then but didn't try it, please read it again and give it a go now!)

If you've never made the gravy ahead of time, you're going to thank me for this. It's the only way to go when you've got a dozen things on the menu, some of which need doing at the last minute. 

You know what I'm talking about. The classic mashed potatoes are mashed at the last minute, the dinner rolls are heated at the last minute, so many things to see to. By the time you sit down at the table, you're exhausted! 

But you can get the turkey broth and gravy done well in advance. You'll have enough broth for stuffing/dressing as well as gravy. Just freeze both until a day or two before you need them. If you make it two or three days ahead, just refrigerate it.

Make-Ahead Turkey Gravy and Broth / www.delightfulrepast.com
Don't forget to Pin it! 


(You can make the Cranberry Sauce two days ahead. Try it! You'll never go back to canned! Actually, some people love the canned cut into slices, so I sometimes serve both.)

Though it's made with just 2 pounds of turkey, the gravy tastes wonderful. But, if you want added flavor or want to increase the amount of gravy, when you take your turkey out of the pan on the big day, combine the pan drippings (minus the fat) and make-ahead gravy for added oomph.

About the broth: I'm a huge fan of store-bought organic free-range low-sodium chicken broth, but NOT for anything to do with a turkey dinner. You MUST make turkey broth, whether this way or with the neck, etc, on the day you roast the turkey, or both.

Do you like to make things ahead or do it all on the day? My mother always did pretty much everything on the day, but she was made of sterner stuff. I have to stretch it out!

Make-Ahead Turkey Gravy and Broth (this photo - the roasted drumsticks) / www.delightfulrepast.com

Make-Ahead Turkey Gravy


(Makes about 4 cups)

The Turkey

2 turkey drumsticks* (about 2 pounds/0.91 kg total)
1/4 teaspoon salt
1/2 teaspoon coarsely ground black pepper

1 tablespoon dry sherry plus enough water to make 1/2 cup (4 fluid ounces/118 ml)


* Other parts might work, too, but I've only ever used drumsticks as they are more readily available where I shop.

The Broth


The Turkey, above, cooked
1 medium onion, peeled and halved
2 medium carrots, cut into 3-inch pieces
4 medium celery stalks, cut into 3-inch pieces
Handful of fresh parsley
1 bay leaf
1/2 teaspoon salt
1/2 teaspoon coarsely ground black pepper
1/2 teaspoon dried thyme leaves

2 1/2 quarts (80 fluid ounces/2.36 litres) water

The Gravy


1/3 dip-and-sweep cup (1.67 ounces/47 grams) unbleached all-purpose flour

4 cups (32 fluid ounces/946 ml) of The Broth

1 Preheat oven to 400F/205C/Gas6. Lightly oil (about 1/2 teaspoon) a heavy-duty quarter sheet pan. Pat the drumsticks dry and place them in the prepared pan. Sprinkle all sides with salt and pepper. Roast for 60 to 70 minutes. Sixty minutes would probably be enough, but I like to get maximum brown bits in the roasting pan.

Note: If you don't see lots of brown in your pan after 70 minutes, let it go longer. This is a crucial step. Just be sure you don't let it burn.

2 Transfer the drumsticks to a 5-quart pot (I use a Le Creuset 5.5-quart round French oven); set aside for the moment.

3 Place the roasting pan on the stove and pour in the liquid a little at a time, stirring and scraping up the browned bits. When pan is completely deglazed, pour the liquid into a jar, bowl or 1-cup glass measure; refrigerate. You'll see from the photo that I ended up with about 1/4 cup of fat, which is perfect!

Make-Ahead Turkey Gravy and Broth (this photo - pan drippings) / www.delightfulrepast.com


4 Add vegetables and seasonings to the pot, along with water. Bring to a boil, reduce heat and simmer with lid slightly ajar for 4 hours, checking liquid level after second and third hours and adding more water only if needed.

Make-Ahead Turkey Gravy and Broth (this photo - the broth) / www.delightfulrepast.com


5 Strain the broth into a 2-quart glass measure. You will have 6 to 8 cups of broth.

6 Transfer your refrigerated pan drippings to a 2-quart saucepan and begin heating. Add flour to pan drippings and cook, whisking or stirring constantly, for 2 minutes.

7 Add about 1/2 cup of the stock and whisk briskly until very smooth, then add remaining broth. Bring to a boil, whisking frequently, until the gravy thickens, 5 to 10 minutes. Taste and adjust seasoning.

8 Leave the gravy as is or strain into a 4-cup glass measure. Pour it into a 6-cup glass freezer container. Let cool a bit at room temperature, refrigerate until cold, then freeze until the day before you want to serve it.


9 The day before you want to use it, transfer the gravy from freezer to refrigerator. Reheat the thawed gravy, combining it with the defatted pan drippings for even more flavor.

Disclosure: We are a participant in the Amazon Services LLC Associates Program, an affiliate advertising program designed to provide a means for us to earn fees by linking to Amazon .com and affiliated sites. We are a ThermoWorks affiliate, earning a small commission at no cost to you on purchases made through our links. This helps cover some of the costs of running the blog. Thank you for your support. 

Jean