23 December 2021

How to Make Homemade Flour Tortillas - With or Without a Tortilla Press

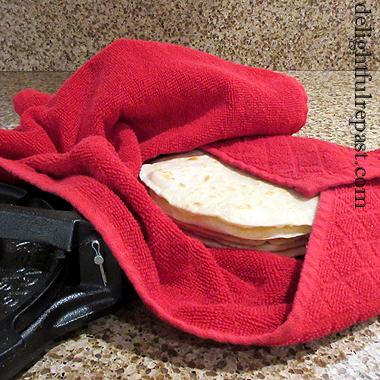
How to Make Homemade Flour Tortillas - with or without a tortilla press / www.delightfulrepast.com

Yes, flour tortillas can be made with a tortilla press, despite what you (and I) may have been told!

Flour tortillas of the store-bought variety often have a lot of questionable ingredients that leave an odd aftertaste. But some of the homemade flour tortillas I've had were greasy and rubbery (and some 1/4-inch thick!), so about 10 years ago I decided to try making my own with just four simple (and organic) ingredients. I made up the recipe as I went along, and they turned out great the first time—which only means homemade flour tortillas are easy and practically foolproof!

Then a few weeks ago I got a cast iron tortilla press to make corn tortillas, posted about it, and a reader asked if the press could be used for flour tortillas as well. I told her I had always heard it couldn't but had never actually tried it. 

So I whipped up a batch and in about an hour reported back to her that you can indeed use the tortilla press for flour tortillas but that the press doesn't get them as paper-thin as I like them. So that set me on another round of experiments in the kitchen.

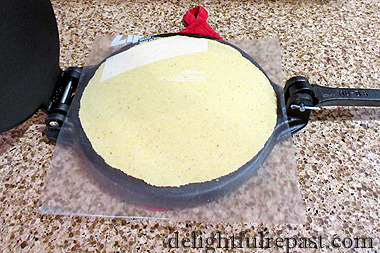
I discovered that giving the tortilla two additional (three, in all) 90-degree-turn-and-presses resulted in a beautifully thin tortilla. But if you have a different press that doesn't get that result for you, there is another way that spares you from getting out your great long rolling pin.

How to Make Homemade Flour Tortillas (with or without a tortilla press)  / www.delightfulrepast.com


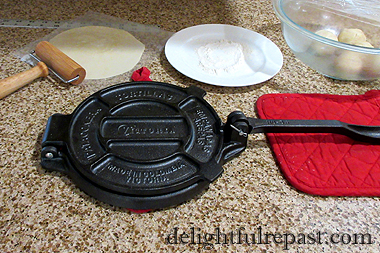
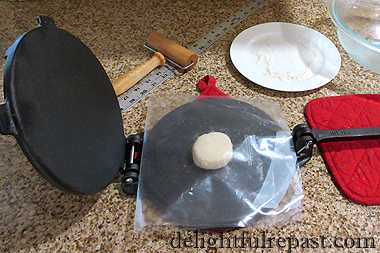
A handy-dandy little gadget called a wooden pastry and fondant roller (4 inches wide, though it says 6 inches) makes quick work of making the tortillas as thin as you like. Just leave the pressed tortilla in its plastic "folder" and give it a few swipes with the roller. And it is useful for so many other things, such as rolling a press-in crust right in the pan to give your bars and traybakes a perfectly even base.

You can use any type of fat for flour tortillas, but I prefer organic unsalted butter. Organic lard is more expensive than organic butter and is not as readily available. The mild butter flavor is sooooo good! Cooking for two on most days, I usually just make a half batch. If you don't have a tortilla press, you can roll them out with a rolling pin.

I've been making so many tortillas since I got the tortilla press, I haven't even bothered to decide where to put it when I put it away. I just leave it out looking cute and compact in one of the corners of my U-shaped countertop.

Hope you'll make some flour tortillas or corn tortillas soon and let me know how they turned out for you. I love hearing all the different ways these versatile flatbreads are made. 

How to Make Homemade Flour Tortillas - with or without a tortilla press / www.delightfulrepast.com

If you like it, please Pin it and share it!

Flour Tortillas


(Makes 12 7-inch tortillas)

2 1/2 dip-and-sweep cups (12.5 ounces/354 grams) unbleached all-purpose flour
1 teaspoon non-GMO baking powder, optional
1 teaspoon salt
6 tablespoons (3 ounces/85 grams) unsalted butter
2/3 cup (5.33 fluid ounces/158 ml or grams) hot* water

*push the 160F (71C) button on my electric kettle, then measure the water in a glass measure, which cools it down a few degrees.


1 In medium mixing bowl, mix flour and salt (and baking powder, if you're using it) together with your hands. Grate the butter into the bowl or use a small knife to slice tiny pieces of butter into the bowl. With your fingertips, mix the butter into the flour until it resembles coarse meal. Pour the hot water while mixing with a fork, in case you don't need to add all the water. The mixture should be moist enough to come together into a tacky dough. Knead, right in the bowl, with one hand or on a smooth countertop for about 3 minutes until it is smooth and springy, adding a little more flour if the dough is too wet or a little more water if it is too dry. 

Note: If you measure ingredients using a digital kitchen scale, you'll likely not need to add more flour or water and will come out with precisely enough dough to make 12 50-gram tortillas. 

2 Cover the dough tightly to keep it from drying out. Let it rest for at least 30 minutes or up to an hour. Divide total weight of dough in grams by 12 to portion out the dough, rolling them into smooth balls (about 50 grams each). As you make the tortillas, keep the dough balls covered to keep them from drying out and let them rest for 10 to 15 minutes.

Note: The first time or two that you make tortillas (before you've developed "a feel" for the dough), test one dough ball first to make sure it presses well and peels easily from the plastic before portioning out all the dough.

3 Preheat your griddle well over low to moderate heat, about 5 minutes. Since I used my nonstick griddle, I rubbed a tiny amount, 1/2 teaspoon, of extra virgin olive oil on the cold griddle (because you are never supposed to preheat a nonstick pan empty or over high heat or use cooking spray on it). Then when I was ready to start cooking the tortillas, I wiped the griddle, removing nearly all the oil, and turned the heat up to medium to medium-high.

How to Make Homemade Flour Tortillas (with or without a tortilla press)  / www.delightfulrepast.com


4 On lightly floured (not more than a tablespoon) small plate, flatten slightly one of the smooth balls to a disk about 2 inches round, getting a dusting of flour on both sides. Place it between the two layers of plastic in the center of the tortilla press. Then gently press the dough ball. Turn it 90 degrees and press again. It will be about 6 inches in diameter. If you would like it a little thinner, as I do, either give it two more 90-degree-turn-and-presses or give it a few swipes with the little wooden pastry roller. It will be about 7 inches in diameter. 

5 Peel back the top layer of plastic, turn it on your hand, and peel back the other layer. Lay it on the hot griddle and cook for about 45 to 60 seconds when the tortilla starts getting bubbles on top and specks of brown on the underside. Turn and repeat. You can give it another turn, if you like. Transfer to a tortilla warmer or a makeshift tortilla warmer—a clean kitchen towel in a glass pie plate. Repeat. Serve from the bottom of the stack first, as they'll be softest.

Disclosure: We are a participant in the Amazon Services LLC Associates Program, an affiliate advertising program designed to provide a means for us to earn fees by linking to Amazon .com and affiliated sites. We are a ThermoWorks affiliate, earning a small commission at no cost to you on purchases made through our links. This helps cover some of the costs of running the blog. Thank you for your support. 

Jean

If you liked this post, please Pin it and share it!
09 December 2021

Homemade Corn Tortillas

Homemade Corn Tortillas / www.delightfulrepast.com


Homemade tortillas are easier than most people think. I first made flour tortillas nearly ten years ago, making up the recipe as I went along, and they turned out great. A rolling pin is all you need. But for corn tortillas, I really needed a tortilla press.

My friend Julia told me about the older generations of her family making them by hand. But that hand patting technique can take years to perfect, so I again looked into tortilla presses. 

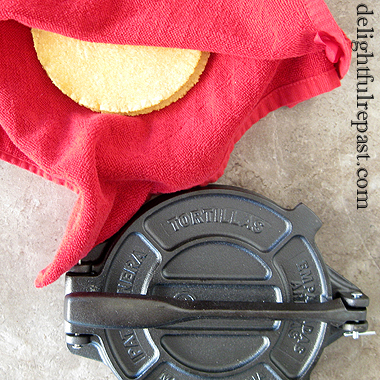
Read great things about this tortilla press I found on Amazon. Beautifully made, heavy cast iron. It will turn your kitchen into a tortilleria! 

I used Bob's Red Mill organic masa harina. Just add hot water and a little salt, and that's it. Since I was just cooking for two, I made a half batch, six tortillas. You might need more or less water depending on your masa harina. These amounts are what worked for me.

There are varying opinions on the temperature of the water, some saying your hottest tap water. I pushed the 160F (71C) button on my electric kettle, then measured the water in a glass measure, which cooled it down a few degrees. It was just right. 

Have your tortilla press standing by, along with a 1-gallon Ziploc bag cut into an open-on-three sides 8-inch square "folder" to line the press. Save the bag for next time; it will last for many, many batches, I'm sure.

I used this batch for tostadas, but I'm looking forward to making more very soon for Chicken Enchilada Verde Casserole.

Do share any tips you might have for making homemade corn tortillas. 


Homemade Corn Tortillas / www.delightfulrepast.com

If you like it, please Pin it and share it!

Homemade Corn Tortillas

(Makes 12 6.5- to 7-inch tortillas)

2 1/2 cups (10 ounces/283 grams) masa harina
2 tablespoons (0.5 ounce/14 grams) non-GMO cornstarch, optional
1/2 teaspoon salt
1 1/2 cups (12 fluid ounces/355 ml or grams) hot water*
2 1/2 teaspoons extra virgin olive oil, optional

* That was the amount of water that worked with every single batch of tortillas made with Bob's Red Mill golden masa harina. But then my order of King Arthur organic white corn masa harina arrived, and I found it took an extra 1/4 cup (2 fluid ounces/59 ml or grams) of water.

1 In large bowl, stir together the masa harina and salt. I sometimes like to add that little bit of cornstarch; it seems to make the tortillas more pliable. While stirring with a silicone spatula, gradually add the water, then stir until the masa is evenly moistened. With one hand, knead the dough right in the bowl or on a smooth countertop for 5 minutes until it is smooth and springy, after a few minutes adding, only if necessary, a little more masa harina if the dough is too wet or a little more water if it is too dry.

Note: Some cooks like to add a small amount of oil if the corn tortillas are going to be stored for a day or more, but that is optional. If using, add it along with the water. 

2 Cover the masa tightly to keep it from drying out. Let it rest for at least 20 minutes or up to an hour. Divide total weight of dough in grams by 12 to portion out the dough, rolling them into smooth balls (about 50 grams or so each). As you make the tortillas, keep the dough balls covered to keep them from drying out.

Note: Test one dough ball first to make sure it presses well and peels easily from the plastic before portioning out all the dough.

3 Preheat your griddle well over moderate heat. Since I used my nonstick griddle, I rubbed a tiny amount, 1/2 teaspoon, of extra virgin olive oil on the cold griddle (because you are never supposed to preheat a nonstick pan empty or over high heat or use cooking spray on it). Then when I was ready to start cooking the tortillas, I wiped the griddle, removing nearly all the oil.


How to Make Homemade Corn Tortillas - with Tortilla Press / www.delightfulrepast.com


4 Place a smooth dough ball between the two layers of plastic in the center of the tortilla press. Then gently press the dough ball. Give it three 90-degree turns and presses to get the thinnest possible tortilla. Peel back the top layer of plastic, turn it on your hand, and peel back the other layer. Lay it on the skillet and cook for about a minute on each side. Transfer to a tortilla warmer or, as I do, a makeshift tortilla warmer—a clean kitchen towel in a glass pie plate. Repeat. Serve from the bottom of the stack first, as they'll be softest.

Disclosure: We are a participant in the Amazon Services LLC Associates Program, an affiliate advertising program designed to provide a means for us to earn fees by linking to Amazon .com and affiliated sites. We are a ThermoWorks affiliate, earning a small commission at no cost to you on purchases made through our links. This helps cover some of the costs of running the blog. Thank you for your support. 

Jean

If you liked this post, please Pin it and share it!

25 November 2021

Malt Loaf - A British Teatime Classic

Malt Loaf - A British Teatime Classic / www.delightfulrepast.com

Malt Loaf originated in 19th century Scotland and was featured in this season's first episode, Cake Week, of The Great British Bake Off (GBBO), called The Great British Baking Show in the US. 

I hadn't thought about malt loaf in years, but after seeing episode one, I began digging through my old recipes. It's not a light and airy cake; more of a dense and squidgy tea bread. Not too sweet, and served with soft butter.

All malt loaf recipes are very similar. Two of the ways mine differs from Prue's GBBO loaf, besides different amounts, are:  1. I skip the black treacle so as not to detract from the flavor of the malt extract.

And 2. I drain the soaked fruit and coat it with flour before adding the wet ingredients, a step that helps keep the fruit from clumping together and sinking to the bottom of the loaf.

If you like a sweeter loaf, use 1/2 packed cup (3.5 ounces/99 grams) dark brown sugar rather than my 1/3 cup. But do try it my way!

So ... now that the season has ended, and long after all those who like to "bake along" with GBBO have baked it, here is my recipe for Malt Loaf. 

Do you make malt loaf? Or did you try it for the first time with "bake along" fans? If not, maybe you'll be inspired to try it now! Do let me know.  

Malt Loaf - A British Teatime Classic / www.delightfulrepast.com

If you like it, please Pin it and share it!

Malt Loaf

(Makes one 2-pound/900 gram/9x4x4-inch loaf)

3/4 cup (6 fluid ounces/177 ml) just-boiled water
1 teaspoon (or 1 tea bag) strong black tea
1 packed cup (5 ounces/142 grams) raisins
1/2 packed cup (2.5 ounces/71 grams) soft pitted prunes, chopped to raisin size
1/2 cup (6 ounces/170 grams) malt extract*
1/3 firmly packed cup (2.33 ounces/66 grams) dark brown sugar
1 3/4 dip-and-sweep cups (8.75 ounces/248 grams) unbleached all-purpose flour
1 teaspoon baking powder
1/2 teaspoon baking soda
1/2 teaspoon salt
2 large eggs (medium, in UK), lightly beaten


1 Pour boiling water over the tea. Let steep for 5 minutes; strain. Pour over raisins and prunes in a bowl. Partially cover and microwave for about 2 minutes, or bring to a simmer in a small pan on the stove and then turn off heat. Let stand, covered, for 10 minutes, then drain, reserving the liquid.

2 Grease (and sometimes I also line bottom and ends, but not the sides, with a piece of baking parchment) a 9x4x4-inch loaf pan or 9x5x3-inch loaf pan. Preheat oven to 325F/165C/Gas3. 

Note: I love the square shape of the 9x4x4-inch loaf pan that I initially got for baking my gluten-free yeast breads but use (without its lid) for nearly everything that calls for a 9x5x3-inch pan. 

3 In a 1-quart saucepan over low heat, cook the malt extract and brown sugar together, stirring constantly until the sugar is dissolved, about 3 minutes. Remove from heat and cool for 5 minutes.

4 In 2- to 3-quart mixing bowl, whisk together the flour, baking powder, baking soda, and salt. Whisking vigorously for a half minute or so is what passes for sifting around here on most days. Put the thoroughly drained fruit on top of the flour, and stir gently until the pieces are coated with the flour and not clumped together. This keeps the fruit from sinking to the bottom of the loaf.

5 Make a well in the center; pour in the malt mixture, eggs, and reserved liquid from the fruit (about 1/3 cup), breaking up the eggs and mixing them with the malt and liquid. Then bring in the flour from the sides, and stir gently until well combined, about 1 minute. Scrape into prepared loaf tin. Bake for about 50 to 60 minutes, until skewer inserted in center comes out with just a few soft crumbs (but not raw batter).

6 Cool in pan on wire rack for 10 minutes before turning out onto wire rack. Continue cooling on wire rack until completely cool, an hour and a half or so. Wrap tightly in foil and let it mellow for a day or two. Cut the loaf into slices and serve with soft butter.

Note: Some people brush the top of the hot loaf with about a tablespoon of malt extract as it cools. Some brush the top and sides. I usually skip that step, but did the top this time.

Disclosure: We are a participant in the Amazon Services LLC Associates Program, an affiliate advertising program designed to provide a means for us to earn fees by linking to Amazon .com and affiliated sites. We are a ThermoWorks affiliate, earning a small commission at no cost to you on purchases made through our links. This helps cover some of the costs of running the blog. Thank you for your support. 

Jean

If you liked this post, please Pin it and share it!
11 November 2021

Snickerdoodles - Classic or Chai Latte

Snickerdoodles - Classic or Chai Latte / www.delightfulrepast.com


Snickerdoodles have been around for about half a century longer than the Snickers candy bar, which came out in 1930 and has nothing at all to do with the classic cookie snickerdoodles! 

You'll find a lot of recipes that call for baking powder rather than cream of tartar. Ignore them. Cream of tartar is not just a leavening agent, it is what gives snickerdoodles their characteristic tang.

There are also a lot of snickerdoodle recipes that call for half butter and half shortening. Ignore those, too. There is nothing to be gained by using the shortening, so why dilute the wondrous flavor of butter? Baked until just the edges start to brown, the cookies are crisp on the outside and soft, kind of cakey, inside.

Snickerdoodles - Classic or Chai Latte / www.delightfulrepast.com


Need I tell you, these cookies are fabulous with a nice cup of tea! The chai latte variation does not call for tea in the cookies, just the use of the spices found in chai lattes rather than the solo cinnamon.

Since the variation is only in the coating, why not try half with cinnamon and half with the chai latte spices?

Are you a snickerdoodles fan or one of the surprising number of people who've not yet tried them? Either way, I hope you'll give my recipe a try—the classic cinnamon or the chai latte variation—and let me know how you like it. 


Snickerdoodles - Classic or Chai Latte / www.delightfulrepast.com

If you like it, please Pin it and share it!


Snickerdoodles - Classic or Chai Latte


(Makes 32 3-inch cookies)

The Dough

2 3/4 dip-and-sweep cups (13.75 ounces/390 grams) unbleached all-purpose flour
2 teaspoons cream of tartar
1 teaspoon soda
1/4 teaspoon salt
2 sticks (8 ounces/227 grams) unsalted butter, room temperature (2 1/2 hours)
1 1/3 cups (9.33 ounces/265 grams) sugar
2 large eggs (medium, in UK), room temperature
1 1/2 teaspoons vanilla extract


The Coating*

3 tablespoons (just under 1 ounce/28 grams) sugar
2 1/4 teaspoons cinnamon
 
* For Chai Latte Variation, use just 1 teaspoon cinnamon, plus 3/4 teaspoon cardamom, 1/2 teaspoon ginger,  and 1/8 teaspoon each cloves and allspice.

1 In medium bowl, whisk together flour, cream of tartar, soda, and salt.

Note: I've given the directions for using a stand mixer, but I've made these many time
s with a hand mixer or just a spoon.
 
2 In stand mixer fitted with flat beater, beat butter on medium speed for 30 seconds. Add sugar and beat until light and fluffy, about 3 minutes. Beat in eggs, one at a time, and vanilla extract. Stir in flour mixture and beat on low speed just until dough comes together. Cover and refrigerate for 2 hours, or until dough is easy to handle.

3 Preheat oven to 400F/205C/Gas6. Line baking sheets with parchment paper. Shape #40 scoops (0.8 ounces or approximately 1.5 tablespoons) of dough into 1 1/4-inch balls; roll in sugar mixture. Place 3 inches apart on parchment-lined baking sheets. Using a flat-bottomed glass (or a stainless steel measuring cup), slightly flatten the dough balls. Bake for 10 to 12 minutes, or until edges are lightly browned.


Note: I use a gigantic baking sheet, called a 3/4 sheet pan, sometimes called a 2/3 sheet pan. It is the maximum size pan that will fit in my oven (in a 30-inch gas range). With it I can bake 24 cookies this size (4 rows of 6) or 35 smaller cookies (5 rows of 7) all in one batch. Since this recipe makes 32 cookies, I froze 8 cookies to be baked another day. (My all-time favorite timer: ThermoWorks TimeStack)

4 Cool on baking sheet for 1 minute, and then remove to wire racks to cool completely. May be stored in airtight container for a week.

 
Disclosure: We are a participant in the Amazon Services LLC Associates Program, an affiliate advertising program designed to provide a means for us to earn fees by linking to Amazon .com and affiliated sites. We are a ThermoWorks affiliate, earning a small commission at no cost to you on purchases made through our links. This helps cover some of the costs of running the blog. Thank you for your support.

Jean

If you liked this post, please Pin it and share it!

28 October 2021

Swedish Meatball Meatloaf

Swedish Meatball Meatloaf - all the flavor of Swedish meatballs without all the fuss / www.delightfulrepast.com

When a craving for
Swedish Meatballs - Svenska Kottbullar struck during a time when it seemed too much of a faff, I worked that recipe into this Swedish Meatball Meatloaf. It gave me all the flavors I was craving, albeit without the "cuteness" of the meatballs.

It was such a doddle, I may never make the meatballs again! Of course I will, when I need that cuteness, but now I can get my Swedish meatball fix even when I need to cut a few corners. Add it to my "streamlined cooking" repertoire. You can even put it together in the morning, then pop it into the oven after work.


Swedish Meatball Meatloaf - all the flavor of Swedish meatballs without all the fuss / www.delightfulrepast.com

Of course, a meatloaf is open to all sorts of variations and substitutions. But please don't skip the allspice and dill. Without those two ingredients, it just couldn't be called Swedish Meatball Meatloaf. Even if you bake with allspice, you might feel a bit hesitant to use it in a meatloaf; but just do it. Trust me, you're going to love it.

Thank you to everyone who commented on my last post and kindly tolerated that I was unable to respond or reciprocate at that time. I'm trying to get back in the saddle now and get back to some sort of normal (awful word, isn't it?).

For those who don't eat red meat, here's my Turkey-Mushroom Meatloaf.


Swedish Meatball Meatloaf - all the flavor of Swedish meatballs without all the fuss / www.delightfulrepast.com

If you like it, please Pin it and share it!

Swedish Meatball Meatloaf


(Serves 6)

The Meatballs

About 4 slices (4.75 ounces/135 grams) good sourdough or white bread for 1 1/2 packed cups fresh breadcrumbs
1/2 cup finely minced onion
1 tablespoon extra virgin olive oil
1 1/2 teaspoons salt
1 1/2 teaspoons coarsely ground black pepper
1/2 teaspoon allspice
1/2 cup (4 fluid ounces/118 ml) milk
1 large egg
2 teaspoons Worcestershire sauce
1 pound 85% lean ground beef
1 pound ground pork

The Sauce

3 tablespoons unsalted butter
3 tablespoons unbleached all-purpose flour
2 cups lower sodium beef broth
1 teaspoon Worcestershire sauce
1/4 teaspoon salt (you'll likely add a bit more after tasting)
1/2 teaspoon coarsely ground black pepper
1/8 teaspoon allspice
1/4 cup heavy cream or sour cream

The Garnish

Sour cream
Chopped dill, fresh or dried (NOT optional, dill MAKES Swedish Meatballs or Meatloaf!)


1 Use a food processor to make perfect fresh breadcrumbs. Cut four slices (you might need another slice or two, depending on your bread) of good sourdough or white bread into four to six pieces. You only need to remove the crust if it's coated with seeds. Process until it becomes breadcrumbs. Don't worry about overdoing it; it's pretty foolproof. You should have 1 1/2 cups,* fairly firmly packed. Add crumbs to a 4-quart mixing bowl.

* And the weight of my 1 1/2 packed cups of fresh sourdough breadcrumbs was 4.75 ounces/135 grams, so next time I will know to use that amount of the same bread so as to not have any leftover crumbs.

2 In small skillet or saucepan, heat oil and cook onion until softened, about 10 minutes. Add to crumbs in mixing bowl.

3 Add salt, pepper, allspice, milk, egg and Worcestershire sauce to bowl. Mix well. Add ground beef and ground pork, and mix well (but do not overmix). Just use your impeccably clean hand to mix, if you like.

4 Preheat oven to 400F/205C/Gas6. Line a 13x9x1-inch quarter sheet pan (or, if you don't have a quarter sheet, a 15x10x1-inch baking sheet pan) with foil or baking parchment paper (you will regret it if you don’t!). Form meatloaf mixture into a 9x5- or 10x4-inch loaf on the lined pan.

5 Bake for 55 to 60 minutes, or until it reaches a temperature of 165F/74C on an instant-read thermometer. Let stand 5 to 10 minutes before slicing. While the meatloaf is baking, start the sauce.

6 In a 2-quart saucepan, melt butter. Stir in flour, cooking and stirring to make a smooth, browned roux. Don't rush it; get the roux browned. Add beef broth and cook, stirring, until smooth and thickened. Stir in Worcestershire sauce, salt, pepper, and allspice; simmer for 10 minutes, then set aside. Ten minutes before serving, stir in cream or sour cream. Heat on low for 10 minutes. Taste and adjust seasoning.

7 Garnish each serving with a dollop of sour cream and a generous sprinkling of dill. Of course, fresh dill is prettier (I used dried, which as you can see is not as photogenic, because I have no dill in the garden just now), but the dried tastes wonderful as well.

Disclosure: We are a participant in the Amazon Services LLC Associates Program, an affiliate advertising program designed to provide a means for us to earn fees by linking to Amazon .com and affiliated sites. We are a ThermoWorks affiliate, earning a small commission at no cost to you on purchases made through our links. This helps cover some of the costs of running the blog. Thank you for your support.

Jean

If you liked this post, please Pin it and share it!