13 April 2023

Ham and Mushroom Quiche - Foolproof All-Butter Pastry Tutorial

Ham and Mushroom Quiche - Foolproof All-Butter Pastry / www.delightfulrepast.com

Pie crust is my "thing," and I make it by all sorts of methods, depending on my mood: food processor, stand mixer, by hand in a bowl, by hand on the worktop, with a pastry blender, with a bench scraper, with my fingers, you name it. Sometimes with water, sometimes milk or soured milk or buttermilk, sometimes egg, sometimes baking powder, vinegar or lemon juice. But always with unsalted butter. I love an all-butter pie crust. 

At one time or another I've made pie crust with shortening, part shortening and part butter, lard, part lard and part butter, even oil. But nothing is better than butter. I've been on a pie kick lately and decided my fingers needed a break, so I'd use the food processor. But I was itching to try something different, and I remembered that I'd heard years ago of a different food processor method but never got around to trying it. So, I adapted my usual (well, most usual) two-crust recipe to that method. And ...

I liked it! So, we've been eating lots of pies around here. Then I decided it had been far too long since I'd made a quiche and, working with what I had on hand, came up with my favorite quiche yet! Ham, onion, red bell pepper, zucchini, mushrooms, cheddar cheese. You can make substitutions, as long as you keep the total add-ins to not more than 2 cups of cooked items. Otherwise, you won't be able to use all the custard filling, no matter how high you fluted your pie shell; and you know how much I hate food waste!

Rather than tell you here what is so different about this flour-butter paste method, I'll invite you to read the directions for it below. And let me know what you think. Have you tried this method? If not, do! And make the quiche while you're at it. Don't know why, but springtime always seems like the right time for quiche!


Ham and Mushroom Quiche - Foolproof All-Butter Pastry / www.delightfulrepast.com

If you like it, please Pin it and share it!


Ham and Mushroom Quiche & Foolproof All-Butter Pastry


The Pastry

(for two pie shells or one double-crust pie)

2 1/2 dip-and-sweep cups (12.5 ounces/354 grams) unbleached all-purpose flour, divided
1 tablespoon sugar
1 teaspoon salt
2 sticks (8 ounces/227 grams) unsalted butter, cut into 1/4-inch slices
5 tablespoons (2.5 fluid ounces/74 ml) ice water plus 1 tablespoon (0.5 fluid ounces/15 ml) apple cider vinegar

The Quiche

(makes one 9-inch quiche)

1 to 2 tablespoons extra virgin olive oil, divided
8-ounce package (227 grams) mushrooms, chopped 
3/4 cup (4 ounces/113 grams) julienned ham
1/4 cup (1.25 ounces/38 grams) chopped onion
1/4 cup (1.25 ounces/38 grams) chopped red bell pepper
1/2 medium zucchini (3 ounces/85 grams) sliced
3 large eggs
1/2 + 1/8 cup (5 fluid ounces/148 ml) heavy cream
1/2 + 1/8 cup (5 fluid ounces/148 ml) milk
1/4 teaspoon salt, divided
1/4 teaspoon coarsely ground pepper, divided
1/4 teaspoon marjoram
1/8 teaspoon nutmeg
1/8 teaspoon crushed red pepper flakes
1 packed cup (4 ounces/113 grams) cheddar (or ...) cheese, shredded


1 Weigh (my kitchen scale) and measure flour, sugar, and salt in 2- to 2.5-quart mixing bowl. Whisk vigorously for about 30 seconds to "sift." With food processor's metal blade in place, scoop out half (1 1/4 cups) the flour mixture into the work bowl of the food processor (another 11-cup food processor). Spread the butter slices evenly over the fairly even flour mixture. Pulse until no dry flour remains and mixture is starting to form clumps of dough, about 25 to 30 one-second pulses. Don't get hung up on counting the number of pulses, just watch for the clumping to begin. With a silicone spatula, spread dough evenly around the work bowl. Sprinkle with the remaining flour and pulse until the dough is just barely broken up, about 5 1-second pulses.

Foolproof All-Butter Pie Crust Flour-Butter Paste Method (Step 1) / www.delightfulrepast.com

 
2 Transfer the dough back to the 2- to 2.5-quart mixing bowl. Cover and refrigerate for 10 minutes or so before proceeding. Sprinkle the dough with the water-vinegar mixture and use the spatula to fold and press the dough until it comes together into a ball.

Foolproof All-Butter Pie Crust Flour-Butter Paste Method (Step 2) / www.delightfulrepast.com


3 Turn the dough out, dividing onto two pieces of plastic wrap and flatten each slightly into a 4- to 5-inch round disk. Wrap and refrigerate for at least 2 hours or up to 3 days. You can even freeze the dough, wrapped well, for up to a month. To defrost the dough, move it from freezer to refrigerator for one day before using it. Let thoroughly chilled dough stand at room temperature for 10 to 15 minutes for easier rolling.

Foolproof All-Butter Pie Crust Flour-Butter Paste Method (Step 3) / www.delightfulrepast.com


Note: If you're making two pie shells, make the disks the same size. If you're making a double-crust pie, make one disk a little larger for the bottom crust. For a 9-inch double-crust pie (I always use the classic 9-inch Pyrex pie plate), I roll the bottom crust into a 13-inch circle and the top crust into an 11-inch circle. 

Foolproof All-Butter Pie Crust Flour-Butter Paste Method (Step 4) / www.delightfulrepast.com


4 For single-crust pie: On lightly floured surface with lightly floured rolling pin, roll out the dough to 13 inches in diameter and 1/8 inch or so thick. Transfer the dough to the pie plate, pressing the dough (but not stretching it) to fit the pie plate, getting down into the corners, with a half- to one-inch overhang (trim with knife or scissors, and save in case you need to patch a little hole after the blind baking). Cover with the reserved piece of plastic wrap and chill for 10 minutes before fluting the edge. Cover and return to refrigerator while the oven heats up. Preheat oven to 375F/190C/Gas5. Line chilled pie shell with a square of foil and fill with pie weights (baking beans, in UK). I use two boxes of ceramic pie weights that store neatly in a 200-gram Twinings tea tin. Bake for 25 minutes. Remove pie weights. Prick the pastry bottom all over with a fork. Bake for another 15 minutes until golden brown. 

Foolproof All-Butter Pie Crust Flour-Butter Paste Method (Step 4) / www.delightfulrepast.com


For double-crust pie: On lightly floured surface with lightly floured rolling pin, roll out the bottom crust dough to 13 inches in diameter and 1/8 inch or so thick. Transfer the dough to the pie plate, pressing the dough (but not stretching it) to fit the pie plate with a half- to one-inch overhang (trim with knife or scissors). Cover with the reserved piece of plastic wrap and refrigerate. Roll out top crust dough to 11 inches in diameter and 1/8 inch or so thick and place it on a rimless baking sheet; cover with reserved plastic wrap and refrigerate. Make pie filling. Then assemble pie and bake as directed. 

And now, to the quiche!

5 In a large skillet, heat a tablespoon of olive oil and cook the mushrooms, ham, onion, and bell pepper, adding more olive oil as needed. Use 1/8 teaspoon of the salt, 1/8 teaspoon of the pepper, and all the marjoram. Be sure all the liquid has evaporated. Cook the zucchini slices separately. Let cool a bit.

6 Preheat oven to 350F/180C/Gas4. Into the fully baked pie shell, put a third of the cheese, half of the ham and vegetables (except the sliced zucchini), a third of the cheese, other half of the ham and vegetables. Pour in the filling. Top with the remaining cheese and the zucchini slices. Set on a parchment-lined 15x10x1-inch baking sheet. Bake for about 50 to 70 minutes, or until it tests done. A slight wobble in the center is fine, but it should not be wet. The reason there's quite a time range given is because of the variables: your oven, how well cooked (moisture removed) the vegetables were, and so on. 

Note: It's always good to keep an aluminum pie crust shield handy in case your edges are overbrowning.

7 Let quiche stand for 20 to 25 minutes before slicing and serving.

Disclosure: We are a participant in the Amazon Services LLC Associates Program, an affiliate advertising program designed to provide a means for us to earn fees at no cost to you by linking to Amazon .com and affiliated sites. This helps cover some of the costs of running the blog. Thank you for your support. 

Jean

If you liked this post, please Pin it and share it!

09 March 2023

Beef Stroganoff

Beef Stroganoff - A Comfort Food Classic / www.delightfulrepast.com


Beef Stroganoff is one of those classic dishes that seems to go in and out of fashion. It is said to have been invented in 1891 by French chef Charles Briere while in the employ of a Russian household. 

The first recipe for Beef Stroganoff in an English language cookbook was in 1932. It became very popular in the US after World War II, then again in the 1960s and at other points over the years. And it appears to be having a moment now, at least at my house. 

Various cuts of beef can be used for the dish to suit different budgets and schedules—meaning the less expensive cuts require longer cooking. I didn't have time for extended cooking to tenderize a cheaper cut, and since I was only making it for two, I used a boneless beef ribeye steak. If you really want to push the boat out, tenderloin or filet mignon is a good choice.

I decided years ago to cook the steak whole and then slice it—rather than the usual slice-and-then-cook method—for two reasons: 1. It's too easy to overcook those slices, and 2. searing the whole steak develops better browning for great fond and flavor without the risk of overcooking and toughening that expensive beef. If you're using a tougher cut that requires long cooking, slice the steak before browning. 

When was the last time you made Beef Stroganoff? As with other dishes I love, I tend to forget about it for a while and then make it frequently for a time, then it seems to "fall out of rotation" until it occurs to me again. I'm making it again this week!


Beef Stroganoff - A Comfort Food Classic / www.delightfulrepast.com

If you like it, please Pin it and share it!

 Beef Stroganoff


(Serves 2 or 3)

1 12- to 16-ounce (340 to 454 grams) boneless beef ribeye steak, trimmed of excess fat
3/4 teaspoon salt, divided (including noodle cooking water)
3/8 teaspoon coarsely ground black pepper, divided
1/4 cup diced or sliced yellow onion
2 tablespoons unsalted butter
8 ounces mushrooms, sliced
1 teaspoon Worcestershire sauce
1/3 of 12-ounce package (4 ounces/113 grams) wide egg noodles
2 tablespoons unbleached all-purpose flour
1/4 cup (2 fluid ounces/59 ml) brandy
1 cup (8 fluid ounces/237 ml) lower sodium beef broth
2 teaspoons tomato paste
1 teaspoon Dijon mustard
3 tablespoons sour cream
1 teaspoon unsalted butter
1 tablespoon minced fresh flat-leaf parsley

1 Add 2 teaspoons extra virgin olive oil to thoroughly preheated skillet, continue heating until oil shimmers, and cook the patted dry, salted (1/8 teaspoon) and peppered (1/4 teaspoon) steak to medium rare; it will cook further after being sliced and added to the sauce. Remove to cutting board and let rest for 10 minutes. 

2 In 2- to 3-quart saucepan, start boiling 1 quart of water with 1/2 teaspoon of salt.

3 Drain off most of the fat from pan, and add onion, cooking for about 5 minutes. Add butter, mushrooms, 1/8 teaspoon each salt and pepper, and the Worcestershire sauce. Cook, stirring frequently, for about 10 minutes. In the meantime, slice the rested steak about 1/8 inch thick across the grain; set aside. And stir the noodles into the rapidly boiling salted water; cook for length of time specified on the package.

4 Sprinkle the flour over the onion and mushrooms and cook, stirring, for a minute or two. Stir in the brandy and beef broth and cook, stirring, for a few minutes until thickening. Stir in the tomato paste and mustard.

5 Just before serving, stir in the sour cream, then the sliced steak. Cook over low heat just long enough to get heated through and steak to be to your preferred doneness; do not overcook and toughen the meat. Taste and adjust seasoning.

6 You can either add the cooked and drained noodles to the stroganoff or add the teaspoon of butter to the drained noodles and serve the stroganoff over a bed of buttered noodles. Garnish with minced fresh flat-leaf parsley.

Disclosure: We are a participant in the Amazon Services LLC Associates Program, an affiliate advertising program designed to provide a means for us to earn fees by linking to Amazon .com and affiliated sites. We are a ThermoWorks affiliate, earning a small commission at no cost to you on purchases made through our links. This helps cover some of the costs of running the blog. Thank you for your support. 

Jean

If you liked this post, please Pin it and share it!

09 February 2023

Cheese Enchiladas with Homemade Red Enchilada Sauce

Cheese Enchiladas with Homemade Red Enchilada Sauce / www.delightfulrepast.com

Cheese enchiladas—one of my favorite comfort food meals—is the perfect thing to have on the occasion of my 13th blogiversary! Can't believe I haven't posted this before. 

And I can't believe I didn't take a pic of the enchiladas after they were baked! Sorry. They were so pretty!

I like to use a combination of Monterey Jack and medium cheddar cheeses, freshly grated. And, for me, homemade sauce is a must. If you've always used canned sauce, you'll be surprised at how quick, easy, and better homemade sauce is.

The enchiladas can be made ahead and refrigerated until an hour before serving time or baked right after assembling. You'll find baking times for both in step 6. 

After 10 years of posting weekly, I switched to posting every other week, which worked well for 2 1/2 years. Then I went to every three weeks, but I'm finding life so full that those three weeks fly by in a blur. Now at the 13-year mark, I've decided to post monthly, on the second Thursday of every month. 

If you join my Followers (in the sidebar, just above the Follow Me on Twitter button), you'll receive updates of this blog's posts in your Reading List on Blogger .com. Or you can just mark it on your calendar. 

Cheese Enchiladas with Homemade Red Enchilada Sauce / www.delightfulrepast.com

If you like it, please Pin it and share it!

And, again, sorry I didn't take a picture of the 
baked enchiladas for you. But if you could have 
smelled them, you'd see why I wanted to 
dive right in without the usual blog photo shoot! 

Cheese Enchiladas


(Makes 12)

The Sauce

3 tablespoons (1.5 ounces/43 grams) unsalted butter 
3 tablespoons (27 grams) unbleached all-purpose flour
2 teaspoons paprika
1 teaspoon cumin
1/4 teaspoon salt
1/4 teaspoon coarsely ground black pepper 
1/4 teaspoon cayenne
1/4 teaspoon oregano
2 tablespoons tomato paste 
2 1/2 cups (20 fluid ounces/591 ml) lower sodium chicken broth (or vegetable broth to make it vegetarian)

The Enchiladas

8 ounces (227 grams) medium or mild cheddar cheese, shredded
8 ounces (227 grams) Monterey Jack cheese, shredded 
12 6-inch white corn tortillas
About 2 tablespoons extra virgin olive oil


1 In skillet, melt the butter and blend in the flour, paprika, cumin, salt, pepper, cayenne, and oregano. Cook over low heat, stirring constantly, for 2 to 3 minutes. Whisk in the tomato paste until smooth and fragrant. Whisk in the broth. Bring the sauce to a simmer. When it begins to bubble, continue cooking and whisking for about 10 minutes, until sauce is thickening. Taste and adjust seasoning. Remove from the heat.

2 Combine the two cheeses and set aside 4 ounces/113 grams (1 packed cup) of the cheese mixture to top the filled and sauced enchiladas.

3 Spread 1/2 cup (4 fluid ounces/118 ml) of the sauce in a lightly greased 13x9x2-inch baking dish.

4 Heat a griddle (my square griddle can cook 2 tortillas at a time), put 2 little 1/2 teaspoon puddles of oil (about the size of a quarter) on the hot griddle. When oil is hot, lay down the 2 tortillas and cook for about a minute, turning them several times. Repeat to lightly cook all 12 tortillas. 

5 Spread a tablespoon of sauce on a dinner plate, lay the cooked tortilla on the plate, spread on a tablespoon of sauce, spread a line of shredded cheese mixture, about 3 tablespoons, a heaping packed 1/8 cup (1 ounce/28 grams) across the tortilla, roll tightly, and place seam side down in baking dish, making two rows of six in the dish. Top with remaining sauce and cheese. Cover and refrigerate until an hour before baking time.

6 Preheat oven to 350F/180C/Gas4. Bake for about 45* minutes, or until bubbly. Let stand for 10 minutes before serving. Serve with sour cream and a squeeze of lime; garnish with cilantro or sliced green onions.

* If you're baking the enchiladas right after assembling them, just bake them for about 25 minutes.

Disclosure: We are a participant in the Amazon Services LLC Associates Program, an affiliate advertising program designed to provide a means for us to earn fees by linking to Amazon .com and affiliated sites. We are a ThermoWorks affiliate, earning a small commission at no cost to you on purchases made through our links. This helps cover some of the costs of running the blog. Thank you for your support. 

Jean

If you liked this post, please Pin it and share it!

12 January 2023

Lemon Cakes with Raspberry Sauce

Lemon Cakes with Raspberry Sauce / www.delightfulrepast.com

Lemon Cakes—or Lemon Cupcakes, if you don't have the 
cannelés pan—look a little "dressy" without having to go to the mess and bother of making icing and getting out the piping bag and all that. Making a little batch of raspberry sauce is a doddle.

I was in the mood for Lemon Drizzle Cake, but I wanted to experiment with other uses for my new cannelés pan that has barely had time to cool off in the month I've had it. It has turned out batch after batch of perfect Cannelés

Anticipating my 13th blogiversary next month here at Delightful Repast, I was in the mood for something a little special, a little festive. Lemon Cakes with Raspberry Sauce and Whipped Cream filled the bill nicely. I hope you'll make them soon.


Lemon Cakes with Raspberry Sauce / www.delightfulrepast.com


For the first ten years of Delightful Repast, I posted every Thursday. Then I went to every other Thursday, then every third Thursday. Well, I'm going to reward myself for keeping this lark going for 13 years by going to monthly posting, the second Thursday of every month. 

I hope you'll carry on with me monthly, marking it on your calendar or however you remind yourself of things. Or just come back every week and read one of more than 600 posts. Wishing you a delightful 2023!


Lemon Cakes with Raspberry Sauce / www.delightfulrepast.com

If you like it, please Pin it and share it!


Lemon Cakes


(Makes 12)

1 large egg, room temperature
1 large egg white, room temperature
1/2 cup (4 fluid ounces/118 ml) milk, divided
1 teaspoon vanilla extract
1 dip-and-sweep cup (5 ounces/142 grams) unbleached all-purpose flour
3/4 cup (5.25 ounces/149 grams) sugar
2 teaspoons baking powder
1/4 teaspoon salt
5 tablespoons (2.5 ounces/71 grams) unsalted butter, room temperature
1 1/2 teaspoons freshly squeezed lemon juice
1 1/2 teaspoons grated lemon zest

1 Preheat oven to 350F/180C/Gas4. Prepare* the cannelés pan. Or put 2½-inch paper bake cups in a standard muffin tin. In small bowl, lightly combine the egg and yolk, a quarter of the milk, and the vanilla extract.

* You can use a baking spray—not a cooking spray—that contains flour or do what I do: grease (with Crisco shortening) and flour each of the 12 molds. Cooking sprays cause a gummy film to eventually build up on nonstick pans and ruins them. 

2 In medium mixing bowl, combine all the dry ingredients and mix on low speed for a minute to "sift." Add the softened butter and remaining milk. Mix on low speed until combined. With mixer on medium-high speed, beat for a minute and a half. Scrape the bowl.

3 Beat in the egg mixture in three batches, beating for 20 seconds after each addition. Scrape the bowl and, with spatula, stir in lemon juice and zest (I do it by hand because zest tends to get tangled up in the beaters).

4 Using a 1/4-cup measure as a scoop, divide the batter evenly among the 12 molds. Fill each with a scant (or level) 1/4 cup of batter, then scrape the bowl and spoon it in. Bake for about 20 to 22 minutes or until they are golden and one in the center tests done with a toothpick.

5 Cool in the cannelés pan for 5 minutes before turning them out to cool completely on a wire rack for an hour.


Raspberry Sauce


(Makes about 3/4 cup)

1 10-ounce package frozen whole raspberries unsweetened
1/4 cup (1.75 ounces/50 grams) sugar
1/4 cup (2 fluid ounces/59 ml) water
1 tablespoon (0.5 fluid ounce/15 ml) freshly squeezed lemon juice

1 In a small saucepan over medium heat, bring all the ingredients to a boil for 2 minutes, then reduce heat and simmer for 10 minutes, all the while stirring frequently.

2 With a silicone spatula, press the sauce through a fine-mesh strainer to remove the seeds. Cover and cool to room temperature, then refrigerate for at least an hour.

Disclosure: We are a participant in the Amazon Services LLC Associates Program, an affiliate advertising program designed to provide a means for us to earn fees by linking to Amazon .com and affiliated sites. We are a ThermoWorks affiliate, earning a small commission at no cost to you on purchases made through our links. This helps cover some of the costs of running the blog. Thank you for your support.

Jean

If you liked this post, please Pin it and share it! 

16 December 2022

Cannelés - A Small French Pastry That Originated in Bordeaux

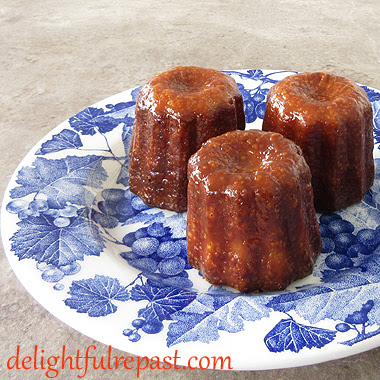
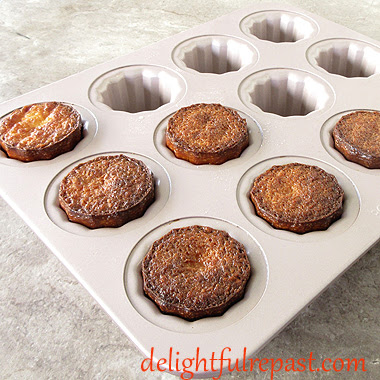
Canneles - A Small French Pastry That Originated in Bordeaux / www.delightfulrepast.com

Cannelés
(sometimes spelled canelés, and pronounced CANuhLEE, actually not quite LEE and not quite LAY) have been on my must-make list for literally (and I don't use that word lightly) decades. 

But every time they occur to me happens to coincide with a time when I am trying mightily to not add another specialty item to my batterie de cuisine collection! Some of you know what I'm talking about, right?

As recently as perhaps 15 years ago, I would have only been satisfied with the very pricey individual tin-lined copper molds and would have gone to great lengths to procure food-grade beeswax to coat the interiors, etc, etc. Well, I am soooo over all that!

When my latest reminder of cannelés came from David at Cocoa and Lavender, well, I could hold out no longer and ordered the same pan he recently acquired. He started his blog at the same time I did, with recipes ranging from simple to complex, like mine; and a love of food that, like mine, goes back to his childhood and his mother's amazing cooking. He also has an allergy, like mine, to garlic! So naturally I assumed that I could trust his choice of cannelés molds.


Canneles - A Small French Pastry That Originated in Bordeaux / www.delightfulrepast.com


So I ordered a pan and started digging through my files, remembering that I had come up with a recipe many years ago that was a mishmash of ones I had looked at and added my own touches to. The main differences between recipes is in the baking time and temperature. 

Most call for at least the first 10 to 20 minutes at a very high (some as high as 500F/260C/Gas10) temperature. One recipe said to bake at 400F/205C/Gas6) for 2 hours! Really?! 

Every recipe I've seen calls for way more sugar than I like. First batch I made, I cut the sugar to 3/4 cup but found them still a bit too sweet (you won't!), so next time I went to 1/2 cup. It was plenty sweet enough for me, but it made the texture all wrong, no longer cannelés, so I'm going to stick with my original 3/4 cup.

One type of cannelés molds I never considered is the silicone. I have never tried a silicone baking "pan" of any kind. They just do not appeal to me in any way. If you like them, fine. But I just, no, just, no. A baking tin, or pan, should not be squishy!

A delightful after-dinner dessert or coffee go-with, cannelés are perfect for the afternoon tea table, along with Fruit Tartlets and petite Cream Puffs.  

So tell me, have you ever made cannelés? What kind of molds—silicone, tin-lined copper, other metal? What degree of caramelization do you prefer—golden, light brown, dark brown, black?


Canneles - A Small French Pastry That Originated in Bordeaux / www.delightfulrepast.com

If you like it, please Pin it and share it!

Cannelés


(Makes 12, if you're using the same size molds)

2 cups (16 fluid ounces/473 ml) milk
3 tablespoons (1.5 ounces/43 grams) unsalted butter
3/4 dip-and-sweep cup (5.25 ounces/106 grams) unbleached all-purpose flour
3/4 cup (5.25 ounces/149 grams) sugar
1/4 teaspoon salt
2 large eggs (medium, in UK and some other places)
2 large egg yolks
1/4 cup (2 fluid ounces/59 ml) dark rum
2 teaspoons vanilla extract

1 In 1-quart saucepan, heat the milk and butter until the butter is melted and the milk is up to a simmer; do not boil.

2 In medium mixing bowl, whisk together the flour, sugar, and salt vigorously for 1 minute to "sift."

3 Add the eggs, yolks, rum, and vanilla extract to the flour mixture and whisk vigorously until smooth. When smooth, whisk in the hot milk a third at a time. This ensures a lump-free batter that doesn't need straining.

4 Cover and refrigerate for 24 to 72 hours.

5 When ready to bake, put a sheet of aluminum foil on the shelf beneath the shelf you'll be placing the pan on (the foil will catch any butter drips) and preheat oven to 425F/220C/Gas7. In small bowl (microwave) or pan (stovetop), melt 2 teaspoons of solid shortening* and brush the molds with it.

* I keep a stick of Crisco in my refrigerator strictly for greasing certain pans. Many pans do a great job of releasing cakes that have been buttered, buttered and floured, oiled, or sprayed. But for pans that are molds (such as these and Bundt cakes), shortening always gives me a good result and does not gum up the pan as some oils do.

6 Whisk the batter a bit. If a skin has formed, just whisk it in. Fill each mold to within about 3/8 inch (1 cm) of the top.

Note: For this pan, I use a 1/3-cup measuring cup as a ladle to fill the molds with the 1/4 cup of batter they need. Using a 1/4-cup measuring cup as a ladle actually fills them with less than 1/4 cup due to the concave meniscus of the liquid (or something like that!). 

7 Place the cannelés pan in the preheated oven. Bake for 20 minutes, then reduce heat to 375F/190C/Gas5 and bake for about 50 to 60 minutes, or until they are as deeply caramelized as you like them. Some people go for nearly black. Rotate pan halfway through for more even baking.

8 Turn the cannelés out onto a wire rack to cool. If any of the cannelés are not adequately or evenly caramelized, set them right side up on a small baking sheet and return them to the oven for 5 minutes or so. Allow them to cool for 2 hours before serving. This allows time for the exterior to crisp and the interior to set to the proper consistency. The crispy exterior will last for perhaps 6 hours. After that it will soften, and the cannelés will still be delicious but the characteristic crunch will be gone. They can be reheated and left to cool again to refresh them.

* Pan details: ChefMade WK9158 carbon steel 12-cup nonstick cannele mould, oven safe up to 450F/230C/Gas8, handwash only, made in China.

Disclosure: We are a participant in the Amazon Services LLC Associates Program, an affiliate advertising program designed to provide a means for us to earn fees by linking to Amazon .com and affiliated sites. We are a ThermoWorks affiliate, earning a small commission at no cost to you on purchases made through our links. This helps cover some of the costs of running the blog. Thank you for your support.

Jean

If you liked this post, please Pin it and share it!