Showing posts with label Middle Eastern food. Show all posts

31 March 2022

Baba Ghanoush with Oven-Toasted Pita Wedges

Baba Ghanoush with Oven-Toasted Pita Wedges / www.delightfulrepast.com

Baba Ghanoush, my second favorite Middle Eastern food (after hummus) is another one of those things my texturally challenged husband won't even try. He's just not a dip/spread kinda guy. But since most people are, you should have some of this on hand over the weekend. Make a big batch, serve some tonight and the rest over the weekend. It keeps nicely for a few days.

As with the hummus, don't get too carried away with the garlic. Remember the garlic is just a minor player, the eggplant is the star. You'll have plenty of time to make the oven-toasted pita wedges (see below) while the baba ghanoush is chilling. Tell me, do you or someone you know have these texture issues, or is Mr Delightful the only person on the planet who doesn't like dips of any kind?

If you'd like to make your own pita bread for the Oven-Toasted Pita Wedges (below), it's really quite easy. I hope you'll try it soon. (And, yes, I do know that 'pita' means bread and that saying 'pita bread' is really saying 'bread bread'!)


Baba Ghanoush with Oven-Toasted Pita Wedges (watercolor by me) / www.delightfulrepast.com)

If you like this post, please Pin it and share it!

I have to admit, baba ghanoush is not the most photogenic food in the world and needs some serious styling, which I didn't have time to do, so I used my watercolor eggplant painting for the "Pinnable-size" image in this post!

Baba Ghanoush - Caviar d'Aubergine

(Makes 2 cups)

2 medium (1 1/2 to 2 pounds total) eggplants
2 tablespoons fresh lemon juice
1/4 teaspoon (1/2 small clove) minced garlic
1/4 cup unsalted tahini
1/2 teaspoon salt
1/4 teaspoon pepper
1/8 teaspoon cumin
1 tablespoon extra-virgin olive oil

1 Preheat oven to 450F/230C/Gas8. Cut eggplants in half, score tops with diamond pattern, rub with just enough oil to coat. Place on foil-lined baking sheet and roast about 30 minutes or until very soft. Cool slightly. Scoop out flesh into colander and let stand a few minutes to drain off any liquid.

2
 In bowl of food processor, place drained eggplant and all remaining ingredients. Pulse 8 to 12 times. Put into serving dish and cover with plastic wrap directly on the surface. Refrigerate for at least four hours before serving. Can be made a day or two ahead.

3
 Garnish with a drizzle of olive oil and some finely chopped mint, flat-leaf parsley or pistachios. (I didn't have any of those on hand, so I just used some paprika.) Serve with oven-toasted whole wheat pita wedges (see below), sliced baguette or Armenian cracker bread (I love ak-mak!) and raw vegetable strips.

Oven-Toasted Pita Wedges

(Makes 48 wedges)

Preheat oven to 375F/190C/Gas5. Brush a little extra-virgin olive oil on both sides of 6 whole wheat pitas (one package). Cut each into 8 wedges. Place on two large baking sheets. Sprinkle with a little salt, if you like. Bake for 6 to 10 minutes or until crisp; no need to turn. Can be made day ahead, cooled completely and stored in airtight container.

And here's my favorite kitchen timer, the TimeStack, 'cause if you're like me and have a lot going on at one time, you need more than one or two timers!

Disclosure: We are a participant in the Amazon Services LLC Associates Program, an affiliate advertising program designed to provide a means for us to earn fees by linking to Amazon .com and affiliated sites. We are a ThermoWorks affiliate, earning a small commission at no cost to you on purchases made through our links. This helps cover some of the costs of running the blog. Thank you for your support. 

Jean

If you liked this post, please Pin it and share it!

21 July 2016

Pita Bread - Pitta Bread

Homemade Pita (Pitta) Bread / www.delightfulrepast.com

Homemade Pita Bread (in British English, pitta bread) is so much better than store-bought and really doesn't take much active time once you get your moves down. I especially like it with just a little whole wheat flour (as in my recipe below), but I was out so just used all unbleached all-purpose flour this time. Still delicious!

Having made it both in the oven and on the stovetop, I get the best results with the oven. But if you've never made pita bread, try it both ways; you might get your best results with the stovetop. One way I've not tried, and plan to next time, is to bake them six at a time on a preheated heavy-duty sheet pan.

Mr. Delightful likes pita bread sandwiches, but not the sandwiches I made today! He refuses to eat "mushy" foods like baba ghanoush or hummus. I put a schmear of hummus on both sides of the pockets and filled them with thinly sliced tomatoes and cucumbers and shredded carrot. Love it!

And I made a wonderful discovery today! Besides being out of whole wheat flour, I was out of tahini; so I decided to try my hummus with peanut butter (organic natural - the kind you have to stir - peanut butter), and it worked! Do you like to try substitutions or would you drag your lazy carcass out to the shops to get the proper ingredients?!

Homemade Pita (Pitta) Bread / www.delightfulrepast.com

Pita Bread - Pitta Bread


(Makes 12)

2 3/4 cups (13.75 ounces/390 grams) unbleached all-purpose flour 
3/4 cup (3.75 ounces/106 grams) whole wheat flour 
1 1/2 teaspoons sugar 
1 1/2 teaspoons salt 
2 teaspoons (0.25 ounce/7 grams) instant yeast 
1 to 1 1/4 cups (8 to 10 fluid ounces/237 to 296 ml) water, room temperature 
3 tablespoons extra virgin olive oil 

1 In large bowl, stir together the two* flours, removing 1/4 cup of the unbleached flour to use for kneading. Stir in sugar, salt and instant yeast. With dough whisk or spoon, stir in the oil and 1 cup of the water until thoroughly combined, gradually adding more water only if needed. Stir for a minute. The dough should be "shaggy," soft but not too wet. 

* The batch photographed was made with all unbleached flour because I was out of whole wheat. 

2 Turn dough out onto lightly floured (from the reserved 1/4 cup) surface, and knead for 8 to 10 minutes, adding only enough flour to keep dough from being "too" sticky. It should be sticky, but not sticky enough to come off on your hands or the counter. 

3 Put into a lightly oiled bowl (I use a 2-quart glass measure so that I can measure the rise), cover and refrigerate overnight. 

Note: The long, slow rise not only makes the bread more flavorful, this timing allows you to make the dough on a busy weeknight. Example: Make the dough Friday evening, refrigerate it overnight, bake the pitas the next day or evening (taking the dough out of the refrigerator about 3 hours before you plan to bake the pitas). 

4 Bring dough to room temperature (about 1 1/2 to 2 hours), knead lightly just a few strokes, divide into 12 equal pieces. I actually weigh the dough and divide the weight by 12 (which came to about 70 grams, or about 2.5 ounces). If you're not as obsessive as I am, you might just eyeball it.

5 Roll each piece into a smooth ball, place fairly close together on your countertop and cover with a damp tea towel or an overturned bowl; allow to rest for 10 minutes. 

Meanwhile, move oven rack to lowest position. Place a pizza stone, cast iron pizza pan or griddle or a heavy-duty baking sheet in the oven, and preheat to 475F/245C/Gas9 for 30 minutes. 

Roll dough balls out on a lightly floured surface to rounds about 3/16 inch (or 1/2 cm) thick (about 6 to 7 inches/15 to 18 cm in diameter), making sure they are evenly thick all over. Cover with a damp tea towel and leave for 20 minutes. 

Quickly place as many pitas as will fit on the hot stone, keeping the oven open as short a time as possible. Cook until they puff up, about a minute; flip with tongs or spatula and cook about another minute. Loosely wrap in a tea towel while you continue to cook pitas. 

Note: The pitas should be soft, not crisp, and pale, with only a few brown speckles. Keeping them covered will keep them soft as well as warm. 

9 Serve, covered, in napkin-lined basket. Or let cool completely, wrapped in tea towel, before wrapping and freezing. 


Homemade Pita (Pitta) Bread / www.delightfulrepast.com


25 June 2015

Tabbouleh - Made with Quinoa Instead of Bulgur

Tabbouleh / www.delightfulrepast.com

Tabbouleh is, of course, neither English nor Southern, so how did it become part of my repertoire? My sister-in-law (Mr. Delightful's sister) married into a Middle Eastern family and learned to make all sorts of wonderful dishes, including tabbouleh. One time, many years ago, when we were spending a week or so with her, we attended a big family gathering (a bridal shower, I think) where her nieces showed me how to make it.

Only when I went home and made a small batch of it did I fully appreciate all the work that had gone into the huge batch they had made for the shower. All by hand. So that's how I've always done it. The food processor might make quick work of all that parsley and mint, but I've yet to try it. Now, after all this time, I'm afraid to. Afraid I'll find out it works great, and then I'll be kicking myself!

It's perfect for summer, especially cookouts. It’s easy to keep serving up the same favorite barbecue menu all summer. Instead, try a different theme once in a while. A Middle Eastern theme might include grilled butterflied leg of lamb, grilled eggplant and other vegetables, along with dishes such as hummus, baba ghanoush and tabbouleh.

This recipe calls for a great deal more tomato, parsley and mint than many tabbouleh recipes. I am told by Middle Easterners that the recipes that are more bulgur than salad or that call for garlic or green peppers are not authentic. But who’s to say what is authentic? Every family of cooks has its own variations on traditional dishes. And here I am really flouting authenticity, using organic quinoa instead of bulgur.

If your family has a tabbouleh tradition, I'd love to hear about your recipe and whether you chop by hand or use a food processor. 


Tabbouleh (or Tabouli) - Made with Quinoa Instead of Bulgur / www.delightfulrepast.com

If you like it, please Pin it and share it!

Tabbouleh

(Makes about 2.5 quarts)

1 1/3 cup water
1 cup organic whole grain quinoa
1/8 teaspoon salt
4 medium (1 1/2 pounds) tomatoes, cut into 1/4-inch dice
3 green onions, very thinly sliced
2 bunches (about 10 ounces total) flat-leaf parsley, very finely chopped
1 bunch (about 2 ounces) mint, leaves only, very finely chopped
1/4 cup freshly squeezed lemon juice
1/3 to 2/3 cup extra virgin olive oil
1/4 teaspoon salt
1/4 teaspoon coarsely ground black pepper
(Optional: 1/4 teaspoon cinnamon and 1/2 teaspoon allspice, authentic, I'm told, but not to my taste)

1 In small saucepan, bring water to a boil. Stir in quinoa and salt. Return to the boil, cover, reduce heat to lowest possible, and simmer for 12 minutes. Let stand, covered, for 5 minutes. Transfer to a 2.5-quart bowl.

2 Meanwhile, prepare by hand the tomatoes, green onions, parsley and mint. Spread the diced tomatoes and their juice over the quinoa, then add the sliced onions and chopped parsley and mint.

3 Whisk together lemon juice, olive oil (start with 1/3 cup), salt and pepper. Pour over tabbouleh and toss to mix well. Taste and adjust seasoning; add more olive oil and/or lemon juice, if needed. Cover and chill for 1 hour (or up to 1 day). Serve with grape leaves or leaves of lettuce or cabbage for scooping.

Note: You can change it up a bit with the addition of either cucumber or red bell pepper, cut into 1/4-inch dice.

Jean

If you liked this post, please Pin it and share it!

31 December 2010

Baba Ghanoush - Middle Eastern Dip/Spread


Baba Ghanoush, my second favorite Middle Eastern food (after hummus) is another one of those things my texturally challenged husband won't even try. He's just not a dip/spread kinda guy. But since most people are, you should have some of this on hand over the weekend. Make a big batch, serve some tonight and the rest over the weekend. It keeps nicely for a few days.

As with the hummus, don't get too carried away with the garlic. Remember the garlic is just a minor player, the eggplant is the star. You'll have plenty of time to make the oven-toasted pita wedges (see below) while the baba ghanoush is chilling. Tell me, do you or someone you know have these texture issues, or is my guy the only person on the planet who doesn't like dips of any kind?


Update 08/29/16: I haven't bought any pita bread in some time, not since I started making my own. It's really quite easy, and I hope you'll try it soon!


Baba Ghanoush - Caviar d'Aubergine


(Makes 2 cups)

2 medium (1 1/2 - 2 pounds total) eggplants
2 tablespoons fresh lemon juice
1/4 teaspoon (1/2 small clove) minced garlic
1/4 cup unsalted tahini
1/2 teaspoon salt
1/4 teaspoon pepper
1/8 teaspoon cumin
1 tablespoon extra-virgin olive oil

1 Preheat oven to 450 degrees. Cut eggplants in half, score tops with diamond pattern, rub with just enough oil to coat. Place on foil-lined baking sheet and roast about 30 minutes or until very soft. Cool slightly. Scoop out flesh into colander and let stand a few minutes to drain off any liquid.

2
In bowl of food processor*, place drained eggplant and all remaining ingredients. Pulse 8 to 12 times. Put into serving dish and cover with plastic wrap directly on the surface. Refrigerate for at least four hours before serving. Can be made a day or two ahead.

3
Garnish with a drizzle of olive oil and some finely chopped mint, flat-leaf parsley or pistachios. (I didn't have any of those on hand, so I just used some paprika.) Serve with oven-toasted whole wheat pita wedges (see below), sliced baguette or Armenian cracker bread (I love ak-mak!) and raw vegetable strips.

* I have the DLC-10E, which (understandably after all this time--I've had it since I was very young) is no longer available. See Cuisinart DLC-2009CHB Prep 9 9-Cup Food Processor, Brushed Stainless and other currently available models.


Oven-Toasted Pita Wedges


(Makes 48 wedges)

Preheat oven to 375 degrees. Brush a little extra-virgin olive oil on both sides of 6 whole wheat pitas (one package). Cut each into 8 wedges. Place on two large baking sheets. Sprinkle with a little salt, if you like. Bake for 6 to 10 minutes or until crisp; no need to turn. Can be made day ahead, cooled completely and stored in airtight container.

24 December 2010

Hummus - Middle Eastern Dip/Spread


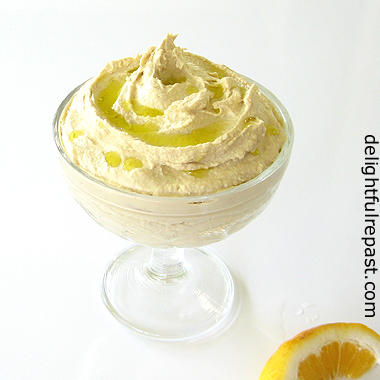
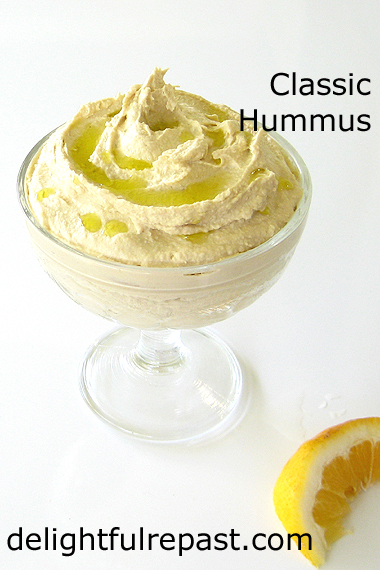
Hummus - Classic Hummus - no nonsense! / www.delightfulrepast.com

Hummus, possibly my favorite Middle Eastern food, is one of those things I've been making for decades, and I still love it! It's also one of those things that can be either really good or really bad. The really bad ones are too dry or too runny, too highly seasoned or too bland. When it comes to hummus, I'm a purist and think "real" hummus should have just six ingredients, not counting garnish. And I use all organic ingredients.

I've told you before how I feel about garlic. It's a wonderful thing when used judiciously, but there are other flavors in the world! Many dishes that typically have garlic can be greatly improved by using less or, in some cases, no garlic. However, there are some things that simply must have a little garlic (and when I say garlic, I don't mean garlic salt or garlic powder or chopped garlic from a jar). One of these is hummus. There is no hummus without garlic, but it only needs a tiny bit.


Update 08/29/16: I stopped buying pita bread some time ago when I started making my own. It's quite easy, and I hope you'll try it soon. Also, try my Baba Ghanoush.

Hummus - Classic Hummus - no nonsense! / www.delightfulrepast.com

Hummus


(Makes 2 cups)

1 15-ounce can garbanzo beans, drained
1/2 cup unsalted tahini
1/3 cup extra virgin olive oil
1/3 cup fresh Meyer lemon juice
1/2 teaspoon salt
1/4 teaspoon (1/2 small clove) minced garlic

1 In bowl of food processor, place all ingredients. Process until smooth, about 5 minutes. If you prefer a thinner consistency, add a little more lemon juice or olive oil. If you're not using a Meyer lemon, though, you could make it too lemony, so a little water might be better.


2 Put into serving dish and cover with plastic wrap directly on the surface. Refrigerate for at least a few hours or overnight before serving.

3 Garnish with a drizzle of olive oil and a little finely chopped mint, flat-leaf parsley or pistachios.

4 Serve with whole wheat pita wedges, Armenian cracker bread and raw vegetable strips. Enjoy the delightful repast!

And now for something completely different ... has nothing to do with hummus, nothing to do with food ... just a little something to make you feel warm and cozy on a cold, winter day. 


Tuppence and Lionel (my fave) belong to Judy at Cranberry Morning.

Jean

17 February 2010

Enough Already with the Garlic!


Hummus - with just the right amount of garlic / www.delightfulrepast.com

Okay, I know this is going to ruffle a lot of feathers, but it must be said. Too many cooks, home and professional, think Garlic Equals Gourmet. And it just doesn't. I don't spend all this time, money and effort procuring the best ingredients I can find only to take them home and bash them over the head with a boatload of garlic.

Take my pizza recipe on this blog, for example. I make it with no garlic at all (except what is in the pepperoni), and some of the biggest garlic users I know don't even miss the garlic. They exclaim over the taste and texture of the crust and how they can really taste the tomatoes and cheese. Yes! There are other flavors in the world besides garlic, but they can only be tasted and appreciated when they are not completely overwhelmed by too much garlic.

This is not to say that I don't like garlic. I do. But when something is not the main ingredient in a dish, it should enhance the main ingredient, not steal the spotlight. And a meal should have a variety of flavors. If one dish has garlic, the others need not. I've been disappointed by many an expensive meal when everything--bread, main dish, side dishes and salad--was loaded with garlic. I want to march in and tell the chef, Don't be a Johnny One Note in the kitchen!

Many dishes that typically have garlic can be greatly improved by using less or, in some cases, no garlic. However, there are some things that even I think simply must have a little garlic. (And when I say garlic, I don't mean garlic salt or garlic powder or chopped garlic from a jar. Those are three items that need to be ... Oops, I don't want to get into one of those Oprah versus the Beef Industry things!) One of these is hummus. There is no hummus without garlic, but it only needs a tiny bit.

Hummus - Classic Hummus - no nonsense! / www.delightfulrepast.com


Hummus


(Makes 2 cups)

1 15-ounce can garbanzo beans, rinsed and drained
1/2 cup unsalted tahini
1/3 cup extra virgin olive oil

1/3 cup fresh Meyer lemon juice
1/2 teaspoon salt
1/4 teaspoon (1/2 small clove) minced garlic

In bowl of food processor, place all ingredients. Process until smooth. If you prefer a thinner consistency, add a little more lemon juice, olive oil or water. Taste, and make adjustments accordingly. Put into serving dish and cover with plastic wrap directly on the surface. Refrigerate for at least a few hours before serving or overnight. Garnish with a drizzle of olive oil and a little finely chopped mint, flat-leaf parsley or pistachios. Serve with whole wheat pita wedges, Armenian cracker bread and raw vegetable strips.

Enjoy the delightful repast! 

Jean