30 September 2011

Cinnamon Babka - Not A Lesser Babka!

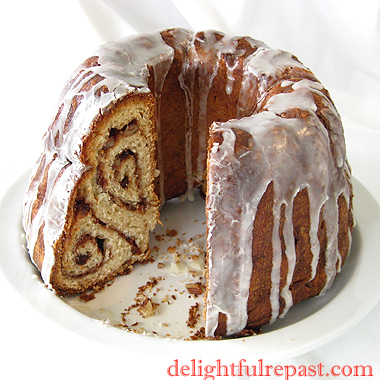
Cinnamon Babka - Not a Lesser Babka! / www.delightfulrepast.com

Wouldn't you know it--my two favorite episodes of Seinfeld are about bread! (Myname is Jean, and I'm a breadaholic.) Marble rye and babka. If you recall, Jerry and Elaine stopped at a bakery on the way to a dinner party to pick up a babka, but the people in front of them got the last chocolate babka and Elaine was not pleased to have to settle for a cinnamon babka. But I agree with Jerry: "[Cinnamon a] lesser babka? I think not!" Not a huge fan of chocolate anything, I much prefer the cinnamon and always intended to make one.

Well, years went by. Then I read the post The Cake that Makes Our Family by Lila Byock on Gilt Taste. She tells the heartwarming story of her grandfather Sy's babka. And you know how I feel about family food stories. She doesn't make it herself, considering it her mother's job for now. My own family is not a babka-making family, but I was so taken with Lila's that I sent her the message: You can be sure that when this shiksa gets around to making one, it will be Sy's! (Thought of calling the post Shiksa Babka but was afraid too many people would be expecting skewered meat!)

But I can never make anything strictly by a recipe. Not even if it's my first attempt at something I've never even eaten! I took so many liberties with the recipe, it can no longer be called Sy's. But he was my inspiration, and I will think of him and his granddaughter Lila every time I make it. And I will be making it again! It goes wonderfully well with a cup of tea (which seems to be a requirement for everything I make!). 

So tell me, do you have strong opinions about babka? Chocolate or cinnamon? Or both? Nuts? Raisins? Streusel topping or glaze? Is there a particular food that "makes" your family?
 

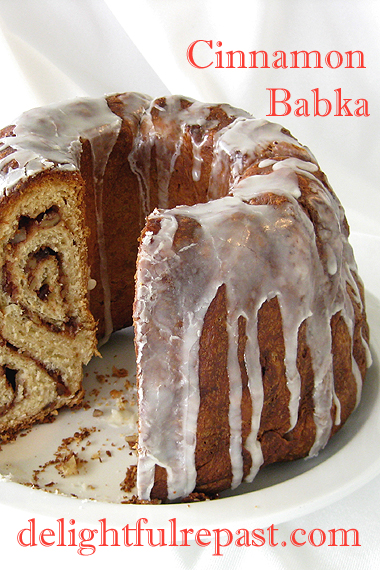
Cinnamon Babka - Not a Lesser Babka! / www.delightfulrepast.com

If you like it, please Pin it and share it!

Cinnamon Babka

(Makes one babka)

The Dough

3 1/2 dip-and-sweep cups (17.5 ounces/496 grams) unbleached all-purpose flour
1/2 cup (3.5 ounces/99 grams) sugar
1 envelope (2 1/4 teaspoons) instant (RapidRise) yeast
1 1/2 teaspoons salt
1 cup (8 fluid ounces/237 ml) milk (I use 2%)
1 stick (4 ounces/113 grams) unsalted butter
1 large egg
2 teaspoons vanilla extract

The Filling

1 stick (4 ounces/113 grams) unsalted butter, softened
1 cup finely chopped walnuts
1 cup raisins, chopped
2 tablespoons flour
1/2 cup (3.5 ounces/99 grams) sugar
1 tablespoon cinnamon

The Glaze

1 packed cup (4 ounces/113 grams) unsifted confectioners' sugar
2 tablespoons very hot water
1 tablespoon real maple syrup
1 tablespoon melted butter
1/4 teaspoon vanilla

1 In 2-quart bowl, whisk together flour, sugar, salt and yeast.

2 In heavy-bottomed 1-quart saucepan, scald milk, which simply means to heat the milk just until bubbles appear at the edge; do not boil. Remove from heat and stir in the butter until it is all melted.

3 In large bowl, beat egg and stir in vanilla and milk-butter mixture. With dough whisk or wooden spoon, stir in half the flour mixture until thoroughly combined. Stir in remaining flour about a half cup at a time. As the dough forms into a ball, work it against the sides of the bowl to get off all the dry flour. Rub a tiny bit of softened butter in a 2-quart bowl and place the ball of dough in it, rolling it around to coat it lightly with butter. Cover bowl tightly and refrigerate for anywhere from 24 hours to 3 days.

4 On the day you want to make the babka, set aside the butter to soften. Remove the dough from the refrigerator about 3 1/2 hours before you want it to go into the oven. In 1-quart bowl, combine chopped walnuts and chopped raisins with flour, making sure all the raisin pieces are separated. You might need to use 1 tablespoon of the flour while chopping the raisins. Stir in sugar and cinnamon.

5 On a lightly floured surface, divide the dough in half. Turn the bowl upside down and cover the two pieces of dough (or cover them with plastic wrap); let stand for 20 minutes. Butter well a 10-cup, 4-inch high, 8.5-inch diameter kugelhopf pan or a 3.75-inch high, 10-inch diameter Bundt or other fluted tube pan.

6 Roll one piece of dough into a 12x16-inch rectangle, with long edge toward you. Spread on half the softened butter and half the filling mixture. Starting with long edge, roll rather tightly and pinch the edge closed. Repeat with other half of dough. With the two rolls side by side, twist like a braid. Form a circle and pinch the ends together. Place in prepared pan, pressing it firmly into place. Cover and let rise until nearly doubled, about 2 to 3 hours, depending on the temperature of your kitchen.

7 Preheat oven to 350F/180C/Gas4. Bake for about 55 minutes. Cool in pan on wire rack for 5 to 10 minutes. Turn babka out onto wire rack and continue cooling for about 1 hour before slicing. In small bowl, whisk together confectioners' sugar and hot water until smooth, then stir in other ingredients for glaze and drizzle over the babka while it is still warm. 

Disclosure: We are a participant in the Amazon Services LLC Associates Program, an affiliate advertising program designed to provide a means for us to earn fees by linking to Amazon .com and affiliated sites. We are a ThermoWorks affiliate, earning a small commission at no cost to you on purchases made through our links. This helps cover some of the costs of running the blog. Thank you for your support. 

Jean

If you liked this post, please Pin it and share it!

23 September 2011

The Best Homemade Pizza

The Best Homemade Pizza / www.delightfulrepast.com

Make Real Pizza at Home was the beginning of Delightful Repast when I started blogging 15 February 2010. Giving explicit instructions for my killer pizza in three posts turns out to have been pretty much wasted on a brand new blog. I don't know how many people have actually read the three posts over the last 19 months that I've been blogging, but there were NO comments on Part One, NO comments on Part Two and just two comments on Part Three! (Note to new bloggers: Well ... need I say more?)

The first day of autumn seemed an appropriate time to reprise my version of this popular comfort food, so I've condensed the three original posts into just one; but I hope you'll go back and read those first three posts. And, hey, if you take pity on me for the lack of response to those posts, do leave a comment on them as well as on this one.

My recipe makes just the right amount of dough for two pizzas of the perfect size and thickness to together serve 4 or 5 people. And the three days in the refrigerator gives the rather wet dough the perfect texture as well as the most wonderful flavor. If there is a “secret” to it, I suppose it’s in the baking. I’ve tried all kinds of pizza pans, with decent results. But I was determined to find the ultimate pan or baking stone or whatever (short of having a wood-fired brick oven installed in my kitchen, that is).

Not a huge fan of unwieldy pizza stones, I racked my brain till I came up with the perfect solution—cast iron. Searching for a 13- to 14-inch round cast iron griddle, I found that Lodge actually makes exactly what I had in mind and calls it the Lodge Pro Logic Cast-Iron 14-Inch Pizza Pan. Unfortunately, the recipes included with the pan did not make the best use of the pan. They called for using it as, well, just a pan. What I had in mind, on the other hand, was to use it as a pizza stone! Believe me, if you want to make “real” pizza at home without any other special equipment, you need to get this pan!

The Best Homemade Pizza / www. delightfulrepast.com


Part One


Pizza Dough


(Makes two 18-ounce crusts for two 13-inch pizzas)

4 dip-and-sweep cups (20 ounces/567 grams) unbleached all-purpose flour, divided
1 tablespoon (12.5 grams) sugar
1 1/2 teaspoons (9 grams) salt
1 teaspoon (0.125 ounces/3.5 grams) instant yeast
1/4 cup (2 fluid ounces/59 ml) extra virgin olive oil
1 3/4 cups (14 fluid ounces/414 ml) water, room temperature

1 In large bowl, stir together 2 cups flour, sugar, salt and instant yeast. With dough whisk or wooden spoon, stir in the oil and water until thoroughly combined. Stir for a minute. Stir in remaining flour a half cup at a time. The finished dough will be elastic and sticky.

2 Oil two 1.5-quart lidded bowls and their lids; set aside. Sprinkle flour on the counter and transfer the dough to the counter. Cut the dough into 2 equal (18-ounce) pieces. Sprinkle flour over the dough. With floured hands, gently round each piece into a ball.

3 Dip each dough ball into one of the oiled bowls, rolling the dough in the oil, and then put the lid on. Rest the dough in the refrigerator for three days.

The Best Homemade Pizza - The Crust / www.delightfulrepast.com

Part Two


On the day you plan to make the pizzas, remove the dough from the refrigerator 3 hours before you want the first one to go into the oven. Place a 14-inch-long piece of 12-inch-wide unbleached natural parchment paper on a peel or a rimless baking sheet--that's what I use for a peel--and dust lightly with flour. Place a second piece of parchment on the counter and dust lightly with flour. Place the two balls of dough on the two pieces of parchment and sprinkle them with flour; dust your hands with flour. Gently press the dough into rounds about 9 inches in diameter; sprinkle with flour and cover loosely with oil-sprayed plastic wrap. Let rest for 2 3/4 hours.

In the meantime, make your sauce. You only need about 2/3 cup of a fairly thick sauce for each pizza. My recipe makes just the right amount for two 13-inch pizzas.

The Best Homemade Pizza - The Sauce / www.delightfulrepast.com

Pizza Sauce


(Makes about 1 1/3 cups)

1 tablespoon extra virgin olive oil
1/4 cup chopped onion
14.5-ounce can organic fire roasted crushed tomatoes
1/2 teaspoon sugar
1/2 teaspoon salt
1/4 teaspoon pepper
1/4 teaspoon basil
1/4 teaspoon oregano
1/4 teaspoon parsley
1/8 teaspoon crushed red pepper flakes

(That's right, no garlic. I want you to taste the tomatoes. If you must have garlic, use just 1/8 teaspoon of finely minced fresh garlic. No garlic powder, no garlic salt, no chopped garlic from a jar. But do try it without garlic. I think you'll be surprised.)

In 1-quart saucepan, heat oil and cook onion for a few minutes until soft. Stir in remaining ingredients. Simmer, loosely covered, for 1 hour, stirring occasionally. Let cool to room temperature. If the crushed tomatoes are quite chunky, use an immersion blender to quickly smooth out the sauce. Sometimes I stir in an extra tablespoon of extra virgin olive oil at this point.

Then get the cheeses and other toppings ready. I think where most home cooks go wrong with pizza is in using too much sauce and too much in the way of toppings. To avoid having a soggy pizza, use much less of everything than you think you need.

Toppings


Prepare these amounts of ingredients for each pizza:

1/4 cup shredded parmesan
4 ounces shredded mozzarella or mozzarella-provolone combination
1/2 3.5-ounce package pepperoni, microwaved in single layer between paper towels for 30 seconds
1/2 2.25-ounce can sliced black olives, drained and patted dry
3 to 4 ounces mushrooms, thinly sliced
2 tablespoons finely julienned red bell pepper, squeezed dry with paper towel

Of course, you can use any toppings you like. These are just our favorites, and this gives you some idea of the quantities to be used--the more toppings, the less of each.

The Best Homemade Pizza - The Toppings / www.delightfulrepast.com

Part Three


With the dough, sauce and toppings ready to go, just follow these final steps:

1 A half hour prior to baking time, place 14-inch round cast-iron pizza pan (or a pizza stone) in oven and preheat oven to 475 degrees for 30 minutes.

2 Make the pizzas one at a time, starting with the dough on the rimless baking sheet. With floured hands, press the dough into 13-inch round. (Actually, since the parchment is only 12 inches wide, it will be a little out-of-round, but not noticeably so.) If the dough keeps springing back, let it rest for 5 minutes so the gluten can relax, and try again. Let stand 10 minutes before saucing and topping.

3 Leaving the edge clear, lightly top it with room-temperature sauce and then with toppings.

4 Slide the pizza (on the parchment) onto the hot cast-iron pan (or pizza stone) in the oven and close the door. Bake for about 15 minutes. After first pizza has been baking for 5 minutes, move second crust to rimless baking sheet and press it out; let stand 10 minutes before saucing and topping.

5 Using the peel (or rimless baking sheet), remove the pizza from the oven and transfer to a wire cooling rack. Wait about 3 minutes before transferring to a cutting board for slicing and serving. Meanwhile, sauce and top second pizza and put it in oven. Makes two 13-inch medium-thick-crust pizzas.

See my original Part Three post for my precision timeline for getting the two pizzas made and served in a timely fashion.

Jean

16 September 2011

Homemade Hamburger Buns and My Big Bad Burger Throwdown

Homemade Hamburger Buns - an instant upgrade for your best burgers / www.delightfulrepast.com

Homemade hamburger buns are the only way to go! With apologies to all the commercial bakeries out there, I have yet to find a store-bought hamburger bun worth eating. I was certainly not going to waste top-quality, grass-fed organic beef on a lackluster commercial bun.

I developed my recipe a few years ago after having another bad bun. That bun, like all the others, had no flavor at all and mooshed into a soggy mess from the slightest moisture. Wanting a flavorful bun that, while soft, can hold up to the heat and moisture of the meat, I set to work and came up with this recipe that is so easy to make, you may never buy another commercial bun.

Chatting with Rod of Rocky Mountain Organic Meats gave me the idea of having a Burger Throwdown, pitting his grass-fed organic ground beef against the best conventional ground-in-the-store ground beef available in a chain supermarket. We've had the Rocky Mountain Organic Meats before, and even my husband (who hasn't always been as tuned-in to all this as I am) immediately tasted the difference. So I wanted to see if other people would as well.

I don't mind telling you I was a bit nervous. After all, Rod was sending me this meat and I really hoped the taste test would turn out in his favor. But I was going to conduct the test impartially and, no matter how it turned out, report my true findings to my readers.  

The Rocky Mountain Organic Meats ground beef arrived frozen, of course, and I thawed it in the refrigerator. Then I went to a popular chain supermarket and asked the butcher for their best ground-on-the-premises ground beef. I shaped the patties, seasoned them identically, cooked them in identical pans for the same length of time and did a blind taste test; only I knew which freshly made patties were which. All I told the tasters was that I wanted to get their opinions on two different kinds of ground beef, calling the conventional Number One and the grass-fed organic Number Two. 

Amazingly, the results were unanimous! All six tasters were wowed by the grass-fed organic ground beef. Two tasters actually said "Wow!" in unison. One said "I thought the first one tasted good, but the second one was just so much more flavorful." Another taster described it as "beefier," while yet another declared it "steak-like." And one just said "Wow! The second it hit my mouth, it was just Wow!" They were all really surprised that there was such a difference.

But even more important than mere taste, all Rocky Mountain Organic Meats are 100% grass-fed, grass-finished and certified organic. No hormones. No antibiotics. No grain. No GMO feed. No irradiation. No feedlots where deadly antibiotic-resistant bacteria thrive. Passionate about sustainable and organic agriculture and livestock production, Rod is dedicated to environmentally friendly agriculture practices, healthy land stewardship and--most important to me--the ethical treatment of animals. The animals are allowed to roam free and are treated humanely.

Please leave a comment below. I really want to hear from you about this! 


Homemade Hamburger Buns - An Instant Upgrade for Your Best Burgers / www.delightfulrepast.com

 If you like it, please Pin it and share it!

24-Hour Hamburger or Hot Dog Buns


(Makes 8)

2 1/2 packed cups (12.5 ounces/354 grams) unbleached all-purpose flour
2 tablespoons sugar
2 1/4 teaspoons (1 package) instant yeast
1 teaspoon salt
3/4 to 1 cup (6 to 8 fluid ounces/177 to 237 ml) water
1 large egg, lightly beaten
2 tablespoons olive oil or melted butter

1 In large bowl, whisk together flour, sugar, yeast and salt. With dough whisk or large wooden spoon, stir 3/4 cup water, beaten egg and oil or melted butter into flour mixture until blended. Add up to 1/4 cup more water, as needed. The dough will be very sticky. Cover with lid or plastic wrap. Place in refrigerator for at least 24 hours or up to three days.

2 On the day the buns will be served, remove dough from refrigerator. On lightly floured surface, knead gently for a minute or two. Divide dough into 8 3-ounce pieces.

3 For hamburger buns: Roll each into a smooth ball, place on greased baking sheet and flatten gently into a 3 1/2-inch disk. For hot dog buns: Roll each into a 5-inch-long cylinder, place on greased baking sheet and flatten slightly.

4 Cover and let rise until doubled, about an hour. During last 15 or 20 minutes (depending on your oven), preheat oven to 400 degrees.

5 Bake at 400 degrees for 20 minutes, or until golden brown. Remove buns from baking sheet and place on wire rack to cool. 

Jean

09 September 2011

Allergy-Free Picnic Cake - Applesauce Spice


This applesauce spice cake is free of four common food allergens: gluten, eggs, dairy and nuts. So it's perfect for a picnic or potluck where there are bound to be people allergic to at least one, if not all four, of those things. I call any cake served right out of the pan a "picnic cake"--easy to transport, easy to serve.

It is the gluten-free, larger "picnic version" of my Recession Cake Not Quite Depression Cake Vegan Applesauce Spice Cake. Now that school has started, think of it as a wholesome after-school snack or easy-to-pack lunchbox treat.

The frosting on this cake is made with butter. If you're making it for someone allergic to dairy, just make a vegan frosting or do as I often do and simply leave the cake unfrosted. It's moist and tasty enough on its own. But if you are not averse to a little butter, I think this Browned Butter Frosting is the perfect topping for any spice cake.

Allergy-Free Applesauce Spice Cake

(Makes one 13x9x2-inch layer)

1 1/8 cups sorghum flour
1 1/8 cups potato starch
3/4 cup tapioca flour
1 1/2 cups sugar
2 1/4 teaspoons baking soda
1 1/2 teaspoon xanthan gum
3/4 teaspoon salt
1 1/2 teaspoons cinnamon
1/4 teaspoon allspice
1/4 teaspoon mace
1/4 teaspoon nutmeg
1/4 teaspoon cloves
1 1/2 cups raisins
2 1/2 cups unsweetened applesauce (I use one 23-ounce jar Santa Cruz Organic)
3/4 cup organic canola oil
2 teaspoons vanilla, optional

1 Preheat oven to 350 degrees. Lightly oil, or spray with cooking spray, a 13x9x2-inch glass baking dish.

2 In large mixing bowl, whisk together flours, sugar, soda, xanthan gum, salt and spices. Stir in the raisins, separating the clumps. Add the applesauce, oil, and vanilla. Blend well. No electric mixer needed.

3 Pour into prepared pan. Bake at 350 degrees for about 40 to 45 minutes or until it tests done.

4 Cool in pan on wire rack for about 2 hours. If you like, frost the top with Browned Butter Frosting once cake is completely cool.

Browned Butter (Beurre Noisette) Frosting

4 tablespoons (2 ounces) unsalted butter
Pinch salt
3 cups powdered sugar
1 teaspoon vanilla extract
2 to 3 tablespoons milk

1 In 2-quart saucepan, melt butter and salt over medium heat. Continue cooking, stirring or swirling frequently, until butter gets foamy and bubbly and just starts to turn light tan, about 3 minutes. You cannot take your eyes off it! Remove from heat. Cool completely.

2 Add powdered sugar and vanilla to the browned butter in the pan. With electric hand mixer, beat at medium then high speed, gradually adding milk, until frosting is smooth and spreadable.

3 Spread on top of the cake in 13x9x2-inch pan. If you look closely at the photo, you can just see the tiny brown specks of browned milk solids in the unstrained browned butter.

02 September 2011

Ice Cream, Frozen Yogurt and Product Review - EasyCanvasPrints.com


As you know, this has been my summer of homemade ice cream and frozen yogurt. So when Brendan of EasyCanvasPrints.com contacted me about reviewing a canvas print in exchange for a canvas made from one of my photos, I chose the photo from my July 15 post about Strawberry Frozen Yogurt. Looking at that photo can cool me off on the hottest day!


The process is so easy, even I could do it! Just go to EasyCanvasPrints.com and follow the steps. When you upload your photo, it tells you if the image has the right resolution for a canvas print. They have two thicknesses: 0.75-inch Standard Wrap and the 1.5-inch Gallery Wrap. I chose the Gallery Wrap on my 8-inch square canvas so that it can sit on a shelf of the bookcase in my office. I chose black edges, but you can get any color or even have the image wrap around.

All I ever take pictures of is food (What else is there?), but I'm thinking photos of children and special occasions like weddings would make wonderful family gifts. Anyway, I thought it was something you might be interested in, so there you have it!

As we go into the three-day holiday weekend, the "farewell to summer" weekend, now is the time to break out the ice cream maker. Here are some delicious possibilities: Butter Pecan Ice Cream, Fudge Ripple Ice Cream, Strawberry Ice Cream, Chocolate Frozen Yogurt and, of course, Strawberry Frozen Yogurt.