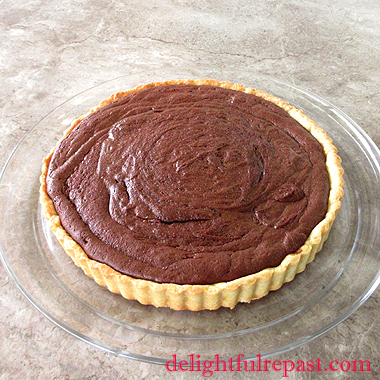
I've made it with chocolate pastry before, but to me that is overkill. A filling with this much chocolate does not need a chocolate crust. To fancy it up for a dinner party, I might garnish with a bit of whipped cream and a few raspberries; but they are not needed and I've photographed for you the plain-jane slice that can stand alone.
Not just intensely chocolatey, this tart is ethereally light. Take a bite, put it in your mouth and the chocolate filling seems to disappear in your mouth. I hope you'll try it soon and let me know if you agree!
If you like it, please Pin it and share it!
Chocolate Tart - Tarte au Chocolat
(Makes one 9-inch/23cm tart, 8 servings)
The Pastry - Pâte Sucrée (a sweet shortcrust pastry)
1 1/4 dip-and-sweep cups (6.25 ounces/177 grams) unbleached all-purpose flour
1/4 packed cup (1 ounce/28 grams) unsifted powdered sugar
1/4 teaspoon salt
8 tablespoons (4 ounces/113 grams) cold unsalted butter, cut into 1/2-inch cubes
1 large egg
1/4 packed cup (1 ounce/28 grams) unsifted powdered sugar
1/4 teaspoon salt
8 tablespoons (4 ounces/113 grams) cold unsalted butter, cut into 1/2-inch cubes
1 large egg
The Filling
1 3/4 sticks (7 ounces/198 grams) unsalted butter, cut into 7 chunks
10.5 ounces (298 grams) bittersweet (68 to 78%) chocolate, coarsely chopped
1/8 teaspoon salt
3 large eggs, room temperature
2 large egg yolks, room temperature
1/3 cup (2.33 ounces/66 grams) sugar
1 Add flour, powdered sugar and salt to work bowl of food processor; turn on for about 3 or 4 seconds to combine. Add chunks of butter; pulse to a crumb texture. Add egg; pulse until the dough starts clumping together. This is to be a crisp, more cookie-like crust, rather than a flaky pastry; so there's not quite the concern about over-processing. Flatten slightly into a 5-inch round disk, wrap and refrigerate for 30 to 60 minutes.
2 Lightly butter a 9-inch/23cm tart tin and set it on a baking sheet. On lightly floured 12-inch square of aluminum foil, roll out the pastry to a 12-inch circle. Transfer dough to tart tin, pressing dough (but not stretching it) to fit the tin. Save the foil; you're not done with it. With scissors or knife, trim the overhang to 1/2 inch all around. Fold it in and press it to the sides to form a thicker side crust. Trim the edges by rolling the rolling pin over the top. Press the pastry into the flutes so that it rises a bit above the edge (in case of shrinkage). Pop it in the freezer for 15 minutes while you preheat the oven to 375F/190C/Gas5.
3 Cover chilled pastry with reserved piece of foil, clean side up, pressing it to fit well. Spread 2 cups of ceramic pie weights (that's two packages of Mrs. Anderson's ceramic pie weights) over the foil. Bake for 15 minutes. Remove foil and weights; continue baking for 10 minutes, until lightly browned to a pale golden.
4 While the pastry is baking, start the filling. In a heavy-bottomed 3-quart saucepan over medium-low heat, heat the butter until melted and small bubbles begin to form around the edge. Remove from heat; add the chopped chocolate and stir until thoroughly smooth. Stir in salt. The melted mixture needs to be tepid when you fold in the egg mixture. If at some point it begins to solidify a bit, you might need to apply a bit of low heat just to thin the mixture, not warm it.
5 Remove tart shell from the oven and turn the temperature down to 325F/165C/Gas3. While the pastry is cooling, continue with the filling. In a 2-quart bowl, beat the eggs, egg yolks, and sugar with an electric mixer on high speed for about 10 minutes, until the mixture is light and airy and doubled or tripled in volume. You may also use a heavy-duty stand mixer with the whisk attachment, and it may take less time.
6 Fold about a third of the egg mixture into the chocolate mixture, gently but rather thoroughly. Then very gently fold in the remaining egg mixture, just until no visible streaks of egg remain. Try not to deflate the eggs.
7 Pour filling into prebaked pastry shell. Bake (with tart tin on baking sheet) for about 25 minutes, until just set but still with a bit of a wobble. Do not overbake. Cool on wire rack at room temperature for at least 2 hours. If you make it a day or two ahead, refrigerate it until 2 hours before serving time; allow it to come to room temperature. Cut into 8 to 12 wedges and serve with a dollop of unsweetened or barely sweetened whipped cream.
Disclosure: We are a participant in the Amazon Services LLC Associates Program, an affiliate advertising program designed to provide a means for us to earn fees by linking to Amazon .com and affiliated sites. We are a ThermoWorks affiliate, earning a small commission at no cost to you on purchases made through our links. This helps cover some of the costs of running the blog. Thank you for your support.
Jean
If you liked this post, please Pin it and share it!


