18 March 2021

Clotted Cream - Stovetop Method

Clotted Cream - Stovetop Method - An Afternoon Tea Essential / www.delightfulrepast.com

As I pointed out in my
Clotted Cream Tutorial, clotted cream, which doesn't sound that appealing to the uninitiated, is the delectable accompaniment to scones that elevates that simple bake to an Occasion. And, of course, it has other delicious applications.

While I couldn't be happier with my Clotted Cream - Oven Method, I have friends whose oven either does not have that low of a temperature setting or does not hold a very steady temperature or will time out before 12 hours is up. I even have friends in studio apartments without an oven. So I wanted to come up with a good and easy stovetop method.

As with the oven method, this does not require your standing at the stove for hours on end. Once you get it going, you can pretty much just go about your business. This must not be stirred or jostled, so it benefits from benign neglect once you have your just-barely-a-simmer temperature established.

Do you love clotted cream as much as I do?


Clotted Cream - Stovetop Method - An Afternoon Tea Essential / www.delightfulrepast.com

If you like it, please Pin it and share it!

Clotted Cream – Stovetop Method


(Makes about 1 cup)

1 pint (16 fluid ounces/473 ml) heavy whipping cream


1 Fill base of double boiler with water to about 1.5 inches (in mine, that means 1 quart). Bring to barely a simmer. Place double boiler insert over the water. It must not touch the simmering water.

Tip: If you don’t have a double boiler, you can use a stainless steel or glass mixing bowl over a large saucepan.

2 Pour 2 cups (16 fluid ounces/473 ml) of heavy whipping cream into top of double boiler. The cream should not be more than 1 inch deep. Leave the lid off. Check by ear every once in a while to make sure the water is barely simmering. If you have an instant-read thermometer, it should register somewhere in the 185F/85C to 200F/94C range.

3 Gently heat the cream at barely a simmer, uncovered, never stirring, for 4 hours. Being careful to not slosh the cream around, remove the top pan from the base and set it on a wire rack to cool at room temperature for 1 hour. Then cover and refrigerate for 12 hours.

4 Lift up a "corner" of the chilled clotted cream and pour off the liquid* underneath into a 1-cup glass measure; use it in your next batch of scones, pancakes, or whatever you happen to be making. Scoop up layer of clotted cream into jar or serving dish. Keeps for several days, covered and refrigerated. Or you can freeze it

* When you pour off that liquid, you don't have to get every last drop out. Usually the underside of the clotted cream layer is quite wet and might actually drip as you spoon it into a container. The contents of the container can seem quite wet, but it all melds together in the refrigerator.

Note: These cute little 4-ounce freezer-safe canning/storage jars with plastic caps are perfect for clotted cream. One recipe makes two jars. 

Disclosure: We are a participant in the Amazon Services LLC Associates Program, an affiliate advertising program designed to provide a means for us to earn fees by linking to Amazon .com and affiliated sites. We are a ThermoWorks affiliate, earning a small commission at no cost to you on purchases made through our links. This helps cover some of the costs of running the blog. Thank you for your support.

Jean

04 March 2021

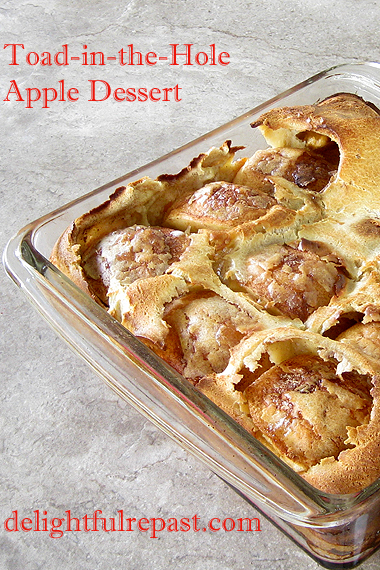
Toad-in-the-Hole Apple Dessert

Toad-in-the-Hole Apple Dessert / www.delightfulrepast.com


Toad-in-the-Hole Apple Dessert is a little something I invented one day when I wanted to eat a dessert but didn't want to go to the trouble of making one. You know what I'm talking about?

I mean I was soooo tired that the easiest of my easiest desserts sounded like waaaayyyy too much trouble. So I thought about the ingredients I had on hand and came up with this. The batter is simply my Yorkshire Pudding batter (minus the savory elements).

For those of you who may not know, toad-in-the-hole is a traditional British dish of sausages baked in Yorkshire pudding batter. And now I've turned it into a dessert.

Toad-in-the-Hole Apple Dessert / www.delightfulrepast.com


Precise times are included in the instructions because, just as a souffle is best served immediately, this dessert is at its best when served fresh out of the oven. Tastes fine later, but you'll want everyone at the table to see it before it, like a souffle, falls.

I make it in a Pyrex dish, so it's especially important to rest the batter for at least the full hour. The rest gives it a better rise, and it also ensures you won't be cracking your glass baking dish by pouring cold batter into a hot dish.

Hope you'll give it a try and let me know how you liked it.

Toad-in-the-Hole Apple Dessert / www.delightfulrepast.com

If you like it, please Pin it and share it!

Toad-in-the-Hole Apple Dessert


(Serves 4 to 6)

The Batter

1 1/4 dip-and-sweep cups (6.25 ounces/177 grams) unbleached all-purpose flour
2 tablespoons sugar
1/4 teaspoon salt
1/2 teaspoon cinnamon
3 large eggs
1/4 cup (2 fluid ounces/59 ml) water
3/4 cup (6 fluid ounces/177 ml) milk
1/2 teaspoon vanilla extract
3 tablespoons (1.5 ounces/43 grams) unsalted butter, melted and cooled

The Apples

3 large baking apples (I used Pink Lady apples weighing about 6.5 ounces each)*
2 to 3 tablespoons sugar
1/2 teaspoon cinnamon

* If your apples are smaller, use four; the idea is to have apple quarters making a pretty solid layer.

1 An hour and a half before serving time, make batter. In medium bowl, whisk together flour, sugar, salt, and cinnamon (to "sift"). Whisk in eggs and water; when smooth, whisk in the milk and vanilla extract. Cover and let stand for an hour. Generously butter (using about a tablespoon) the bottom of an 8x8x2-inch baking dish.

An hour and a quarter before serving time, preheat oven to 425F/220C/Gas7 for 15 minutes while proceeding with recipe. Peel, quarter, and cut away the cores of 3 large cooking apples and arrange them in the buttered baking dish. In a small bowl, stir together the sugar and cinnamon. Sprinkle it over the apples. Bake for 20 minutes. Melt the butter; set aside 1 tablespoon of it to cool. Remove apples from the oven. Quickly heat the 2 tablespoons of melted butter in the microwave and pour it over the apples.

Whisk the cooled tablespoon of melted butter into the batter. Pour the batter over the apples. Bake for 20 minutes; reduce heat to 350F/180C/Gas4 and continue baking for 20 minutes or until puffed and golden. Serve immediately. The ideal accompaniment is Custard Sauce, but vanilla ice cream or whipped cream will do in a pinch.

Tip:  Do not open the oven door to take a peek for at least the first 30 minutes. 

Disclosure: We are a participant in the Amazon Services LLC Associates Program, an affiliate advertising program designed to provide a means for us to earn fees by linking to Amazon .com and affiliated sites. We are a ThermoWorks affiliate, earning a small commission at no cost to you on purchases made through our links. This helps cover some of the costs of running the blog. Thank you for your support. 

Jean