30 April 2015

Grandma's Little Yellow Cake - Caramel Icing

Grandma's Little Yellow Cake - Caramel Icing / www.delightfulrepast.com

This was my Southern grandmother's basic Little Yellow Cake when she wasn't getting fancy with a layer cake. The "little black dress" of cakes, it can be accessorized lots of ways, and she had four toppings she used for it at various times: caramel icing, chocolate icing, broiled coconut or streusel.

My husband prefers the chocolate icing, but I just had to have caramel. Some cooks shy away from making caramel because it's one of those things with a bit of a mystique about it. But, truly, it is so easy. Sometimes I start with regular granulated sugar, but this one is made with dark brown sugar and couldn't be easier. 


Grandma's Little Yellow Cake with Caramel Icing / www.delightfulrepast.com

Don't forget to Pin it!

The cake is a tender yellow cake that starts with the butter being cut, or rubbed, into the flour mixture as if making biscuits. Grandma was constantly making biscuits, so she always had buttermilk on hand. I don't always have it, so I just use milk soured with cider vinegar, as shown below.

This got me thinking about Grandma's kitchen (especially since I just wrote about My Kitchen). She had a tiny, and I mean teeny tiny, kitchen that was always neat as a pin. Never a dish in the sink or anything left on the counter. Her kitchen equipment was so limited, she would be goggle-eyed with wonderment to step into my kitchen. And yet her cooking was not limited. Go figure. 


Grandma's Little Yellow Cake - Caramel Icing / www.delightfulrepast.com


Grandma's Little Yellow Cake with Caramel Icing 


(Makes one 9-inch/23-cm round or one 8-inch/20-cm square layer) 


The Cake 

1 1/2 tablespoons cider vinegar
Enough milk to make 1 cup (8 fluid ounces/237 ml)
1 1/4 dip-and-sweep cups (6.25 ounces/177 grams) unbleached all-purpose flour
1/4 dip-and-sweep cup (1.25 ounces/35 grams) cornstarch
3/4 cup (5.25 ounces/149 grams) sugar
1 teaspoon baking powder
3/4 teaspoon baking soda
1/2 teaspoon salt
8 tablespoons (4 ounces/113 grams) unsalted butter, softened
2 large eggs, room temperature
1 teaspoon vanilla extract


The Caramel Icing 

1 cup (8 fluid ounces/237 ml) heavy cream
1/2 lightly packed cup (3.75 ounces/106 grams) dark brown sugar
Pinch of salt
1 teaspoon vanilla extract 


1 Preheat oven to 350F/180C/Gas4. Grease well and lightly flour one 9-inch round or 8-inch square pan; you can skip the flour if you're going to serve it directly from the pan as I did this time. Measure vinegar into 1-cup glass measure; add enough milk to make 1 cup. Stir and let stand about 5 minutes while you proceed.

2 In mixing bowl, whisk together flour, cornstarch, sugar, baking powder, baking soda and salt. Cut in the butter as if making biscuits. Add soured milk, eggs and vanilla. With electric mixer, mix on low speed for 30 seconds to combine, then on medium speed for 1 minute. 

3 Pour into prepared pan. Bake for 30 to 40 minutes, or until golden and a toothpick inserted in the center comes out clean. 

4 Cool in pan on wire rack for 10 minutes. Remove from pan and cool on rack for an hour. Grandma usually just served this cake directly from the pan, and that's what I did here. 

5 After the cake has been cooling for 45 minutes, put the cream, sugar and salt in a heavy-bottomed 1.5-quart saucepan and bring the mixture to the boil, stirring until sugar is dissolved. Then boil without stirring until the caramel registers about 232F/111C to 240F/115C on an instant-read* thermometer, about 10 to 12 minutes. 

You could use a candy thermometer that clips to the pan, but since I'm not a candy fan I don't have one of those. I use my Thermapen for everything!

6 Remove from heat, stir in vanilla and beat vigorously with a wooden spoon until smooth. Pour onto cake and immediately spread it to cover cake; the caramel sets up very quickly.  

Jean

23 April 2015

Pomme Rosti - Hash Browns with an Attitude?


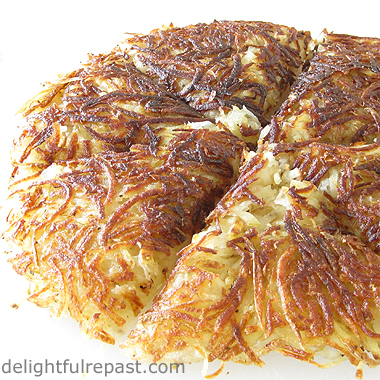
Pomme Rosti - Hash Browns with an Attitude / www.delightfulrepast.com

It's funny, I can't make decent hash browns to save my life; but call them Pomme Rosti, and I have no problem! Does that make me a potato snob?

I hadn't thought about Pomme Rosti in years, then I had on PBS Roku the other day and came across it on something called ChefSteps and, of course, had to make it. But I do it a little differently. (I just found their short video about Pomme Rosti for you on YouTube.)

I don't use nonstick skillets, and I've always had trouble with hash browns or country-fried potatoes sticking to the pan. So when it was time to slide the pomme rosti out of the pan and turn it over, I was very pleasantly surprised (actually, I was shocked) when it slid right out of my stainless steel fry pan without the slightest bit of problem! 

Pomme Rosti - Hash Browns with an Attitude? / www.delightfulrepast.com

Whatever you want to call the recipe, you need starchy potatoes, like russets or Yukon golds, not waxy potatoes. And yet, after the potatoes are shredded, you will be rinsing away as much starch as you can. Go figure. 

Anyway ... just 20 minutes in the pan and these potatoes are crunchy and brown on the outside, creamy and tender on the inside. And they're not just for breakfast. They are dinner party worthy. 

Aren't potatoes the best? (Especially mashed potatoes. Oh and potato salad.) What's your favorite kind of potatoes? Have you ever made pomme rosti?


Pomme Rosti - Hash Browns with an Attitude? / www.delightfulrepast.com


Pomme Rosti - Hash Browns with an Attitude 


(Makes 6 servings) 

1.5 pounds (680 grams) Yukon gold potatoes, unpeeled, coarsely shredded 
7 tablespoons (3.5 ounces/99 grams) unsalted butter, melted 
1/4 + 1/8 teaspoon salt 
1/4 + 1/8 teaspoon coarsely ground black pepper 

1 Put shredded potatoes (I used the Cuisinart food processor to shred in just a few seconds) into a 2.5-quart bowl of ice water and swish them around. Drain them in your hands as you pull them out by handfuls, spread them on "an impeccably clean towel' (as Julia Child would say), roll up the towel and give it a good squeeze.

2 Preheat 12-inch slope-sided skillet over medium-high heat. Dry the bowl thoroughly and return the shredded potatoes to it. Pour on the melted butter, salt and pepper; mix well. Transfer potatoes to preheated skillet, pressing them down as much as you can.


Pomme-Rosti / www.delightfulrepast.com

In case you're wondering about the foil behind the pan, I put a 30x18-inch piece of heavy-duty foil over the back of the stove whenever I'm frying so I don't get the stove all greasy. But, no, I don't use a new piece of foil every time; I reuse it many times and then recycle it.

3 Cook over medium-high heat until golden brown, about 10 to 12 minutes. Slide them onto a plate.* Carefully place the skillet upside down over the potatoes and then flip the whole thing over and cook the other side until golden brown, about 10 to 12 minutes. 

* I used the All-Clad Stainless 12-Inch Fry Pan to cook the potatoes and slid them onto its lid to turn the potatoes. The lid handle stuck down through the grate so it was steady as I slid the potato "pancake" onto it. Then I set the pan upside down over the potatoes and used potholders to flip the whole thing over. Worked like a charm! 

Note: If making this up to an hour ahead, preheat oven to 200F/93C. Leave it whole and place on a wire rack set inside a rimmed baking sheet in preheated oven. When ready to serve, proceed with Step 4. And eat it all; it really loses something when reheated the next day or even just hours later.

4 Slide onto a plate or cutting board. Cut into 6 wedges. Sprinkle on a bit more salt and coarsely ground pepper and garnish with a dollop of sour cream and a sprinkling of fresh dill or your favorite fresh herb. Or with cheese or grilled onions or crispy little pieces of bacon or ...

Disclosure: Some posts contain links to my affiliate account at Amazon.com. If you purchase something from Amazon through one of my links, I receive a small commission, at no additional cost to you, which I use toward the expenses of running this blog. Thanks for supporting Delightful Repast when you shop at Amazon!

Jean

If you like this post, please Pin it and share it!

16 April 2015

My Kitchen

Berry Cream Pie / www.delightfulrepast.com

British newspaper The Guardian recently started a Kitchen Encounters: My Kitchen series, in which the interviewees (people in food -- sorry if that sounds unwieldy, I refuse to say "foodies") respond to the same 10 questions. I'm probably correct in assuming that they won't be contacting me for an interview any time soon, so I thought I'd just interview myself! 

Besides, I've had an extremely busy week or so working on freelance projects with clients and haven't had much time or energy left to cook for myself and my blog, so this is a perfect way to post this week.


I hope you'll leave a comment and tell me a little something about your kitchen or anything else you have on your mind.


My Kitchen: Food writer Jean at Delightful Repast


My kitchen is ... U-shaped, not especially large but what I call "maximized" since I remodeled it eight years ago, with quite a lot of countertop (quartz) and efficient storage. The walls are pale butter yellow because that is simply a must for me; I've had a yellow kitchen nearly all of my adult life. Another must is a big, deep, single-bowl cast-iron sink (and no waste disposal unit, called a garbage disposal in the US).


Kohler Cape Dory Kitchen Sink / www.delightfulrepast.com

My favourite (British spelling, not typo) kitchen tool is ... a Danish dough whisk, the utensil in my header (see it there between "Delightful" and "Repast"?). Since I'm a breadaholic and constantly making yeast dough, it's something that gets a lot of play in my kitchen. You'll find more here at 10 Favorite Kitchen Gadgets and 10 Favorite Kitchen Essentials.

My storecupboard staple is ... organic unbleached all-purpose (in the UK, plain) flour. I panic when my flour bin is down by a quarter and I don't have a spare bag on hand. Though I also have a huge stash of other flours (whole wheat and all the gluten-frees) in my freezer, I never buy bread flour or cake flour and like to say I can make anything with my unbleached all-purpose.

When I'm starving I ... head for my Number Two storecupboard staple: 16-ounce cans of organic refried pinto beans. I usually cook dried beans, but if I need a quick hit of protein I just heat up half a can of beans and shred a little cheese on top, and my day is saved. I eat this only when alone; my husband thinks it is disgusting!

My culinary inspiration is ... my heritage. My Southern (US) paternal grandmother and my English maternal grandmother. And my mother who was an inspired cook with "perfect pitch," able to taste any sort of dish and recreate it. I learned a lot from them and I have lots of my mother's things in my kitchen, so I'm always sort of communing with them in the kitchen.

My best-kept kitchen secret is ... I have no kitchen secrets. I'm always happy to tell my readers and friends (and even total strangers standing by the produce looking lost) anything I know about food. My best-kept secret of all is my blog. Almost none of my friends and relatives even know I have a blog.

My current obsession is ... sourdough. I make all kinds of bread and bread-y things, but it had been several years since I had made sourdough. Then several months ago I decided to start another sourdough starter, and I'm constantly making sourdough breads and bread-y things. And, of course, anyone who has been reading my blog for any length of time knows of my lifelong obsession with tea (the beverage and the occasion).

Everything tastes better with ... bread. No, just kidding. Everything, well, many things taste better with lots of coarsely ground black pepper. I don't like the powdery stuff, but I no longer bother with pepper mills. My pepper snobbery is limited to insisting on coarsely ground. I buy it in 4-ounce jars and use it up quickly enough that it doesn't lose its "freshlygroundness."

When I go shopping I ... use a list and don't use a list simultaneously. I go down every single aisle of the store, picking up things from my list and from my head. If something looks especially good or is an exceptionally good deal, I change my meal plans on the spot. And I never shop for more than a few days at a time. I find a lot less food goes to waste that way than if I try to shop for the entire week.

For dinner tonight ... I'm pulling a homemade meal out of the freezer. It's been an extremely busy food week, so I'm glad I always have something homemade (like Golumpkis or Sheet-Pan Tamales) in the freezer for days like this. 

09 April 2015

Sourdough English Muffins


It takes more time to make Sourdough English Muffins than regular English Muffins, but if you like the heartier texture and flavor of sourdough it is so worth it! 

To make Sourdough English Muffins, you will need a sourdough starter. If you don't already have one going, just follow my easy method at How to Make Your Own Sourdough Starter. Or if you prefer a non-sourdough muffin, try my regular English Muffin recipe instead. 

But we love sourdough everything, so naturally I would develop a Sourdough English Muffin recipe. And these are true wild yeast sourdough, no added commercial yeast. (Didn't want you to throw in an envelope of yeast, thinking I had accidentally left it out of the recipe.) 

Of course, if you bake with sourdough you know that I can't tell you how long to allow for the second rise. Unlike commercial yeast, sourdough starters are all different and never as fast as yeast. That second rise might take 3 hours or it might take 9. Mine took 6 hours. Since I've had my starter going for several months, I can expect these muffins to take about that long to rise any time I make them and plan accordingly. 

Does that mean you have to check the dough constantly during the second rise? No. Just check it after 2 or 3 hours, then again every hour. 

And what about the temperature? These are cooked on a griddle, not in the oven, so the temperature takes a bit of tinkering the first time. They need to be cooked at a temperature low enough that they can cook for 10 minutes on each side (so they'll be cooked through) without burning. I use a heavy square griddle on the "big burner" (16,200 BTU) of my gas stove and set it on "2." A little trial and error will help you sort it out for your particular pan and stove. 

I cook the 12 muffins in two batches mainly because I only have 8 crumpet/muffin rings. I think I'll just go ahead and order another box of 4 rings and do them all at once on two griddles and pop half into the freezer.


Sourdough English Muffins 


(Makes 12, in 2 batches) 

1 cup fed 100% hydration sourdough starter (Follow Steps 1 and 2)
1 cup (8 fluid ounces/236 ml) milk 
3 tablespoons (1.5 ounces) unsalted butter, melted and slightly cooled 
1 tablespoon sugar 
1 1/2 teaspoons salt
3 dip-and-sweep cups (15 ounces/425 grams) unbleached all-purpose flour, divided
1 tablespoon (0.5 ounce/14 grams) unsalted butter, melted and slightly cooled, for greasing rings and griddle
1/4 cup cornmeal for dusting

1 Two days before cooking muffins: Feed up your starter to 1 cup: Take 2 tablespoons starter out of refrigerated storage container. Put it in a 2-cup glass measure. Stir in 1/3 cup flour and 1/4 cup water. Stir vigorously, cover loosely and let stand at room temperature for 8 or 12 hours. 

2 Stir down starter and add 1/3 cup flour and 1/4 cup water. Proceed as in previous step. 

3 Day before cooking muffins: Stir down fed starter and measure 1 cup of it into 2-quart glass measure. (Should be exactly 1 cup; if over, just add any leftover starter to your starter storage jar.) With a dough whisk or large spoon, stir in milk, melted butter, sugar, salt and 1 cup flour. When all the flour is incorporated, stir in remaining 1 1/2 cups flour 1/2 cup at a time. Stir until dough just comes together into a soft, slightly sticky dough. 

4 Using the final 1/2 cup of flour, sprinkle dough very lightly with flour and knead gently, right in the bowl, for a minute, adding only as much extra (over the 1/2 cup) flour as needed to handle the dough. Divide dough in two (I use my digital scale to be precise). Cover and let stand at room temperature for 2 hours, then refrigerate overnight. 

5 On baking day: Bring a batch of dough out of refrigerator and let stand at room temperature for 2 hours. 

6 Brush griddle very lightly with melted butter. Brush six 3.5-inch / 9-cm crumpet rings with butter and place on the griddle. 

7 With greased hands, shape dough into an even log and divide into 6 equal portions* (about 2.75 ounces or 78 grams). Shape into smooth balls and pat into 3.5-inch rounds. Dip in cornmeal to coat both sides evenly. 

* If you like to be quite precise, as I usually do, weigh the finished dough and divide by 6. 

8 Place cornmeal-coated rounds inside rings and press dough to fit rings. Spray a rimless baking sheet with cooking spray, and place over rings. Let rise until puffed and risen to top of rings, anywhere from 3 to 9 hours.

* You can make these without the rings, but the muffins will have a more irregular appearance. 

9 Uncover the muffins. Set the muffin-filled griddle over very low heat and cook the muffins slowly for about 10 minutes until browned. With tongs, remove the rings (or remove the tongs a few minutes after turning, which is what I've taken to doing lately). Turn the muffins carefully and cook slowly for about 10 minutes until second side is browned and muffins are cooked through. An instant-read thermometer inserted into the center of the muffin horizontally should register 200 degrees. 


10 Cool on wire rack. Then split with a fork, toast and serve. Splitting with a fork, rather than cutting with a knife, will preserve the nooks and crannies, the unique texture of the English muffin.


Disclosure: Some posts contain links to my affiliate account at Amazon.com. If you purchase something from Amazon through one of my links, I receive a small commission, at no additional cost to you, which I use toward the expenses of running this blog. Thanks for supporting Delightful Repast when you shop at Amazon!

02 April 2015

Classic Creamy Coleslaw


Classic Creamy Coleslaw / www.delightfulrepast.com

I like my coleslaw sweet and tangy, but not too sweet. I've seen coleslaw dressing recipes that call for three or four times more sugar than my modest 2 tablespoons. Coleslaw is one of my favorite salads because it is made ahead. Having a 4-quart bowl of it in the fridge makes me feel like I've got lunch and dinner covered for three days! 

It's the quintessential side for barbecue and is perfect on Pulled Pork Sandwiches or even fish tacos and chili dogs. Don't even talk to me about "lightening up" my mayonnaise-based dressing. There's a tablespoon of mayonnaise per serving, and most of that mere tablespoon doesn't get eaten anyway. Which reminds me ... 

If you like a coleslaw with thick dressing clinging to the vegetables, go ahead and salt, rinse and dry your cabbage beforehand. But I happen to like the juice gradually coming out of the cabbage and thinning the dressing a bit. That way the coleslaw marinates in it, but then when you toss and serve the finished product, the dressing all but drains away leaving only the flavor behind.

Slicing, or shredding if you prefer, a whole cabbage is ever so much better than using the packets of coleslaw mix you can buy. That pre-shredded cabbage is always so dry, at least any time I've tried it. The cabbage you cut yourself is so much fresher and juicier. 


Classic Creamy Coleslaw / www.delightfulrepast.com

Coleslaw 

(Makes 16 servings) 

The Salad 

1 2-pound head green cabbage
3 large carrots (1/2 pound total), coarsely shredded
1 medium bulb fennel, sliced or diced
1 medium red bell pepper, diced
1/4 cup diced red onion, soaked in vinegar, rinsed and dried 

The Dressing 

1 cup mayonnaise
2 tablespoons sugar
1 teaspoon celery seed
1/2 teaspoon coarsely ground black pepper
1/2 teaspoon dry mustard
1/4 teaspoon salt
3 tablespoons apple cider vinegar 

1 Remove any ragged outer leaves of cabbage. Cut in half, then cut each half into 4 wedges. Trim the core from each wedge and slice it crosswise. Wash and dry in salad spinner. Empty into 4-quart bowl. Add carrots, fennel, red bell pepper and red onion to bowl. 

2 In small bowl or 2-cup glass measure, whisk together dressing ingredients. Add to salad and mix well. Cover and refrigerate for 2 to 6 hours or up to 3 days. Toss and serve.