Showing posts with label side dishes. Show all posts

20 January 2022

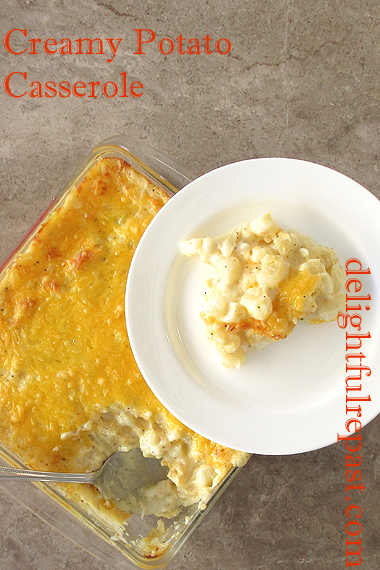
Creamy Potato Casserole - also known as Funeral Potatoes

Creamy Potato Casserole - also known as Funeral Potatoes / www.delightfulrepast.com

Versions of this Creamy Potato Casserole have been around since before I was born and seem to enjoy a "revival" or surge in popularity every so many years. In some cultures and regions, the dish is called Funeral Potatoes because they are an absolute must at every funeral reception.

Many recipes call for frozen hash browns, which certainly would be a timesaver, but I've always made them with fresh potatoes. Most recipes call for a can of condensed cream of chicken, or cream of mushroom, soup. That's not something I ever buy, but I always have organic chicken broth on hand and so make up a sauce with that.

Super easy, and open to many variations, it's always a crowd pleaser at any event, not just funeral luncheons. So perhaps a more pleasant name for the dish would be Party Potatoes. But we just call it Potato Casserole. Instead of making it in a 13x9x2-inch baking dish, I used two smaller ones this time.

I meant to make one and freeze one so that I could tell you how well the dish freezes, but we ended up devouring both, so maybe you can tell me how well it freezes!


Creamy Potato Casserole - also known as Funeral Potatoes / www.delightfulrepast.com

If you like it, please Pin it and share it!


Creamy Potato Casserole


(Serves 12 to 16)

The Potatoes

4 pounds (1.8 kg) russet potatoes

The Sauce

4 tablespoons (2 ounces/57 grams) unsalted butter
1/4 cup finely chopped onion
1/4 cup (1.25 ounces/35 grams) unbleached all-purpose flour
1 cup (8 fluid ounces/237 ml) milk
1 cup (8 fluid ounces/237 ml) chicken broth
1/4 teaspoon salt
1/4 teaspoon coarsely ground black pepper
1/4 teaspoon marjoram
1/4 teaspoon thyme leaves
1/4 teaspoon nutmeg

The Assembly

1 8-ounce (227 grams) container sour cream
1/2 teaspoon salt
1/2 teaspoon coarsely ground pepper
1 packed cup (4 ounces/113 grams) shredded Monterey jack cheese
1 packed cup (4 ounces/113 grams) shredded cheddar cheese


1 In 5- to 6-quart Dutch oven, cook well scrubbed (but not peeled—they are much easier to peel after cooking) potatoes in boiling salted (1 teaspoon salt) water until tender but not overly so, about 30 minutes for large potatoes. Drain, remove from pan, and let cool a bit.

Note: My 5.5-quart Le Creuset enameled cast iron Dutch oven is too heavy for things like this that need draining. A lighter weight stainless steel 6-quart pot makes draining the potatoes so much easier.

2 While potatoes are cooling, make the sauce in the same pan the potatoes were cooked in. Melt the butter, cook the onions for about 5 minutes, stir in the flour, cook the flour for a minute or so. Stir in the milk, broth, and seasonings; cook, stirring frequently, until thickened.

Note: I know that seems like such a tiny amount of onion, but don't be tempted to increase it. It's supposed to add a subtle hint of onion to the dish, not completely take it over.

3 When potatoes are cool enough to handle, peel (or not) and cut into small cubes. Add to the sauce. Stir in the sour cream, salt and pepper, and shredded Monterey jack cheese until well combined. Taste and adjust seasoning. Turn into greased 13x9x2-inch baking dish. Top with shredded cheddar. Refrigerate until 1 hour before serving.

4 Preheat oven to 350F/180C/Gas4. Bake uncovered until hot and bubbly, about 55 minutes, if chilled, or 45 minutes, if baking right after preparation.

Disclosure: We are a participant in the Amazon Services LLC Associates Program, an affiliate advertising program designed to provide a means for us to earn fees by linking to Amazon .com and affiliated sites. We are a ThermoWorks affiliate, earning a small commission at no cost to you on purchases made through our links. This helps cover some of the costs of running the blog. Thank you for your support. 

Jean

If you liked this post, please Pin it and share it!

06 August 2020

Crispy-Skinned Fluffy Baked Potatoes - Jacket Potatoes

Crispy-Skinned Fluffy Baked Potatoes - Jacket Potatoes / www.delightfulrepast.com

Baked potatoes (in the UK, jacket potatoes) are simply wonderful when done well and horrid if done wrong. There are all sorts of methods to achieving the "perfect" baked potato, some of which do not result in my idea of the perfect potato but might make your perfect potato.

First, you must select the proper baking potato, which is a starchy, floury (rather than waxy) potato. In the US, that means the russet potato (I always buy organic). In the UK, try Maris Piper, King Edward, or Estima. Wherever you are, you need a proper baking potato.

If you don't like eating the potato skin, it might not be important to you to achieve a crisp skin. But we enjoy a delicious crisp, slightly salty potato skin, without a leathery bottom, so this particular method works for us.


Crispy-Skinned Fluffy Baked Potatoes - Jacket Potatoes (this image, a watercolor sketch) / www.delightfulrepast.com
Couldn't resist doing a quick little watercolor sketch, since I've never
painted a potato, baked or otherwise, in my life!


The brining step is something I picked up when I was flipping through YouTube one day and happened onto the channel of Kent Rollins, a charming chuck wagon cook in Oklahoma. He was baking some really big potatoes, so made more brine than this. Brining is the only thing I did differently than usual, and it makes a difference.

Since we're not hardworking cowboys here, I consider the 7-ounce potatoes I used to be the perfect size baked potato. But if you like to use larger potatoes, you'll need to extend the initial baking time. 

But I hate serving people a huge potato they might not be able to finish. Scraping wasted food into the bin hurts my heart, so I'd rather leave 'em wanting more! Hey, dessert's still coming, they're going to be happy!

And someday, when we can have people over again, I think a baked potato bar would be fun, with a selection of toppings to suit everyone's taste: sour cream, shredded cheese, nacho cheese sauce, caramelized onions, snipped chives, green onions, fresh herbs, chili. What's your favorite topping? 

Crispy-Skinned Fluffy Baked Potatoes - Jacket Potatoes / www.delightfulrepast.com
Please Pin it and share it!

Crispy-Skinned Fluffy Baked Potatoes


(Makes 4, can be doubled)

The Potatoes

4 medium (6- to 8-ounce/170 to 227 grams) russet potatoes (outside US, choose another starchy, floury potato meant for baking)

The Brine

1/2 cup (4 fluid ounces/118 ml) water
2 tablespoons salt

The Finish

1 tablespoon extra virgin olive oil

1 With oven rack in middle of oven, preheat oven to 450F/230C/Gas8. Line a 13x9x1-inch quarter sheet pan with foil. Place a wire rack over the pan and rub a bit of oil on the rack.

Note: You might have a wire cooling rack that fits inside a quarter sheet pan, but I don't; mine just fits over it. If I were baking 8 medium potatoes, I'd use my 18x13x1-inch half sheet pan which does have a wire rack that fits down in it.

Crispy-Skinned Fluffy Baked Potatoes - Jacket Potatoes / www.delightfulrepast.com


2 Scrub the potatoes very well since you will want to eat the lovely crispy potato skin. Prick them all over with a fork. I always do 8 on this size potato, 3 on top, 3 on bottom and 1 on each side. In a bowl large enough to hold a potato, stir together the water and salt. Dip each potato in the brine, rolling it around to coat all surfaces. Place on the rack.

3 Bake for 45 minutes, at which point the potatoes should be done (though we're not going to stop there). Check one of the potatoes for doneness by your favorite method. An instant-read thermometer (Thermapen or ThermoPop) inserted in the center should register 205 to 210F/96 to 99C. If you use the same type, shape and size potato every time, you'll find the perfect timing for your oven.

4 Remove from oven. Brush tops and sides with the olive oil (or bacon grease, duck fat, goose fat, etc). Return to oven for an additional 10 minutes. As soon as you take them out of the oven after the second bake, slit the tops and give the ends a bit of a squeeze. Serve immediately.

Disclosure: We are a participant in the Amazon Services LLC Associates Program, an affiliate advertising program designed to provide a means for us to earn fees by linking to Amazon .com and affiliated sites. We are a ThermoWorks affiliate, earning a small commission at no cost to you on purchases made through our links. This helps cover some of the costs of running the blog. Thank you for your support. 

Jean

09 April 2020

Sheet Pan Home Fries - New West KnifeWorks Review and Giveaway

Sheet Pan Home Fries - No Muss No Fuss - soooo much easier, you'll never make them in a skillet again / www.delightfulrepast.com


We all need comfort food, like my Sheet Pan Home Fries, now. And I thought giving away a really good knife would be a real perkative in the midst of all this this. But first ...


The Sheet Pan Home Fries


While there's nothing difficult about making home fries, it's more trouble (and mess) than it needs to be when you're in the middle of making other things as well. Too much checking and turning, and I always end up using too much oil to keep them from sticking. 

It took me a long time, but I finally wised up and haven't looked back since. I thought, why not just throw them on a sheet pan and put them in the oven? I didn't want to get fussy about that either. I know a lot of people roast vegetables in the oven and do a lot of turning, and I didn't want to be bothered with turning.

So I lined a quarter sheet pan with parchment paper to prevent sticking problems, tossed my potato chunks with a few simple ingredients (you can season them however you like) and just a modest amount of oil, popped it in the oven and just let it go. Fabulous! All part of my streamlined cooking strategy to save time.

It also saves time on cleaning because there are no grease splatters on the stove to clean up. No skillet with stuck-on bits to soak and scrub. And, even more important for those of us who really care about making every simple dish as good as it can possibly be, the potatoes are perfectly cooked, evenly cooked.

And if what you're looking for is Roasted Potatoes for Sunday Lunch, just hit that link and make a batch of the most perfect Roasties. Are you a home fries person or a hash browns person? If the latter, you must try my Pomme Rosti.


Sheet Pan Home Fries - New West KnifeWorks Review and Giveaway / www.delightfulrepast.com

The New West KnifeWorks Knife


I grew up with a mother who was a world-class cook with the worst --THE WORST--knives in the world, so I was determined that when I grew up I would have good knives. And I gradually acquired very good knives. But a couple of years ago I discovered the truly remarkable knives made by New West KnifeWorks (NWKW).

The NWKW knives are as beautiful as they are useful and a joy to work with. Call me shallow, but the first thing I noticed about the Ironwood 5-Inch Chopper was that it is the most gorgeous knife I've ever seen. That desert ironwood handle is beautiful. It is a richly textured, incredibly dense hardwood that with minimal care will last forever, making this an heirloom.

The handle is ergonomic, the blade is razor-sharp, and together they make a well-balanced knife that is just big enough to be my go-to "chef" knife for most of my cutting board work. For the tasks that require a bigger blade, I can pull out a chef knife; but this should take care of about 90 percent of my slicing and chopping. It cuts through tough potatoes, broccoli and cauliflower like butter. Chopping chocolate and nuts is effortless.

Go to the section below the recipe for details on this very generous giveaway. If you don’t happen to need a knife, you know someone who does; and this knife would make a great and generous gift.


Sheet Pan Home Fries - No Muss No Fuss - soooo much easier, you'll never make them in a skillet again / www.delightfulrepast.com

Sheet Pan Home Fries


(Serves 4 or 5, can be easily doubled*)

2 to 2.2 pounds (32 to 35.27 ounces/0.9 to 1 kilogram) russet potatoes
2 tablespoons (1 fluid ounce/ml) extra virgin olive oil
1/2 teaspoon salt
1/2 teaspoon coarsely ground black pepper
1/4 teaspoon marjoram

1/4 teaspoon thyme


* To serve a crowd, double ingredients and bake on 18x13x1-inch half sheet pan.

1 Preheat oven to 400F/205C/Gas6. Line a 13x9x1-inch quarter sheet pan with baking parchment paper.

2 Peel potatoes and cut into roughly 3/4-inch (2 cm) cubes. In 1.5- to 2-quart bowl, toss potatoes with olive oil, salt, pepper, marjoram and thyme. Spread in a single layer on parchment-lined quarter sheet pan.

3 Bake for 45 to 55 minutes, or until tender and golden brown.

New West KnifeWorks Review and Giveaway / www.delightfulrepast.com


New West KnifeWorks Knife Giveaway


This giveaway is open to readers in the US* who are 18 years of age or older. To enter, leave a comment below (one entry per person). Tell me the first thing you'd make with the knife. Please include your email address in the body of your comment. Must enter by 11:59 p.m. Eastern time Wednesday April 22.

* If you are outside the US but would like to have this sent to someone you know in the US (you would have to send them a gift card separately on your own), go ahead and enter!

Winner will be chosen by random drawing and be announced here in the comments before noon Eastern time on Thursday April 23. If I don't hear back from the winner of the random drawing by noon Eastern time Sunday April 26, a new winner will be selected from the original entrants (those who commented before the giveaway deadline). 

Disclosure: New West KnifeWorks provided a knife for review purposes and one for the giveaway. The views expressed here are entirely my own. I always tell my readers what I really think!

Disclosure: We are a participant in the Amazon Services LLC Associates Program, an affiliate advertising program designed to provide a means for us to earn fees by linking to Amazon .com and affiliated sites. We are a ThermoWorks affiliate, earning a small commission at no cost to you on purchases made through our links. This helps cover some of the costs of running the blog. Thank you for your support. 

Jean

21 November 2019

Chunky Southern Sweet Potato Casserole

Chunky Southern Sweet Potato Casserole / www.delightfulrepast.com

I know people go mad for the Southern Sweet Potato Casserole, but oh my goodness! Even when people say, "I've cut way back on the sugar," it has way more sugar than I ever put in desserts. "Bless their hearts!" 

Sometimes I make my Maple-Pecan Sweet Potato Puree, but when I'm in the mood for more texture, I make this, which I've decided to call Chunky Southern Sweet Potato Casserole. Either one is more "side dishy" than most out there and allows you to enjoy your dessert more fully.

Don't give in to the temptation to add more cinnamon. It isn't meant to be noticed. The 1/4 teaspoon is just enough to add to the illusion of sweetness. You know, in case any of your guests are used to a high-sugar sweet potato casserole.

Chunky Southern Sweet Potato Casserole / www.delightfulrepast.com


Chunky Southern Sweet Potato Casserole


(Makes 12 servings)

The Sweet Potatoes 

3 pounds (48 ounces/1.36 kg) red-skinned orange-fleshed sweet potatoes, peeled, quartered lengthwise, sliced 1/3-inch thick
5 tablespoons (2.5 ounces/71 grams) unsalted butter, melted
1/4 cup (2 fluid ounces/59 ml) real maple syrup
1/4 teaspoon salt
1/4 teaspoon cinnamon

The Topping 

1/4 packed cup (1.75 ounces/50 grams) dark brown sugar
1/3 dip-and-sweep cup (1.67 ounces/47 grams) unbleached all-purpose flour
5 tablespoons (2.5 ounces/71 grams) unsalted butter, softened
1 cup (4 ounces/113 grams) chopped pecans

1/2 cup (2 ounces/57 grams) rolled oats OR dried Biscuit crumbs
1/8 teaspoon salt

1 Preheat oven to 350F/180C/Gas4. Lightly butter or spray with cooking spray a 13x9x2-inch baking dish. Put the sliced raw sweet potatoes in it.

2 In 1-quart saucepan or in 1- or 2-cup glass measure, melt butter and whisk in maple syrup, salt and cinnamon. Pour over sweet potatoes and toss until they are well coated. Cover tightly with foil and bake for 45 minutes.

3 In small mixing bowl, mix topping ingredients with a fork until it's clumping together into large crumbs. Sprinkle evenly over the sweet potato mixture. Bake uncovered right away for about 30 minutes, or cover and refrigerate until 45 minutes or so before serving time. 

4 Preheat oven to 350F/180C/Gas4. Bake uncovered for 45 minutes, or until heated through. 

Disclosure: We are a participant in the Amazon Services LLC Associates Program, an affiliate advertising program designed to provide a means for us to earn fees by linking to Amazon .com and affiliated sites. We are a ThermoWorks affiliate, earning a small commission at no cost to you on purchases made through our links. This helps cover some of the costs of running the blog. Thank you for your support. 

Jean

15 August 2019

Classic Macaroni Salad - and Tuna Macaroni Salad

Classic Macaroni Salad (THE best because of my mother's secret) / www.delightfulrepast.com

Macaroni salad is not the same as pasta salad. Follow this link for my more fashionable, vegetable-heavy, vinaigrette-dressed Pasta Salad. This is old-fashioned (retro) macaroni salad, comfort food from way before anyone ever thought of pasta salad or getting trendy with their food.

Classic macaroni salad is a hit at any picnic, potluck or barbecue (Notice I said "barbecue," not "BBQ," which is one of those things that's always irritated me!). It's great for Game Days, too, if you're into that sort of thing. It's perfect for the lunchbox, for parents or kids; everyone loves it.

After all these years, Mr Delightful, who grew up with tuna macaroni salad--and I'm sorry, but that's just crazy!--loves my Classic Macaroni Salad. I hope you will, too. But if you're on Team Tuna, don't click away; I've included that option as well. You can make Half Classic/Half Tuna.

I make this the way my mother made it, rather than the typical way. Nothing unusual about the ingredients--it's the method. She always layered on the ingredients in a particular order rather than stirring up the dressing separately. I don't know why, but it makes a difference. 

It's just not summer without Classic Macaroni Salad or Perfect Potato Salad! What dishes say "summer" to you?


Classic Macaroni Salad (THE best because of my mother's secret) / www.delightfulrepast.com

Classic Macaroni Salad for Her / Tuna Macaroni Salad For Him


(Makes 12 servings)

8 large eggs
1 1-pound (16 ounces/454 grams) package salad macaroni (ditalini)
2 tablespoons (1 ounce/30 ml) sweet pickle juice
3/4 teaspoon salt
3/4 teaspoon coarsely ground black pepper
1 tablespoon parsley flakes
3/4 cup finely chopped sweet pickles
3/4 cup finely chopped carrot
1/2 cup or more finely chopped celery
1/4 cup finely chopped onion, rinsed and drained
1/4 cup or more finely chopped red bell pepper, patted dry
1 3/4 cup real mayonnaise, divided

1 tablespoon coarse "country" Dijon mustard

Options for the half with tuna:

1 5-ounce can tuna, drained and flaked
1 cup frozen peas, thawed but not cooked

12 pimiento-stuffed green olives, chopped

1 To hard-cook eggs, place eggs in a single layer in large pan. Add enough room temperature water to cover eggs completely and an inch over. Bring to a boil over high heat. As soon as water is bubbling lightly, remove pan from the heat and cover tightly with the lid. Let stand for 15 minutes. Drain and add cold water to pan; repeat twice. Leave eggs to cool for 15 minutes in cold water. Drain, and proceed with recipe or refrigerate until ready to use. (Notice that the egg yolks are yellow and velvety, not orange and shiny-gooey!) 

2 Cook macaroni al dente according to package directions in a 5- to 5.5-quart Dutch oven. Put in colander. Rinse repeatedly with cold water until macaroni is cool. Drain thoroughly. Put back in pan.


The Christopher Kimball Signature Timer is a bit larger with
larger buttons and can time two things at once.


Note: Don't get careless about the timing of the pasta--ever, but especially with salad macaroni (ditalini); it can get overcooked very quickly. I rely on one of my two ThermoWorks kitchen timers: the Christopher Kimball Signature Timer (above) or the TimeStick (below--Mine is yellow!).

The ThermoWorks TimeStick comes in an array of colors.


3 Sprinkle pickle juice, salt, pepper and parsley flakes over cooked and cooled macaroni. (Sure, you can use fresh parsley if you have it; but I didn't. Dill can be good, too.) Stir in pickles, carrot, celery, onion, red bell pepper, 1 1/4 cups of the mayonnaise, and the mustard. 

4 When ready to add eggs to salad, use egg slicer to slice eggs. Reserve 7 or more pretty slices for garnish (14, if using 2 bowls); cover and refrigerate. Roughly chop remaining slices and add to salad. Transfer salad to 4-quart serving dish (or two 2-quart bowls), cover and refrigerate. Chill for at least 4 hours; but making it a day ahead is best. 

5 Before serving, stir in the reserved mayonnaise (perhaps not all of it, or perhaps a bit more), as the macaroni will have absorbed the first portion and will likely be rather dry. (And this would be the case no matter how much you put in the first time!) Garnish with reserved egg slices and perhaps a bit of chopped fresh parsley or dill, if you have it.

The Tuna Option: Divide salad between two 2-quart bowls; add tuna, peas and olives to just one of them.

And now for something completely different … apropos of absolutely nothing … just a little something to make you smile.

Classic Macaroni Salad (and this sketch has nothing to do with it!) / www.delightfulrepast.com
I set out to paint Peter Rabbit, but this chap looks more 
mature than Peter. So I'm thinking of him as Old Mr Rabbit, 
Peter's father who was made into a pie by Mrs McGregor.


Disclosure: We are a participant in the Amazon Services LLC Associates Program, an affiliate advertising program designed to provide a means for us to earn fees by linking to Amazon .com and affiliated sites. We are a ThermoWorks affiliate, earning a small commission at no cost to you on purchases made through our links. This helps cover some of the costs of running the blog. Thank you for your support. 

Jean

08 August 2019

Baked Acorn Squash

Baked Acorn Squash / www.delightfulrepast.com

I spotted a few acorn squashes this week when I was scouting around for produce. I always like to see what's just coming into season, or going out, and look for things I've never had or haven't had in a long time. And it had been a very long time since I last had acorn squash.

Acorn squash comes in a wide variety of sizes, and I prefer the small to medium, three-quarters of a pound to a pound and a half. One of these was just under 3/4 pound, perfect for two of us. But cook two while you're at it; they fit perfectly in the 9-inch pie plate and will keep well in the fridge for a few days.

Baked Acorn Squash / www.delightfulrepast.com
Watercolor sketch of my little 12-ounce acorn squash


Acorn squash has a very mild, subtly sweet and nutty, flavor. Goes very well with pork dishes. You can go sweet or savory with it. I went slightly sweet with it this time, but savory is good, too, with just butter or good olive oil, salt, pepper and whatever herbs you like.

So many recipes have you cooking the squash skin side up and then turning it over halfway through. I prefer to just cook it skin side down the whole time. In the summer heat, I'm happy to skip any step that doesn't really add something to a recipe. 

What kind of squash do you like?

Baked Acorn Squash / www.delightfulrepast.com


Baked Acorn Squash


(Makes 4 servings)

2 small (12 ounces/340 grams each) acorn squashes
2 tablespoons (1 ounce/28 grams) unsalted butter, melted
Pinch (1/16 teaspoon) salt
2 tablespoons dark brown sugar
Optional: 1/8 teaspoon cinnamon mixed with the brown sugar

1 Preheat oven to 350F/180C/Gas4. Using a large, heavy, sharp chef's knife, cut each squash in half from the tip down through the stem end. Lay each half skin side up on the cutting board and cut in half again. With a paring knife, score each wedge about 1/4 inch deep in a cross-hatch pattern.

Baked Acorn Squash / www.delightfulrepast.com


2 Place the 8 quarters skin side down in a 9-inch glass pie plate. Brush each wedge with melted butter. Sprinkle with a pinch of salt. Put 3/4 teaspoon of dark brown sugar in the hollow of each wedge, spreading it out a bit. Put 1/2 cup of water in bottom of baking dish.

3 Bake, uncovered, for about 45 minutes, until tender. Larger squash will require longer baking; check at 50 minutes, then every 5 or 10 minutes thereafter.


Disclosure: We are a participant in the Amazon Services LLC Associates Program, an affiliate advertising program designed to provide a means for us to earn fees by linking to Amazon .com and affiliated sites. We are a ThermoWorks affiliate, earning a small commission at no cost to you on purchases made through our links. This helps cover some of the costs of running the blog. Thank you for your support. 

Jean


04 July 2019

Baked Beans from Scratch - Instant Pot or Classic

Baked Beans from Scratch - Instant Pot or Classic / www.delightfulrepast.com

Aunt Sissy's Baked Beans came to mind last month for two reasons: 1) Summer would be starting, and that's Baked Bean Season around here; and 2) It was the ninth anniversary of her death and I was enjoying fond memories of her. She was a very capable woman and quintessential homemaker, skilled in all the domestic arts.

Ever since I got an Instant Pot in December, I've wanted to adapt her recipe to the electric pressure cooker. If you don't have one, do make these beans Aunt Sissy's way at the post Baked Beans - From Scratch. But I think my Instant Pot version is identical, and there's no need to presoak the beans.

Usually at the end of the natural pressure release time, I take the inner cooking pot out of the Instant Pot to either cool or serve. This time, for some reason, I left it in place and learned a valuable piece of information. 

When I took the inner pot out over an hour later to put the "cooled" beans in the refrigerator, they were not cool. Leaving them in the turned-off and unplugged Instant Pot had kept them piping hot for over an hour! 

These beans are a must for every summer barbecue, and I hope you'll try them soon, either way.

Baked Beans from Scratch - Instant Pot or Classic / www.delightfulrepast.com

Baked Beans from Scratch - Instant Pot


(Makes 8 servings) 

6 slices (about 6 ounces/170 grams) bacon, chopped
1/2 cup finely minced onion (1 small onion)
1 pound (16 ounces/454 grams) navy or small white beans
3 1/2 cups (28 fluid ounces/828 ml) water
3 tablespoons (1.31 ounces/37 grams) dark brown sugar
3 tablespoons (2.1 ounces/60 grams) unsulfured molasses
1 teaspoon salt
1 teaspoon dry mustard
1 teaspoon apple cider vinegar
1/2 teaspoon coarsely ground black pepper

1 to 1 1/4 cups ( 8 to 10 fluid ounces/237 to 296 ml) ketchup


1 With Instant Pot on Saute function, cook chopped bacon until crisp. Remove all but 1 tablespoon of fat from the pot. Add chopped onion, and cook until softened, about 5 minutes. Be sure to scrape up all the brown bits on the bottom, adding a bit of the water if needed, to free up all that flavor and to make sure your Instant Pot won't give you the Burn signal. Turn it Off.


2 Rinse and pick over beans to remove any debris. Add beans to Instant Pot along with all remaining ingredients. Stir everything up. 

3 Put the lid in place and turn the steam valve to Sealing. Press the Pressure Cook key. Leave the indicator lights on High Pressure and Normal temperature, and change the cooking time to 45 minutes.

Note: It can take 20 to 25 minutes to reach working pressure. This varies with the amount and temperature of the ingredients in the pot. 

4 When the beep sounds, turn it off by pressing Cancel. Set a kitchen timer for 25 minutes and allow the pressure to release naturally, then do a quick release by turning the steam valve to Venting.

5 When the float valve drops down, carefully remove the lid. If the beans are not done to your liking, put the lid back on, turn the steam valve to Sealing, and cook on High Pressure for additional minutes. Taste and adjust seasoning.

Note: The cooked beans can be kept in the refrigerator for several days or in the freezer for up to 3 months.

Note: Check out Instant Pot Pinto Beans post for more info about the vagaries of dried bean cookery!


Disclosure: We are a participant in the Amazon Services LLC Associates Program, an affiliate advertising program designed to provide a means for us to earn fees by linking to Amazon .com and affiliated sites. We are a ThermoWorks affiliate, earning a small commission at no cost to you on purchases made through our links. This helps cover some of the costs of running the blog. Thank you for your support. 

Jean

15 November 2018

Roast Potatoes - Roasties

Roast Potatoes - Roasties - A British (and Irish) Classic / www.delightfulrepast.com

Roast Potatoes, also called Roasties, are one of the key players in the British Sunday Lunch (or Sunday Roast). Served alongside Roast Beef, Roast Pork, lamb or chicken (or my Braised Brisket), Yorkshire Pudding and two vegetables, it’s a tradition that’s unstoppable.


Roast Potatoes - Roasties (this picture - served with Braised Brisket) / www.delightfulrepast.com


You can season this any way you like, but I usually keep it classic. Since achieving the perfect texture is job one, it’s important to start with the right potato. In the UK, try King Edward, Maris Piper or another floury, rather than waxy, potato. In the US, russets work beautifully.

Use a pan large enough to allow some space between the potatoes. A half sheet pan is perfect for 3 pounds (1.36 kg) of potatoes. If your potatoes are different shapes and sizes, cut them into similar sizes and shapes for even cooking. I’m a little obsessive, though, and always pick out four nearly identical 12-ounce (340 grams) potatoes

Make only the quantity you’ll consume at that meal. Don’t make “extra” as they don’t really reheat all that well. 

Are you a roast potato fan, or is this something new for you? Once you’ve had perfect roasties, audibly crunchy on the outside and fluffy on the inside, you’ll want to have them all the time! 


Roast Potatoes -  Roasties - A British (and Irish) Classic / www.delightfulrepast.com


Roast Potatoes – Roasties


(Serves 4 to 6)

4 roughly equal size and shape russet potatoes (about 12 ounces each)
1 1/2 teaspoons salt, divided
3 tablespoons extra virgin olive oil
2 tablespoons unsalted butter, melted
1/2 teaspoon coarsely ground black pepper

1 Peel the potatoes and quarter them (I often quarter them lengthwise as pictured). Place in a large pan with 1 teaspoon of salt and enough cold water to cover the potatoes. Bring to a beginning boil over high heat; reduce heat to medium, cover loosely and simmer for 5 minutes. Start the timer at the “beginning boil” stage.

2 When you first start cooking the potatoes, preheat the oven to 425F/220C/Gas7. Spread 2 tablespoons of oil in an 18x13x1-inch half sheet pan.

Note: A 13x9x1-inch quarter sheet pan is perfect for a half recipe.

3 About 3 minutes into the 5-minute simmering of the potatoes, put oiled half sheet pan into the oven.

4 Drain the potatoes thoroughly, put the lid on and shake the pan gently several times to give the potatoes a bit of a bashing to rough up their surfaces without breaking up the potato quarters. Remove the lid and leave the potatoes to dry for a few minutes.

5 Carefully place the potatoes in a single layer in the hot oil. Drizzle with (or brush on) melted butter and remaining 1 tablespoon of oil. Sprinkle with pepper and 1/2 teaspoon salt. Roast for 15 to 20 minutes. Turn the potatoes and roast for another 15 to 20 minutes; repeat once, cooking until the potatoes are well browned, crisp and tender, about 60 minutes total. Serve immediately.

Disclosure: We are a participant in the Amazon Services LLC Associates Program, an affiliate advertising program designed to provide a means for us to earn fees by linking to Amazon .com and affiliated sites.

Jean