27 April 2012

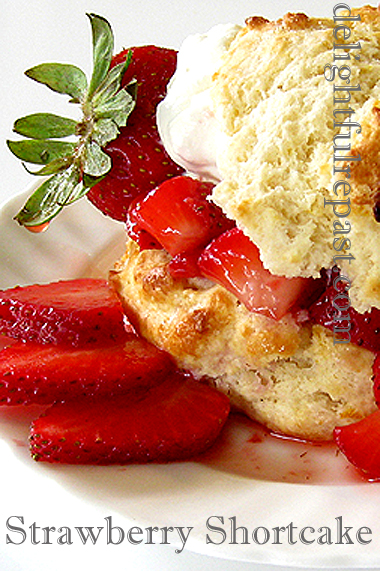
Strawberry Shortcake - Gluten-Free or Not


Strawberry shortcake is the quintessential summer dessert. A bit rustic in appearance, it is the perfect finale to a cookout or other casual dinner. Let's get real--it can even be dinner!

Strawberry shortcake can be made with those little store-bought sponge cakes or slices of pound cake or angel food cake, but I've always favored the kind made with slightly sweet baking powder biscuits. I draw the line, though, at buttering the biscuits before piling on the strawberries and whipped cream. 

If you are not on a gluten-free diet, just replace the first four ingredients of the biscuit dough with 2 dip-and-sweep cups (10 ounces/283 grams) of unbleached all-purpose flour. And if you don't use alcohol, or are serving the shortcake to children or people who don't use alcohol, just leave out the orange liqueur. I just put it in because I think orange is the perfect accent for strawberries. 

So, tell me, how do you like your strawberry shortcake? 

Strawberry Shortcake - Gluten-Free or NOT / www.delightfulrepast.com

If you like it, please Pin it and share it!

Strawberry Shortcake 


(Makes 8 servings) 


Berries

2 1-pound clamshells (or 3 baskets) organic strawberries, stemmed and sliced
4 tablespoons sugar
2 tablespoons orange liqueur or fresh orange juice


Drop Biscuits

3/4 dip-and-sweep cup sorghum flour
3/4 dip-and-sweep cup potato starch
1/2 dip-and-sweep cup tapioca starch
1 1/8 teaspoons xanthan gum
OR replace above 4 ingredients with 2 dip-and-sweep cups (10 ounces/283 grams) unbleached all-purpose flour
3 tablespoons sugar
1 tablespoon baking powder
1/2 teaspoon salt
6 tablespoons cold unsalted butter, cut into 1/2-inch cubes
Zest of 1 medium orange
1 cup milk or organic rice milk


Whipped Cream

1 cup heavy whipping cream 
1 tablespoon sugar
1/2 teaspoon vanilla extract


1 About an hour before serving time, stir together strawberries, sugar and liqueur or juice in 2-quart bowl. Cover, and let stand at room temperature while you're making the biscuits. 

2 Preheat oven to 500F/260C/Gas10. Line an insulated baking sheet with parchment; set aside.

3 In 2-quart bowl, whisk together the dry ingredients. With your fingers or a pastry blender or two knives, cut in the cold butter until the mixture looks like coarse crumbs with some bigger chunks remaining. Pour milk or rice milk over flour mixture and gently mix until just combined.

4 Using a greased 1/3 cup measure, scoop out 8 mounds of dough about 2 inches apart on the parchment-lined insulated baking sheet. If you have dough left over, scrape it out and divide it among the 8 mounds. Bake for about 12 minutes,* or until golden brown. Let biscuits cool slightly on wire rack while you're making the whipped cream. 

* And here is my favorite kitchen timer; since I got this ThermoWorks TimeStack, I haven't looked back!

5 In mixing bowl, combine cream, sugar and vanilla extract. Whip to soft peaks.

6 Slice the biscuits horizontally and place the bottom halves in serving bowls. Divide the strawberries among the bowls, reserving some berries and juice to spoon on top. Divide the whipped cream among the bowls. Top each serving with a biscuit top. Garnish with remaining berries and juice. Serve immediately.

Disclosure: We are a participant in the Amazon Services LLC Associates Program, an affiliate advertising program designed to provide a means for us to earn fees by linking to Amazon .com and affiliated sites. We are a ThermoWorks affiliate, earning a small commission at no cost to you on purchases made through our links. This helps cover some of the costs of running the blog. Thank you for your support.

Jean

If you liked this post, please Pin it and share it!


20 April 2012

Peanut Butter Chocolate Chip Ice Cream


If you're gearing up for summer, it's time to get out the ice cream maker. If you don't have one, it's time to get one! I put it off for years, telling myself "Be sensible. It's one of those things you'll use once or twice and then ..." Turns out, I use it all the time! The gel-filled canister must be placed in the freezer 24 hours ahead of time, so I just keep it in the freezer at all times. I may even order a second canister for my machine so I can make two flavors without waiting for the canister to freeze.

For links to the nine other ice cream, frozen yogurt, vegan ice cream and sherbet recipes I've developed, just type "ice cream" in the "Looking for Something?" search box on the right or hit the "Recipes/Reviews" page link at the top and look under "Desserts." 

Peanut Butter Chocolate Chip Ice Cream

(Makes about 5 cups)

1 cup creamy natural nothing-added organic peanut butter
2/3 cup sugar
1 1/2 teaspoons vanilla extract
1/8 teaspoon salt, if peanut butter is unsalted
1 1/2 cups organic whole or 2% milk
3/4 cup organic heavy whipping cream
1/2 cup semi-sweet chocolate mini chips or chopped chocolate

1 In medium bowl (I use a 2-quart glass measure to make pouring into the machine easier), stir together peanut butter, sugar, vanilla extract and salt until the mixture is well blended. stir in a little milk to thin the mixture, then gradually whisk in remaining milk and cream. Cover and refrigerate at least 4 hours or overnight.

2 Assemble the Cuisinart ICE-21 Frozen Yogurt-Ice Cream-Sorbet Maker; turn it on. While it is running, pour the chilled mixture through the spout. Let mix until thickened, about 15 minutes. Or follow the directions for whichever brand ice cream maker you have. If you have a KitchenAid, you can use their KitchenAid Ice Cream Maker Attachment. Add the chopped chocolate or chips during the last 2 minutes.

3 Transfer the soft ice cream to a freezer-safe airtight container. Place in freezer for at least 4 hours. If it is super hard when you're ready to use it, remove it from the freezer 15 minutes before serving.

13 April 2012

How to Make Flour Tortillas - So Much Better Than Store-Bought


Flour tortillas of the store-bought variety usually have a lot of questionable ingredients that leave an odd aftertaste. But some of the homemade flour tortillas I've had were greasy and rubbery (and some 1/4-inch thick!), so I decided to try making my own with just four simple (and organic) ingredients. I made up the recipe as I went along, and they turned out great the first time--which only means homemade flour tortillas are easy and practically foolproof!

Cooking for two on most days, I set out with the idea of making six smallish tortillas. So I got out a medium bowl, about 2 quarts, and measured in the amount of organic unbleached flour I thought would be needed. Not being too keen on lard, and having an actual aversion to vegetable shortening, I got out the organic unsalted butter. Started with 2 tablespoons but decided to add a bit more. Heated up 1/2 cup water, but didn't use it all; turns out, 1/3 cup is just right. Did all the mixing with my fingers, then kneaded the dough briefly right in the bowl. Couldn't be easier.

Please Pin it and share it!

On my impeccably clean quartz countertop, I mashed the ball of dough into a 5-inch disk and cut it into six wedges. Then I rolled each wedge into a ball, threw them back in the bowl, covered the bowl and let the dough balls rest at room temperature for about 30 minutes while I proceeded with other parts of the meal. Then I pressed them out by hand on the same unfloured countertop. If I were making a lot of tortillas, even just a double batch, I would use a rolling pin. But for so few, it just seemed simpler to do it by hand. My little recipe made exactly six tasty little 7-inch tortillas.

I know step-by-step photos would be helpful, but I don't usually have a second photographer on hand, so I've given very explicit directions and am confident you won't have any trouble turning out a batch of homemade tortillas the very first time. Mmm ... once you make your own flour tortillas, you'll never go back to store-bought!


You might also want to try my Mexican Rice and Albondigas Soup recipes!

Flour Tortillas

(makes six 7-inch tortillas)

1 1/4 dip-and-sweep cups (6.25 ounces/177 grams) unbleached all-purpose flour
1/4 teaspoon salt
2 1/2 tablespoons (1.25 ounces/35 grams) unsalted butter
1/3 cup (2.67 fluid ounces/79 ml) very warm water


1 In medium bowl, mix flour and salt together with your hands. Grate the butter into the bowl or use a small knife to slice tiny pieces of butter into the bowl. With your fingertips, mix the butter into the flour until it resembles coarse meal. Pour the warm water with one hand while mixing with the other, in case you don't need to add all the water. The mixture should be just moist enough to come together into a stiff dough. Knead, right in the bowl, with one hand for about a minute.

2 On impeccably clean unfloured work surface, mash the ball of dough into a 5-inch disk and cut it into six wedges. Roll each wedge into a fairly smooth ball, place them in the bowl, cover and let rest at room temperature for about 30 minutes.

3 On the same unfloured work surface, with a rolling pin or with your hand, roll or press each dough ball into a 7-inch round. Measure--if they are not 7 inches, they are not thin enough.

4 Heat an ungreased skillet or griddle over medium-high heat. (You would love the Lodge Pro Logic 12-Inch Square Griddle. I hate round griddles!) Cook on first side about 30 to 45 seconds or until tortilla starts puffing up and is getting specks of brown on the underside. Turn and cook second side about 30 to 45 seconds or until browning in spots. As each one is done, stack on a plate covered with a kitchen towel. 

Jean

06 April 2012

Banana Loaf Cake - Banana Bread

Banana Bread - Banana Loaf Cake / www.delightfulrepast.com

Banana bread has a bit of a bad rep because of all the bad banana bread out there. I prefer to call my version banana loaf cake, to differentiate it from all those dry banana breads that have too much sugar and not enough banana. Not everyone likes nuts, so feel free to leave them out if you don't. Some people like to toast the nuts first, but I rarely take the time to do that and haven't had any complaints yet.

Of course, you can spread a slice with softened butter and call it breakfast. Or top a slice with a dollop of whipped cream and call it dessert. I suppose you could even frost the loaf, or just the top of it, with a thin icing. But I guess I'm a no-frills kinda gal because I prefer just a plain, unadorned slice along with a nice cup of tea.

How about you? Don't tell me you don't like bananas; I'll only tell you that even people who don't like bananas like this. But if you really really really don't like bananas, try my chocolate loaf cake! Frugal types like banana cake/bread because it's a great way to use up really overripe bananas instead of throwing them out. In fact, the more overripe, the better. If you can, wait until the bananas are thoroughly disgusting before making this.

Banana Bread


(Makes one 9x5x3-inch or 9x4x4-inch loaf)

2 packed cups (10 ounces/283 grams) unbleached all-purpose flour
1 teaspoon baking soda
1/2 teaspoon salt
2/3 cup chopped walnuts, toasted or not
1 2/3 cups (about 1.5 pounds, unpeeled) mashed very ripe bananas
1 tablespoon plus 2 teaspoons fresh lemon juice, divided
Milk to make 2/3 cup
4 ounces (1 stick) unsalted butter, room temperature
2/3 packed cup (4.75 ounces/135 grams) dark brown sugar
2 large eggs
1 teaspoon vanilla extract

1 Preheat oven to 350F/180C/Gas4. Grease, butter or spray a 9x5x3-inch or 9x4x4-inch loaf tin. In small bowl, whisk together flour, baking soda and salt. Stir in chopped walnuts. 

2 In medium bowl, mash bananas and 1 tablespoon lemon juice with large fork or potato masher.

3 In measuring cup, put 2 teaspoons fresh lemon juice, add milk to make 2/3 cup; stir gently and let stand for 5 minutes. 

4 In large bowl, cream butter and brown sugar together until light and fluffy. Beat in eggs, then vanilla and mashed bananas. Add dry ingredients and lemon-thickened milk alternately to wet ingredients, and stir just until combined. Scrape into prepared loaf tin; smooth top.

5 Bake for 65 to 75 minutes, or until toothpick inserted in center comes out clean. Cool in pan on wire rack for 10 minutes. Remove from pan and continue cooling on wire rack for an hour.