27 April 2017

Classic Deviled Eggs


Classic Deviled Eggs - a must for every barbecue, picnic and potluck - organic, of course / www.delightfulrepast.com

Deviled eggs, or devilled if you're in the UK, are a classic party food. Have you ever been to a barbecue, picnic or potluck that didn't have at least a few batches of deviled eggs? There's a reason for that: everybody loves them! Some people say, it's not a party until you break out the deviled eggs!

There are several ways to boil (hard-cook) the eggs, some of which are supposed to be vastly superior to the others; but I'm not even going there, except to say that the best way is whatever works for you. I'm just including one method, in the directions, and leaving it up to you to sort out.

I'm only going to comment on the degree of doneness because, well, they need to be actually done. As you may know, I adore Jacques Pepin, but he and I don't see eye to eye on this subject. I say a hard-cooked egg yolk should be yellow and matte, and he says it should be orange and shiny. That's just wrong!

I'm blogging this recipe at the request of a reader. I do that, you know. So if there's anything you'd like to see here at Delightful Repast, or if you have a cooking question, just let me know. What's your favorite thing to take to a gathering? (Mr Delightful would say, "My cavernous appetite!") 

Classic Deviled Eggs - a must for every barbecue, picnic or potluck - organic, of course / www.delightfulrepast.com
Vintage dish is Indiana Glass Company clear Hobnail Egg Plate first made in the 1940s, other colors being added later.

Don't forget to Pin it!

Classic Deviled Eggs


(Makes 24)

12 large eggs
1/2 cup mayonnaise 
1 to 1 1/2 teaspoons country Dijon mustard 
1/4 teaspoon salt 
1/8 teaspoon coarsely ground black pepper 
1/8 teaspoon dried dill 
1/8 teaspoon curry powder 
Garnishes (fresh dill, pimiento slivers, stuffed olive slices, minced parsley or paprika) 

1 Place eggs in a single layer in large pan. Add enough room temperature water to cover eggs completely and an inch or two over. Bring to a boil over high heat. As soon as water is bubbling enough to make even one egg rattle, remove pan from the heat and cover tightly with the lid. Let stand for 14 minutes. Drain and add cold water to pan; repeat twice. Leave eggs to cool for 15 minutes in cold water. Drain, and proceed with recipe or refrigerate until ready to use. 

2 Peel the eggs, cut them in half lengthwise and remove the yolks. Place egg whites on a plate and yolks in a 1-quart bowl.

3 With a fork, mash yolks well. Add mayonnaise, mustard and seasonings; mix well. Taste and adjust seasoning. 

4 Using a spoon or a pastry bag (Pfft!), fill the egg halves. Garnish. Chill until serving time.


20 April 2017

Harney and Sons Fine Teas - Organic Tea Review and Giveaway


Harney and Sons Fine Teas - Organic Tea Review and Giveaway / www.delightfulrepast.com

Several years ago I was introduced to Harney and Sons Fine Teas by master tea blender John Harney himself, the founder of the company. I was saddened to learn of his death five years later, but his family is carrying on the fine tea tradition.


Wait! Not a tea lover? Don't go away just because you aren't one! Someone you know and love is, and this will make a wonderful gift for that person!

Update 04/27/17: Giveaway is now closed.

Harney and Sons have white, green, matcha, oolong, black and decaffeinated teas as well as herbal infusions. Since I drink mostly organic teas, I was happy to learn that they currently offer ten organic teas and herbal infusions.

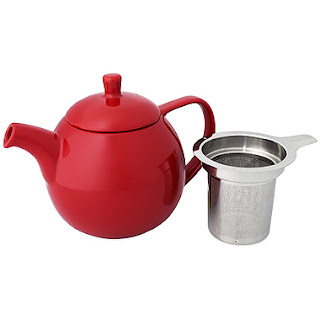
The 24-ounce teapot, which happens to have an excellent non-drip spout, makes up to four teacups or two or three mugs of tea. It comes in six colors: ivy (green), red, blue, white, lime and turquoise. Choose your color!


Harney and Sons Fine Teas - ForLife Curve Teapot with Infuser / www.delightfulrepast.com
24-Ounce ForLife Curve Teapot with Infuser

John Harney favored a 5-minute steep for most black teas, as do I, so I went with that for all my tastings. And for each I put 25 fluid ounces of water in the electric kettle (because about an ounce evaporates in the boiling) and 6 grams of loose leaf tea in the fine-mesh stainless steel infuser.

In the case of the Earl Grey, 6 grams was 4 1/2 teaspoons (3 scoops with my 1 1/2-teaspoon measuring spoon or 3 "rounded" teaspoons). If you're an Earl Grey fan, you probably know you can get more or less pronounced bergamot flavor by playing around with the amount of tea and/or the steeping time, but I was quite pleased with the balance the first time.

(Oh and try my Earl Grey Shortbread!)

The measurement was the same for the Assam, though the leaves are not quite as bulky as the Earl Grey and so make measuring a "level" 1 1/2-teaspoon measure more, well, level. The resulting brew was perfect, strong enough to stand up to the teaspoon of milk I like to add, but not too strong on its own. Mr Delightful, who never adds anything to his tea and who is a real Earl Grey fan, liked this Assam a lot. Don't worry ...

I'm going to stop now and move on to the giveaway! I'm sure I've already lost some of you who like to drink tea but not go on and on about it they way I do!


Harney and Sons Fine Teas - Organic Tea Review and Giveaway / www.delightfulrepast.com


Update 04/27/17: Giveaway is now closed.

Harney & Sons Tea and Teapot Giveaway 


The winner of the giveaway will be sent: a 4-ounce tin Organic Assam, a 4-ounce tin Organic Breakfast, a 4-ounce tin Organic Darjeeling, a 4-ounce tin Organic Earl Grey, a package of Walkers shortbread and a 24-ounce ForLife Curve Teapot with Infuser in your choice of several colors.

This giveaway is open to US residents* 18 years of age or older. Leave a comment below (one entry per person); tell me which color teapot you'd like and perhaps your favorite time of day for a nice cup of tea. Please include your email address in the body of your comment. Must enter by 11:59 p.m. Eastern time Wednesday April 26.

* If you are outside the US but would like to have this sent to someone in the US (you would have to send them a gift card separately on your own), go ahead and enter! 

Winners will be chosen by random drawing and be announced here in the comments before noon Eastern time on Thursday April 27. If I don't hear back from the winner of the random drawing by noon Eastern time Sunday April 30, another drawing will be held and a new winner selected from the original entrants (those who commented before the giveaway deadline).

Disclosure: Harney & Sons provided product for review purposes and for the giveaway. The views expressed here are entirely my own. I always tell my readers what I really think!


Harney and Sons Fine Teas - Organic Tea Review and Giveaway / www.delightfulrepast.com

Don't forget to Pin it and share on all your SM!
(And tell your non-virtual friends as well!)

13 April 2017

Fresh Blackberry Scones

Fresh Blackberry Scones - that aren't purple! / www.delightfulrepast.com
Yes, you can make fresh blackberry scones that aren't purple!

I don't make blackberry scones as often as I'd like because I don't often just happen to have fresh blackberries on hand, as I do dried fruits. And frozen blackberries just won't do because I like to cut the berries in half since the whole berries are just too large.

But once I've cut the berries in half, I do freeze them for about 30 minutes before mixing them in so that they don't "bleed" all over the dough in an unattractive way. And I cut the scones in a way that leaves no scraps to be rolled out for a messy second cutting.


Usually I make 16 much smaller scones from this amount of dough because I'm making them for afternoon tea, an occasion that calls for dainty little things. But these are larger, what I call breakfast-size. Serve with a bit of blackberry preserve to punch up the berryliciousness!

What kind of scones do you like? You might also try my Classic Scones, Cream Scones and Fresh Peach Scones. And don't forget the Clotted Cream!

PS Be sure to come back next week for a fab giveaway!


Fresh Blackberry Scones - that aren't purple! / www.delightfulrepast.com


Fresh Blackberry Scones


(Makes 8 breakfast-size scones)

1 cup (4 ounces/113 grams) firm fresh blackberries
2 teaspoons apple cider vinegar
Enough milk to make 2/3 cup (5.33 fluid ounces/158 ml)
2 dip-and-sweep cups (10 ounces/283 grams) unbleached all-purpose flour
1/4 cup (1.75 ounces/50 grams) sugar
1 1/2 teaspoons baking powder
1/2 teaspoon baking soda
1/4 teaspoon salt
6 tablespoons (3 ounces/85 grams) cold unsalted butter, cut into cubes
Finely grated zest of half a lemon or one orange
1 large egg
1 teaspoon vanilla extract

1 Line a baking sheet with parchment and sprinkle an 8-inch circle lightly with flour. Wash and blot dry the firm, fresh blackberries. Cut them in half horizontally and set on parchment-lined quarter sheet pan; place in freezer for 30 minutes. After 15 minutes, preheat oven to 425F/220C/Gas7.

2 In 1-cup glass measure, stir together vinegar and milk; set aside. In medium bowl whisk together the flour, sugar, baking powder, baking soda and salt. Cut the butter (or rub it in with your fingers) into the flour mixture until it resembles coarse meal with some larger bits. Stir in zest and berries to coat and separate.

3 Whisk egg and vanilla extract into soured milk; pour into dry mixture and gently mix until just combined.

4 Scrape the dough onto the floured parchment and gently pat the dough, dusting with flour as needed, into a 7- to 7.5-inch round about an inch thick. Cut into 8 wedges. Pull the wedges out (I use a pie server) and space them an inch or two apart. If you like, brush the tops with a bit of cream, milk or melted butter. Bake for about 18 minutes or until golden brown.

Now put on the kettle and make a proper cup of tea. Enjoy the delightful repast!


Fresh Blackberry Scones - that aren't purple! / www.delightfulrepast.com

06 April 2017

Lemon Drizzle Cake - The Best Lemon Loaf Cake

Lemon Drizzle Cake - The Classic British Lemon Loaf Cake / www.delightfulrepast.com

Lemon Drizzle Cake is the classic British lemon loaf cake that will forever be a teatime staple. With no messy frosting, tidy little slices can be easily managed without a fork and go neatly into packed lunches for school or work. The fine-crumbed, velvety texture makes this my favorite lemon drizzle cake.  


My mother was probably the first home cook in America to get a Cuisinart food processor the minute it came on the market. And she loved making cakes in it, or by hand, not with a mixer. I rarely make cakes in it, but I like to use it for one of her favorites, Lemon Drizzle Cake, as well as our Whole Lemon Cake.

Using a food processor, you don't even need to use a fine grater for the lemon zest. Just take off the peel in strips with a vegetable peeler and throw them into the food processor with the sugar and run it for a few seconds before getting on with the recipe. The food processor makes quick work of lemon drizzle cake.

The lemon drizzle disappears into the cake, so some people like to also add a visible powdered sugar icing, but I don't bother. If I want to get fancy, I slap a few candied lemon slices on top of the loaf. The leftover syrup from them is a tasty simple syrup for sweetening drinks.

Do you prefer making cakes by hand, with a food processor, hand mixer or stand mixer?

Just did the math. It takes all of 38 seconds total mixing time in the food processor!


Lemon Drizzle Cake - The Best Lemon Loaf Cake / www.delightfulrepast.com
Don't forget to Pin it!

Lemon Drizzle Cake


(Makes 1 loaf cake, 10 to 16 slices) 

The Lemon Loaf 

2 sticks (8 ounces/227 grams) unsalted butter
1 teaspoon fresh lemon juice 
Milk, room temperature, to make 1/4 cup (2 fluid ounces/59 ml)
1 1/2 dip-and-sweep cups (7.5 ounces/213 grams) unbleached all-purpose flour

3 tablespoons (24 grams) non-GMO cornstarch
1 teaspoon baking powder
1/2 teaspoon salt
1 1/4 cup (8.75 ounces/248 grams) sugar 

Strips of zest of 2 medium unsprayed unwaxed lemons
4 large eggs, room temperature
1 teaspoon vanilla extract 

The Lemon Drizzle 

1/3 cup (2.67 fluid ounces/79 ml) fresh lemon juice
1/4 cup (1.75 ounces/50 grams) sugar  

1 In 2-cup glass measure, melt the butter in microwave (if you melt it in a pan on the stovetop, pour it into something with a spout); set aside to cool. In 1-cup glass measure, stir together lemon juice and milk; it will thicken a bit as it stands. 

2 Grease and flour, or spray with cooking spray, a 9x4x4-inch loaf pan or 9x5x3-inch loaf pan. I use 1/2 tablespoon of softened butter and 1 tablespoon of flour. Preheat oven to 350F/180C/Gas4. 

Note: I love the square shape of the 9x4x4-inch loaf pan that I initially got for baking my gluten-free yeast breads but use (without its lid) for nearly everything that calls for a 9x5x3-inch pan. Makes it easy to cut cute little triangles for the tea table. 

3 In 2-quart glass measure, whisk together flour, cornstarch, baking powder and salt. Whisking the daylights out of the dry ingredients takes the place of sifting. 

4 Cut your strips of lemon zest into 2-inch pieces and put them on top of sugar in food processor; process for about 15 seconds. Add eggs and vanilla extract; process for 3 seconds. 

5 Give the melted and cooled butter a stir and, with the food processor running, pour the butter through the feed tube in a slow and steady stream, taking about 15 seconds. 

6 Take the lid off the food processor, stir in the milk a bit, and scatter the flour mixture over top of the egg mixture. Put the lid back on and pulse 3 times. Scrape the sides and pulse 2 more times. 

7 Pour into prepared loaf pan and bake for 15 minutes. Reduce oven temperature to 325F/165C/Gas3 and continue baking for about 50 minutes. 

8 Cool in pan on wire rack for 10 minutes before turning out onto wire rack.

9 In 1-cup glass measure or small bowl, stir together well the sugar and lemon juice (the sugar will not be dissolved). With cake tester, thin skewer or toothpick, poke small holes in top of cake. Using a teaspoon, gradually drizzle tiny amounts of the glaze over the cake, allowing it to soak in before adding the rest. I also use a silicone pastry brush to brush the sides of the cake. Plan on this step taking about 10 minutes. There's no point in just pouring on glaze and having it run all over your countertop! Continue cooling for an hour.

Disclosure: Some posts contain links to my affiliate account at Amazon. If you purchase something from Amazon through one of my links, I receive a small commission, at no additional cost to you, which I use toward the expenses of running this blog. Thanks for supporting Delightful Repast when you shop at Amazon!