28 February 2013

Product Review - Whittard of Chelsea Tea - and How to Make a Proper Cup of Tea


If you've been reading Delightful Repast for any length of time, or following me on Twitter (@delightfulrepas), you know that a good strong cup of black tea is my beverage of choice (and has been since the age of two-ish). Whilst I do use the occasional teabag, I most often use loose leaf tea. I have several favourites: Darjeeling, English Breakfast, Earl Grey and some proprietary house blends of companies in England. 

Whittard of Chelsea recently sent me three of their blends for review: Afternoon, Earl Grey and English Breakfast (comes in a Whittard gift set). Whether I'm reviewing a product I've purchased or one that was given to me, I always tell my readers what I really think. As I say to brands on my PR page, my opinions are not for sale. I brewed the teas in my usual way (see below) and tasted them with and without milk (I use 2%).

I've drunk many brands of English Breakfast tea, and they are all different. Whittard's is a blend of malty Assam for strength, crisp Ceylon for depth and mellow Kenyan for colour. This is a great wake-up tea. Good without, but I love it with just a splash of milk. A splendid way to greet the day!

Next I tried the Earl Grey, a lighter tea than English Breakfast. Earl Grey is a tea some brands just don't do well. One brand I'm thinking of tastes very much like a popular pine cleaner! Not the case here. Whittard's excellent Earl Grey is a blend of Indian and China teas flavoured with the characteristic bergamot. Traditionally an afternoon tea, I drink it pretty much around the clock! Usually drunk without milk or with just a dash (I used 1 teaspoon), I liked it both ways. 

I saved Afternoon for last because it is unique to Whittard, being a house blend created by Mr. Whittard in the 1940s. It's an aromatic blend of black and green teas flavoured with jasmine and a touch of bergamot. It's a much lighter tea than I am accustomed to drinking. I don't really consider green tea tea; tend to lump it in with herbal infusions. Of course, that is not the case; green tea is "real" tea made from the same plant as black tea. If you are a fan of green tea, you would probably enjoy this fragrant blend.

The next Whittard of Chelsea teas I'd like to try are the Darjeeling, 1886 Blend and the organic Earl Grey and English Breakfast.


How to Make a Proper Cup of Tea 

To make a proper cup (pot, really) of black tea, just before a kettle of freshly drawn water comes to the boil, warm the teapot with hot water, empty it, add one measuring teaspoon of tea leaves for each 6 or 8 ounces of water (depending on the strength you prefer). Immediately (that's why the teapot is sitting on the stove in the photo above) pour in the freshly boiling water, let it stand for 5 minutes, stir, and then strain into cups. If you prefer to use a tea ball, be sure it is large enough to allow the tea leaves to unfurl. Serve with sugar or sugar cubes, thin slices (not wedges) of lemon and a small pitcher of milk (never cream).

Note: If you drink a great deal of tea throughout the day--or work in an office where people are constantly boiling water for tea, French press coffee, hot chocolate, soups and noodles--you might take a look at the Zojirushi Water Boiler and Warmer and read my review of it.

What are your favourite teas?

21 February 2013

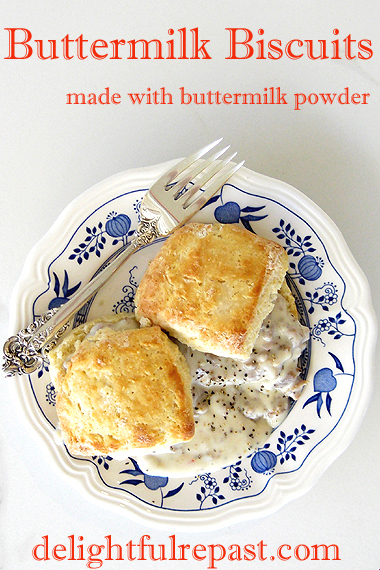
Buttermilk Biscuits - Made with Buttermilk Powder


Homemade biscuits elevate a basic breakfast to new heights. In the case above, they transformed a couple of scrambled eggs into Comfort Food. If you're Southern (as I am, on my father's side), they can appear on the lunch or dinner table as well. So it's important to know how to make good ones. If you're English (as I am, on my mother's side), a biscuit is a cookie; what we're talking about here resembles a scone.

If you've only ever eaten the kind that comes in a tube that you whack on the edge of the counter to unfurl and pull apart, a homemade biscuit will be a revelation. Once you see how quickly they can be made from a few basic ingredients and how much better they taste, you will never eat another canned biscuit.

When I have buttermilk (or sour cream or plain yogurt) on hand, I make my other Biscuits recipe. But, unless I'm making other recipes that week that call for buttermilk, I'd rather use buttermilk powder than waste a carton. 

The three keys to good biscuits are:

1 butter rather than shortening (Though there are plenty of people who make tasty biscuits with shortening, I don't eat the stuff. The only fats I use in my kitchen are organic butter, organic oils and "drippings" from organic meat.)

2 not over-mixing after adding the liquid (Working the dough too much after the liquid is added makes a tough biscuit.)

3 a very hot oven (This makes a biscuit with a crisp, golden exterior and a fluffy interior.)

Of course, I always use organic flour and buttermilk powder as well. Lots of Southern cooks swear by a certain soft wheat flour, and some cooks use part cake flour to approximate that flour. I just use organic unbleached all-purpose flour from Bob's Red Mill and have never felt the need for a softer flour. I use Organic Valley milk, butter and buttermilk powder. (And, no, I'm not on their payroll! Just like to tell you what products I use.)


Buttermilk Biscuits - Made with Buttermilk Powder / www.delightfulrepast.com

If you like this post, please Pin it and share it!


Buttermilk Biscuits - Made with Buttermilk Powder

(Makes 12 biscuits)

2 dip-and-sweep cups (10 ounces/283 grams) unbleached all-purpose flour
3 tablespoons buttermilk powder
1 tablespoon baking powder
1 teaspoon salt
5 tablespoons (2.5 ounces/71 grams) cold unsalted butter, cut into 1/2-inch cubes (if using food processor, put butter in the freezer for 15 minutes)

3/4 to 1 cup (6 to 8 fluid ounces/177 to 237 ml) milk

1 Preheat oven to 500F/260C/Gas10. Lightly spray an insulated baking sheet with cooking spray. If you have a food processor and want to use it for this, with metal blade in place, combine the flour, buttermilk powder, baking powder and salt in work bowl of food processor. Pulse 3 times to combine. Add frozen butter and pulse 6 to 8 times or until mixture resembles coarse meal with some bigger chunks remaining. Transfer mixture to mixing bowl.

If not using a food processor, whisk together the dry ingredients in a large bowl. With your fingers or a pastry blender or two knives, cut in the cold butter until the mixture looks like coarse crumbs with some bigger chunks remaining.

2 Pour milk over flour mixture and gently mix until just combined. Start with smaller amount of milk and add remainder only if mixture has dry spots.


3 On a lightly floured surface, gently pat the dough into about a 3/4-inch-thick 6x8-inch rectangle. Cut into 12 square biscuits, and then gently round each biscuit by hand (as in photo above) or leave square. (If you use a round biscuit cutter, you either waste dough or have some tough biscuits made from re-rolled dough.*) Place about 2 inches apart on the insulated baking sheet and bake for 10 minutes or until golden brown. When I remember to do it, I brush the tops of the biscuits with a little milk before baking. It makes them pretty!

* Someday I'll get around to ordering this set of hexagon cutters that would solve the problem of wasted or re-rolled dough.

Biscuits may be frozen, double-wrapped, for up to one month. Thaw at room temperature, wrapped, then unwrap and heat at 350F/180C/Gas4 for 5 minutes. Keep some on hand for biscuits and gravy (cream gravy that starts with some well-browned loose sausage).

Jean

14 February 2013

Afternoon Tea Review - Montage Beverly Hills


You might as well know it, I am not a normal woman. I don't like chocolate (though I make chocolate stuff for others). And--true confession time--I hate (detest, abhor, loathe) shopping. I know a lot of women who rely on "retail therapy" to cheer them up, but nothing does that for me quite like afternoon tea. Aah-fternoon tea. 

On a recent trip to Los Angeles, I joined a friend for afternoon tea at Montage Beverly Hills. She reminded me that it's been more than twenty years since I introduced her to the pleasures of afternoon tea and it had been three months since we had last gone out for tea together. We agreed it's crucial to our well-being and that we must have tea together more often.
 
Such a pair of avid tea aficionados--okay, okay, make that tea snobs--have, as you might assume, pretty high standards. We want ambience, excellent scones with the proper accompaniments, a sufficient number of well-made sandwiches, assorted pastries and proper tea. Doesn't sound like too much to ask, but you'd be surprised at how few places merit a perfect score.
 
Let's start with ambience. Though just a few years old, Montage manages to create the illusion of the old-world elegance I love. Tensions melted away as we sank into comfy chairs at a window table looking out on the courtyard, a park-like oasis right in the city. A glass of sparkling wine, along with the serene sounds of the harp, struck just the right note.

Of course, we like to think we add to the
ambience by dressing for the occasion!

The table was set with lovely china, and when our server brought out the two trays of accompaniments--one with milk, honey and lemon for the tea and one with clotted cream, lemon curd and raspberry jam for the scones--we practically swooned! We thought, Clearly these people know what they're doing!

Our chosen teas were brought out in two full-sized teapots after they were brewed. Thank you! I can't tell you how much I hate being served a tiny pot of "hot" water and an assortment of teabags! When the traditional three-tiered stand was set before us, we started with the scones. Excellent--the proper texture and not too sweet. The quality of the lemon curd, raspberry jam and especially the clotted cream was well above the usual. As you can see from the photo below, we like clotted cream a lot!
 

The sandwiches--turkey, fig and mascarpone; curried chicken salad; cucumber; hummus and grilled carrots; watercress; and egg salad (two of those, because neither of us cares for smoked salmon)--each on a different bread--were delicious and satisfying.

 
I usually skip the little pastries at tea. To me they're just decoration for the tea table. So I can't really comment on those except to say that they were indeed very pretty.

For reservations, call 310-499-4199 (Montage, 225 N Canon Drive, Beverly Hills). For tea at home, see: How to Make a Proper Cup of Tea, Tea and Scones, and my review of the Zojirushi Water Boiler and Warmer

And, tell me, do you prefer shopping or afternoon tea? Or both? 

03 February 2013

Meyer Lemon Marmalade


Hope you don't think it's too soon for another marmalade recipe. Though the Meyer lemon is in season December through April, the season for Seville oranges (December to February) is what determines when Marmalade Season is. So I only make marmalade in January and February, hoping to have enough to last all year. One would not want to have to resort to shop-bought marmalade!

“Oh, dear. Bought marmalade. Dear me, I call that very feeble.” ~ Lady Constance Trentham in Gosford Park, played by Maggie Smith (as she looks at the marmalade as if it were something the footman had just scraped off the bottom of his shoe)
 
As I said in my Satsuma Marmalade post last week, I like to weigh rather than measure my ingredients. The formula I used for the Satsuma Marmalade was 2 pounds fruit / 2 pounds (1 quart) water / 2 pounds (4 1/2 cups) sugar. Since the Meyer lemons have less liquid and less sweetness than the Satsumas, I decided on a formula of 2 pounds fruit / 2 1/2 pounds (5 cups) water / 2 1/2 pounds (5 2/3 cup) sugar. 

My old non-digital kitchen scale always got the job done (albeit with some difficulty), but when the OXO Good Grips 11-pound digital scale was sent me for review, I was so excited that it arrived just in time for this batch of marmalade. Instead of trying to contain the lemons in the tiny bowl of my old scale (sort of like herding cats!), I just set them on the flat weighing platform. If there had been more, I could have used a big bowl on the platform. Just put a container on the scale, then press the zero button to set weight to zero before adding the ingredients. Wow!


As you can see, the bowl in which I weighed the sugar registered 2 pounds 2 1/8 ounces. I just pressed the "zero" button to zero-out the scale before adding the sugar. That's called taring. The button on the far left allows one to switch between pounds and ounces and metric units.   

Meyer Lemon Marmalade

(Makes 6 half-pint jars)

2 pounds Meyer lemons
6 cups water
2 1/2 pounds (5 2/3 cups) sugar

1 Scrub the lemons well. Trim a tiny bit off the ends, then halve the lemons lengthwise. Cut each half into four wedges; remove the seeds (lots of seeds, probably two dozen, in a Meyer lemon). With the wedge on its side with the peel toward you, slice crosswise very thinly. Scrape the fruit and juice into your jam kettle (any heavy, wide, non reactive 4-quart or more pan; I use my 5.5-quart Le Creuset French oven).


2 Add water to the fruit. Bring to a full boil. Boil, uncovered, for 7 minutes; no need to stir. Remove from heat, cover and let stand at room temperature for 2 hours. Refrigerate for 8 hours or for a day or two.

3 When ready to make the marmalade, get your jars ready. Get out canner (or large pot deep enough that water will be 1 to 2 inches above the tops of the jars), two kitchen towels, 2-cup glass measure, thermometer, jar lifter, half-pint jars, new lids, bands. Put a saucer in the freezer for testing the doneness of the marmalade.


4 Put a folded kitchen towel in the bottom of the large pot (unless, of course, you have a canner with a rack). Fill 2/3 full of water and begin heating the water. Heat extra water in a teakettle or saucepan. Submerge clean jars and new lids in the hot, but not boiling, water. They'll be hot in about 10 minutes, but just keep them below simmering until ready to use.

5 Bring lemon mixture to a boil over medium-high heat. Boil gently, uncovered, about 20 minutes, or until peel is tender. No need to stir at this stage.  Once peel is very tender, stir in 4 1/2 cups of sugar all at once until dissolved.

6 Bring mixture to a full rolling boil (big bubbles all over the pan that cannot be stirred down), stirring frequently. Keep it boiling hard for about 30 minutes, or until it registers 220 degrees, stirring occasionally, till the end when you will need to give it a gentle stir pretty much constantly. When done*, remove from heat and let stand for 10 minutes (keeps the peel from sinking to the bottom of the jars).

Note: *Doneness can be difficult to determine. There are several tests recommended by various experts. I've tried them all, and they don't work for me. In my experience, they all result in overcooked marmalade. I cook it until it's 220 degrees and "looks right." If the marmalade has thickened and darkened a bit and it's 220 degrees, have the courage of your convictions and take it off the heat. After you've made it a few times, you'll get a feel for it.

7 Do one jar at a time. Remove a jar and lid from the water. Using the 2-cup glass measure, ladle the hot marmalade into the hot jar, leaving 1/4-inch headroom. Stick a knife or something (I use a chopstick) into the filled jar right next to the glass in about 4 places to release any air bubbles. Check the headspace measurement again and add more marmalade if needed. Wipe off the top of the jar with a damp towel, carefully place the lid and screw the band on (but don't tighten it). Repeat for all the jars. Put the water back on the heat.


8 Return filled jars to the water bath, adding enough hot water to have water 1 to 2 inches above the tops of the jars. Jars must be upright and not touching. Heat to a gentle boil, covered, and set timer for 10 minutes. Adjust the heat to keep the water at a simmer. After 10 minutes, move the pot off the heat and take off the lid. Let the jars sit in the water for 15 minutes. If you're not using a rack with handles in your "canner" and don't have a jar lifter, just ladle out some of the water so you can lift the jars out with an oven mitt. Remove the jars and set them on a kitchen towel on the counter. The lids will make a popping sound when they seal, so just count the pops as the jars start cooling. Leave them undisturbed for 24 hours. Then, if you lost count of the pops, check the seals by pressing on the center of the lids; they should be a bit concave and not move. Properly sealed jars are ready to be stored in the cupboard. Any jars that did not seal should be stored in the refrigerator.