Showing posts with label streamlined cooking. Show all posts

25 April 2024

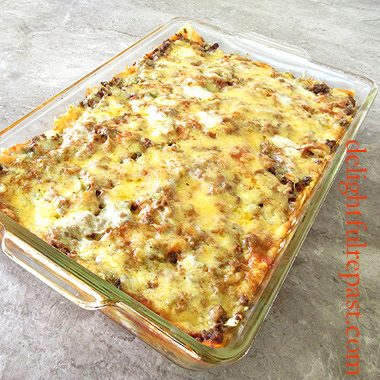
Enchilada Casserole - For Now or Later - Homemade Freezer Meals

Enchilada Casserole - For Now or Later - Homemade Freezer Meals / www.delightfulrepast.com

It was time for Enchilada Casserole, and I thought "Why not make a bigger batch and have four meals out of it?" One for now and three for later. You know, I'm all about streamlining and am never happier than when my freezer is full of homemade freezer meals!

Since I'm usually cooking for two, I freeze two portions in my favorite 3-cup rectangular glass storage containers that are just the right size and shape for two pieces of anything you make in a 13x9x2-inch baking dish and cut into 8 pieces. You might need a different size container for the number of servings that make a meal in your house.


Enchilada Casserole - For Now or Later - Homemade Freezer Meals / www.delightfulrepast.com


This casserole can be made with ground beef or chopped cooked chicken or whatever you like. For convenience, I used frozen chopped onions and canned green chiles.

I couldn't compromise on the sauce though, and homemade is really not that much trouble. It's a pretty basic and simple sauce that packs a lot of flavor. And you can adjust it however you like. If a canned sauce has too much of something for your taste, you can't do anything about it.

Do you love casseroles? My father did not like casseroles (or chicken or ground beef), so we never had them. I love them! 


Enchilada Casserole - For Now or Later - Homemade Freezer Meals / www.delightfulrepast.com

If you like it, please Pin it and share it!


ENCHILADA CASSEROLE

(Makes 8 servings)

The Meat

1 1/2 pounds (24 ounces/680 grams) ground beef (I use organic grassfed 85% lean) 
OR 4 cups chopped cooked chicken, and omit the 3/4 teaspoon salt
1/2 cup chopped onions
3/4 teaspoon salt
1 4-ounce (113 grams) can diced mild green chiles

The Sauce

3 tablespoons (1.5 ounces/43 grams) unsalted butter 
3 tablespoons (27grams) unbleached all-purpose flour
2 teaspoons paprika
1 teaspoon cumin
1/4 teaspoon salt
1/4 teaspoon coarsely ground black pepper 
1/4 teaspoon cayenne
1/4 teaspoon oregano
3 tablespoons (2 ounces/57 grams) tomato paste 
3 cups (24 fluid ounces/710 ml) lower sodium chicken broth

The Casserole

12 ounces (340 grams) cheese, shredded (I use half jack and half medium cheddar)
9 6-inch white corn tortillas
4 1/2 teaspoons extra virgin olive oil


1 In large skillet, cook the ground beef, breaking it up and browning it well. Remove the fat from the pan by your favorite means: covering pan with lid and draining it off, tilting the pan and spooning it out with a large metal spoon, or using a turkey baster. Then add the onions and salt, and cook for a few minutes. Then stir in the diced chiles. Remove from the heat. OR cook the onions in a tablespoon of extra virgin olive oil, stir in the chopped chicken and chiles, and set aside.

2 In another skillet or saucepan, melt the butter and blend in the flour, paprika, cumin, salt, pepper, cayenne, and oregano. Cook over low heat, stirring constantly, for 2 to 3 minutes. Whisk in the tomato paste until smooth and fragrant. Whisk in the broth. Bring the sauce to a simmer. When it begins to bubble, continue cooking and stirring for about 10 minutes, until sauce is thickening. Remove from the heat. 

3 Spread 1/3 cup (2.67 fluid ounces/79 ml) of the sauce in a lightly greased 13x9x2-inch baking dish.

4 Heat a griddle (my square griddle can cook 2 tortillas at a time), put 2 little 1/2 teaspoon puddles of oil (about the size of a quarter) on the hot griddle. When oil is hot, lay down the 2 tortillas and cook for about a minute, turning them several times. Repeat to lightly cook all 9 tortillas. Stack them neatly and cut in half. 

5 Dip each tortilla half in the sauce as you assemble the casserole. Place 4 halves with cut edges against the long sides of the baking dish and then 2 halves down the middle. Top the first layer of tortillas with 1/3 of the meat mixture, then 1/3 of the cheese mixture. Make second layer of tortillas, meat, and cheese. For the third layer, tortillas and meat, then pour over the remaining sauce, and top with cheese. 

6 Preheat oven to 350F/180C/Gas4. Bake for about 30 to 35 minutes, or until bubbly and browned. Let stand for 30 minutes before cutting into 8 pieces. Place 2 pieces in each of 4 of my favorite 3-cup lidded Pyrex storage containers. Freeze for up to 3 months. 

7 When ready to serve, remove plastic lid and heat in microwave until heated through. Plate and garnish with sour cream, a squeeze of lime, chopped cilantro, or sliced green onions. Serve with Mexican RicePinto Beans or Refried Beans, and Broccoli Salad.

Disclosure: We are a participant in the Amazon Services LLC Associates Program, an affiliate advertising program designed to provide a means for us to earn fees by linking to Amazon .com and affiliated sites. This helps cover some of the costs of running the blog. Thank you for your support. 

Jean

If you liked this post, please Pin it and share it!

15 February 2024

Swedish Meatballs - For Now or Later - Homemade Freezer Meals

Swedish Meatballs for Now or Later - Freezer Meals / www.delightfulrepast.com

Swedish Meatballs is one of our favorite meals, but a bit of a faff for just one or two meals for two; so I added it to my list of favorite recipes to add to my "streamlined cooking" repertoire.

It doesn't take much longer to make a double batch and divide it amongst five 3-cup lidded glass storage dishes, making five—yes, five!—meals for two to pop into the freezer for future busy-day dinners.

I served the first of my freezer stash over rice with a salad on the side. Also great with noodles or mashed potatoes. It's wonderful having homemade food with the convenience of frozen foods!


Swedish Meatballs for Now or Later - Freezer Meals / www.delightfulrepast.com

If you like it, please Pin it and share it!


Some of my other freezer meals are: Shepherd's Pie, Salisbury Steak, and Stuffed Shells. I'm always trying to think of meals that might freeze well.

Do try it and let me know how you like it. AND please tell me about any meals you make ahead and freeze. I like to have variety in my "frozen food section" at all times. (Ohhh, and I just realized, this is Delightful Repast's 14th blogiversary!)
 

Swedish Meatballs for Now or Later - Freezer Meals / www.delightfulrepast.com


Swedish Meatballs  

(Makes about 70, 10 main-dish servings) 

The Meatballs 

About 4 slices good white or sourdough bread (4 ounces/113 grams) for 1 1/2 packed cups breadcrumbs 
1/2 cup (2 3/4 ounces/80 grams) finely minced onion
1 tablespoon extra virgin olive oil
1 1/2 teaspoons salt
1 1/2 teaspoons coarsely ground black pepper
1/2 teaspoon allspice
2/3 cup (5 1/3 fluid ounces/151 ml) milk
2 large eggs
1 teaspoon Worcestershire sauce
1 pound (16 ounces/454 grams) lean ground beef
1 pound (16 ounces/454 grams) ground pork

The Sauce 

6 tablespoons (3 ounces/85 grams) unsalted butter
6 tablespoons (1 7/8 ounces/53 grams) unbleached all-purpose flour
4 cups (32 fluid ounces/946 ml) lower sodium beef broth
1/2 teaspoon Worcestershire sauce
1 teaspoon dried dill
1/4 teaspoon salt
1/4 teaspoon coarsely ground black pepper
1/4 teaspoon allspice
1/2 cup (4 fluid ounces/114 ml) heavy cream
Garnish: sour cream and chopped dill 


Use food processor to make perfect fresh breadcrumbs. Cut slices of good white or sourdough bread into four to six pieces. You only need to remove the crust if it's coated with seeds. Process until it becomes breadcrumbs. Don't worry about overdoing it; it's pretty foolproof. You should have 1 1/2 cups, fairly firmly packed. Add crumbs to a 3- to 4-quart mixing bowl. 

Cut a small piece of onion into a couple of chunks and use the food processor (no need to clean the bowl) to finely mince the onion. Sauté in oil until soft. Add to bowl. 

3 Add salt, pepper, allspice, milk, eggs and Worcestershire sauce to bowl. Mix well. Add ground beef and ground pork, and mix well. Just use one impeccably clean hand to mix, if you like. Put mixture in the refrigerator for at least 2 hours before shaping meatballs.

Preheat oven to 400F/200C/Gas6. Using a #60/0.5-ounce/1 tablespoon scoop, scoop out all the meatballs (makes 70) and place them on an 18x13x1-inch half sheet pan (10 rows of 7). Then go back and roll each one into a smooth round ball and place back on the sheet. Bake for 30 about minutes. Meanwhile, make the sauce.

In 12-inch skillet, melt butter. Stir in flour, cooking and stirring to make a smooth, browned roux. Don't rush it; get the roux browned. Add beef broth and cook, stirring, until smooth and thickened. Stir in Worcestershire sauce, salt, pepper and cream. If serving immediately, transfer meatballs to sauce and heat on low for 10 minutes.

For freezer meals: Choose your lidded glass storage containers suitable for the number of servings you need. I use five of these 3-cup lidded Pyrex dishes and put 14 meatballs in each. Divide the sauce among the dishes. Put on the lids, cool, chill, then freeze. To serve, get one out of the freezer the night before and put it in the refrigerator to thaw; heat in the microwave (lid removed) or in a small pan on the stove. Plate and garnish with a dollop of sour cream and a sprinkling of dill. 

Disclosure: We are a participant in the Amazon Services LLC Associates Program, an affiliate advertising program designed to provide a means for us to earn fees at no cost to you by linking to Amazon .com and affiliated sites. This helps cover some of the costs of running the blog. Thank you for your support.

Jean

If you liked this post, please Pin it and share it! 

21 December 2023

Wild Yeast Sourdough Simplified - A Tutorial

Wild Yeast Sourdough Simplified - A Tutorial / www.delightfulrepast.com

I developed my simplified sourdough a few years ago to shorten the process from the typical way I used to make sourdough bread, which was either a 28- or 36-hour process (from first feeding of the starter to time to shape the loaf). That was fine for me at that time, but when that became inconvenient I came up with my Sourdough Simplified method.

For quite some time, that was wonderful. Still is, but as my starter matured and the two rise times shortened, the bread was just not the same. While still good, it lost most of its characteristic tang and chewiness. And I'm afraid Mr Delightful has gotten spoiled with his homemade sourdough toast every morning of his life and has gotten quite particular!

Well, I was not inclined to go back to the original process, so I added a step—a pre-ferment—to my simplified sourdough process. And it worked! So I wanted to write up this postscript for you so that if you are working with a mature starter but want to speed things up as much as you can without sacrificing flavor and texture, you can. This shortens the usual method by 10 to 18 hours from start to shaping.

If you think sourdough is too much trouble, you will be amazed at how trouble-free this method really is. There is none of that annoying feeding and discarding, no having to cater to your starter to keep it going. Just put your little pint jar in the refrigerator and neglect it for weeks or months at a time until you want to make bread. Then stir it up, take out what you need, replenish it, and forget about it until next time.

The following schedule is my schedule. You can pick any time you want. And these times are approximate because there are many variables. The main thing is that you pick a time, probably in the morning, on a day that you want to make the bread; subtract 12 hours from that and start your pre-ferment at that time.

My schedule for this is: 
Day 1 —  6:00pm Make the pre-ferment and let rise for 12 hours. Replenish the jar of starter.
Day 2 —  6:00am Make the dough. Let rise until doubled (variable, but mine currently takes 5 1/2 hours). 
Day 2 —11:30am (variable) Shape the loaf. Let rise until doubled (variable, but mine currently takes 2 hours).
Day 2 —  1:30pm (variable) Bake.

For me, this schedule means I can stir up the pre-ferment after dinner (I do Intermittent Fasting and don't eat after 6:00pm) and forget about it till I get up the next morning and make the dough. Then I have several hours to myself before it's time to shape the loaf and then 2 hours till I need to preheat the oven, bake, and take it out of the oven. So by 2:15pm, the finished loaf is cooling off and so am I!


Wild Yeast Sourdough Simplified - Sandwich Loaf - A Tutorial / www.delightfulrepast.com


If you're new to wild yeast (no added commercial yeast) sourdough baking or you just don't currently have a starter, I've outlined my streamlined starting a starter process in the Sourdough Simplified post. If you already have a starter but want to learn how to maintain it in a pint canning jar with no discarding or other faffing about (basically, just ignoring it!), see the directions below. Happy baking! 


Wild Yeast Sourdough Simplified - Boule - A Tutorial / www.delightfulrepast.com

 If you like this post, please Pin it and share it!


Sourdough Sandwich Loaf or Boule


(Makes one large loaf)

The Pre-Ferment

1/2 cup (4.5 ounces/128 grams) mature stirred-down 100% hydration starter
5.5 fluid ounces (163 grams or ml) room temperature water
1 dip-and-sweep cup (5 ounces/142 grams) unbleached all-purpose flour 

The Dough

7 fluid ounces (207 grams or ml) room temperature water
1 1/2 teaspoons to 1 3/4 teaspoons (0.35 ounce/10 grams) salt (I use 1 1/2 teaspoons)
3 dip-and-sweep cups (15 ounces/425 grams) unbleached all-purpose flour

Note: Before we get started, let me say one more thing. If you do not have a kitchen scale, get one. It is something else that will simplify your life. I've used one for decades, probably because I grew up with English cookery books, and switched to this digital one, OXO Good Grips 11-pound digital scale (pictured below), when I found it years ago.

1 For the pre-ferment: At 6:00 pm (or whatever your chosen time is), in 2-quart glass measure, stir together the starter and water, then flour. Cover loosely and let stand at room temperature for 12 hours. Replenish the starter.

Maintaining Starter: Unless you're baking bread every day or two, keep the starter in the refrigerator and feed only to replenish. I keep about 3/4 cup (6.75 ounces/192 grams) of starter in a pint canning jar. Though I won't be feeding the starter, after taking out 1/2 cup (4.5 ounces/128 grams) for the loaf, I need to replenish the starter in the jar and so feed it with 2.25 ounces (64 grams) each flour and water, stir it vigorously and let stand at room temperature for about 1 to 4 hours (you should see some bubbles, but not too many), then refrigerate until the next bake.


Wild Yeast Sourdough Simplified - Starter / www.delightfulrepast.com


2 At 6:00 am (or 12 hours after your chosen start time), make the dough. Stir water and salt into the pre-ferment, then the flour. Cover loosely with lid or lightly oiled plastic wrap and let stand at room temperature about 6 hours, or until the dough has doubled. It all depends on variables like your starter and the temperature of your kitchen.

As the starter matures, the rise time shortens. At some point, the first rise might take only 5 hours and the second, less than 2 hours. If longer rise times better suit your schedule, you can reduce the amount of starter used in the dough.

Wild Yeast Sourdough Simplified - A Tutorial / www.delightfulrepast.com

  
3a For Sandwich Loaf: Grease the bread pan. I use a 9x4x4-inch (1.5-pound) pullman pan. It's about the same capacity as a 9x5x3-inch loaf panUsing no more than 1/8 cup altogether, sprinkle countertop with some flour. Gently scrape the dough onto the floured countertop. Sprinkle with flour. Press gently into a roughly 12-by-8-inch rectangle. Using a bench scraper, fold one third of the rectangle toward the center, then fold the other end to the center, like a letter. With the bench scraper, place folded dough in the pan, pressing it into the corners. Brush on a little water. Cover it loosely with an oiled or cooking-sprayed piece of plastic wrap.

3b For Boule: Place a square of parchment paper on a rimless baking sheet (which will act as a "peel" later). Sprinkle 1/2 teaspoon of flour in a 9-inch circle in the center of the parchment and 2 tablespoons of flour on your work surface. Scrape the dough out onto the work surface. Put a little of the flour on top of the dough and with floured hands, press dough lightly into a 10-inch square. Fold it in thirds like a letter; then fold that rectangle into thirds, forming a square. Tuck the edges under, working the dough into a smooth round. Place the dough on the parchment. Turn a large glass bowl over it, or cover it loosely with an oiled or cooking-sprayed piece of plastic wrap.

4a Let rise until doubled. If using 9x5x3-inch loaf pan, it should rise an inch or two above the rim of the pan. If using the 9x4x4-inch pullman pan (minus its lid), the dough should rise to below or just even with the top of pan. This can take anywhere from 2 to 5 hours. The dough needs to rise until the dough doesn't quickly spring back when poked with a floured finger or knuckle. 

4b The boule will spread as well as rise and not appear to rise very high. Not to worry! It will rise in the oven (called oven spring) and be a lovely, well-risen loaf. 

Tip: Check on the dough's progress regularly. After making it a few times, you'll have a better idea of how long it will take. And that will change as the weather changes.

5a Toward the end of the rising time, preheat oven to 450F/230C/Gas8. Just before baking, brush the loaf with a little water. Bake for 10 minutes. Reduce heat to 400F/205C/Gas6 and continue baking for about 30 minutes or until crust is beautifully golden and middle of loaf registers 210F/99C on instant-read thermometer. Remove from pan immediately and let cool on wire rack for 1 1/2 to 2 hours before slicing.

5b When you’ve got about 30 to 45 minutes left, place oven rack in lower-middle position and place pizza stone or Lodge Pro-Logic 14-Inch Cast Iron Pizza Pan on rack. Preheat oven to 475F/245C/Gas9 for at least 30 minutes. With a sharp blade, cut a "+" about 1/4-inch deep on the top and slide the boule on its parchment square onto the hot stone. Reduce temperature to 425F/220C/Gas7. Bake for about 45 minutes, or until crust is beautifully golden and middle of loaf is 210F/99C. If it's getting too brown, cover loosely with foil. Remove from oven, using the rimless baking sheet or pizza peel to lift the boule off the pizza stone. Let cool on wire rack for 1 1/2 to 2 hours. 

PS For those who care about such things, this is a 69% hydration dough. 

Disclosure: We are a participant in the Amazon Services LLC Associates Program, an affiliate advertising program designed to provide a means for us to earn fees at no cost to you by linking to Amazon .com and affiliated sites. This helps cover some of the costs of running the blog. Thank you for your support.

Jean

If you liked this post, please Pin it and share it! 

11 May 2023

Enchilada Casserole - Enchilada Cazuela

Enchilada Casserole - Enchilada Cazuela / www.delightfulrepast.com

My Enchilada Casserole came on the heels of a binge of enchilada making. I made multiple batches of cheese enchiladas, chicken enchiladas, shredded beef enchiladas.
 
Then after a break from all that, I found myself craving enchiladas again, but not craving that much work. I mean, it's easy enough to roll a dozen enchiladas, but it can get a bit tedious.

I have a natural inclination to make things that take a lot of time, but I have other things I want to do with my limited time and energy right now, so I sat myself down and gave myself a good talking-to ...

... about streamlining, simplifying, coming up with ways to get the flavors I'm craving with less time and effort. The result, this Enchilada Casserole. Made with ground beef. Carne molida. One step.

And I decided to use a couple of other busy-day timesavers, frozen chopped onions and canned diced green chiles. Of course, you're welcome to chop your own onion and chiles, but remember, I was streamlining! 

I couldn't compromise on the sauce though, and homemade is really not that much trouble. It's a pretty basic and simple sauce that packs a lot of flavor. And you can adjust it however you like. If a canned sauce has too much of something for your taste, you can't do anything about it.

Do you love casseroles?


Enchilada Casserole - Enchilada Cazuela / www.delightfulrepast.com

If you like it, please Pin it and share it!


Enchilada Casserole


(Makes 4 to 6 servings)

The Beef

1 pound (16 ounces/454 grams) ground beef (I use organic grassfed 85% lean)
1/2 cup frozen chopped onions
1/2 teaspoon salt
1/2 to 1 4-ounce (113 grams) can diced mild green chiles

The Sauce

3 tablespoons (1.5 ounces/43 grams) unsalted butter 
3 tablespoons (27grams) unbleached all-purpose flour
2 teaspoons paprika
1 teaspoon cumin
1/4 teaspoon salt
1/4 teaspoon coarsely ground black pepper 
1/4 teaspoon cayenne
1/4 teaspoon oregano
3 tablespoons (2 ounces/57 grams) tomato paste 
2 1/2 cups (20 fluid ounces/591 ml) lower sodium beef or chicken broth

The Enchiladas

10 ounces (283 grams) cheese, shredded (I use half jack and half medium cheddar)
9 6-inch white corn tortillas
4 1/2 teaspoons extra virgin olive oil


1 In large skillet, cook the ground beef, breaking it up and browning it well. Remove the fat from the pan by your favorite means: covering pan with lid and draining it off, tilting the pan and spooning it out with a large metal spoon, or using a turkey baster. Then add the onions and salt, and cook for a few minutes. Then stir in the diced chiles. Remove from the heat.

2 In another skillet or wide saucepan, melt the butter and blend in the flour, paprika, cumin, salt, pepper, cayenne, and oregano. Cook over low heat, stirring constantly, for 2 to 3 minutes. Whisk in the tomato paste until smooth and fragrant. Whisk in the broth. Bring the sauce to a simmer. When it begins to bubble, continue cooking and whisking for about 10 minutes, until sauce is thickening. Remove from the heat. 

3 Spread 1/4 cup (2 fluid ounces/59 ml) of the sauce in a lightly greased 11x7x1.5-inch baking dish.

4 Heat a griddle (my square griddle can cook 2 tortillas at a time), put 2 little 1/2 teaspoon puddles of oil (about the size of a quarter) on the hot griddle. When oil is hot, lay down the 2 tortillas and cook for about a minute, turning them several times. Repeat to lightly cook all 9 tortillas. Stack them neatly and cut in half. 

5 Dip each tortilla half in the sauce as you assemble the casserole. Place 4 halves with cut edges against the long sides of the baking dish and then 2 halves down the middle. Top the first layer of tortillas with 1/3 of the meat mixture (about 1 cup), then 1/3 of the cheese mixture. Make second layer of tortillas, meat, and cheese. For the third layer, tortillas and meat, then pour over the remaining sauce, and top with cheese. Cover and refrigerate until an hour before baking time.

6 Preheat oven to 350F/180C/Gas4. Bake for about 45* minutes, or until bubbly. Let stand for 10 minutes before serving. Garnish with sour cream, a squeeze of lime, chopped cilantro, or sliced green onions. Serve with Mexican Rice, Pinto Beans or Refried Beans, and Broccoli Salad.

* If you're baking the enchiladas right after assembling them, just bake them for about 25 minutes, or until bubbly.

Disclosure: We are a participant in the Amazon Services LLC Associates Program, an affiliate advertising program designed to provide a means for us to earn fees by linking to Amazon .com and affiliated sites. This helps cover some of the costs of running the blog. Thank you for your support. 

Jean

If you liked this post, please Pin it and share it!

14 July 2022

Salisbury Steak - Classic Comfort Food

Salisbury Steak - Classic Comfort Food / www.delightfulrepast.com

Salisbury Steak popped into my head this morning when I was thinking about dinner. Then I thought how nice it would be to make a big enough batch to make four dinners for the two of us, one for this evening and three for the freezer.

So I scaled up my usual Salisbury Steak recipe. This is what I call streamlined cooking and why I have so many of these Pyrex 3-cup rectangular storage dishes, perfect for my make-ahead freezer meals for two. 

Wish I'd had them in the freezer last week when I needed to take food to a sick friend. But, no, I had to make a batch of chicken soup when I wasn't feeling all that great myself. Can't let my freezer stash get down to zero again!

Let me assure you, my Salisbury Steak is good old-fashioned comfort food, not like the TV dinner version with painted-on "grill marks" or like the school lunch version I avoided throughout elementary school.

What is one of your favorite comfort food meals when life has gotten hectic or stressful?


Salisbury Steak - Classic Comfort Food / www.delightfulrepast.com

If you like it, please Pin it and share it!
  

Salisbury Steak


(Makes 8 servings)

The Steaks

2 pounds (32 ounces/ grams) lean ground beef (organic and grass-fed, if possible)
1 cup fresh breadcrumbs (about 3 slices/3.5 ounces/99 grams good sourdough or white bread)
2 large eggs
2 tablespoons ketchup
2 teaspoons dry mustard
1 teaspoon salt
1/2 teaspoon coarsely ground black pepper
1/2 teaspoon marjoram
1/2 teaspoon Worcestershire sauce
1 tablespoon unsalted butter
1 tablespoon extra virgin olive oil

The Gravy

1 small (4 ounces/113 grams) yellow onion, thinly sliced
1/2 pound (8 ounces/227 grams) mushrooms, sliced
1/4 teaspoon salt
1/4 teaspoon coarsely ground black pepper
1 quart (32 fluid ounces/946 ml) lower sodium beef broth
2 tablespoons ketchup
1 teaspoon Worcestershire sauce
2 tablespoons cornstarch mixed with 1/4 cup (2 fluid ounces/59 ml) water

1 In medium bowl, mix together ground beef, breadcrumbs, eggs, ketchup, dry mustard, salt, pepper, marjoram and Worcestershire sauce. Using 2/3-cup measuring cup, divide mixture into 8 equal portions and shape into oval patties about 5 inches long and 3/4 inch thick.

2 Heat (I mean really heat!) a large skillet*, add butter and oil, and brown the steaks well (I mean really well!) over medium-high heat, about 5 minutes on each side. Transfer steaks to a plate and pour all but about 2 tablespoons of the fat from the pan. Do not clean it or scrape it! Add the onion and cook over medium heat, stirring frequently and scraping up the tasty brown bits in the pan, until soft and golden, about 5 minutes. Add mushrooms (and a little more butter or oil, if needed) to the pan, and sprinkle with the salt and pepper. Cook, over medium heat, stirring frequently, until tender, about 5 minutes.

* I use this All-Clad 6-Quart Saute Pan (12-inch, 2.75 inches deep, straight sides). Being stainless steel with no nonstick coating, you can get it really hot to put a brown crust on things. I can't imagine that my gravy would have turned out so beautifully brown if the steaks hadn't been browned really well, leaving fabulous fond in the pan. And its straight sides mean a large surface area for cooking.

3 Add beef broth, ketchup and Worcestershire sauce to skillet. Mix well, bring to a boil. Reduce heat and stir in cornstarch mixture. When sauce begins to bubble and thicken, add steaks back to pan. Cover loosely and simmer for about 15 minutes, stirring occasionally, to heat through. When 2 or 3 minutes remain, taste and adjust seasoning.

4 If you're making meals for two for the freezer, put 2 steaks in each of 4 Pyrex 3-cup rectangular storage dishes, use a slotted spoon to divide the mushrooms between the 4 dishes, then divide the sauce between the four dishes. Put the lids on and allow them to cool for 1 hour, then transfer them to the refrigerator until they are thoroughly chilled before placing them in the freezer.

Disclosure: We are a participant in the Amazon Services LLC Associates Program, an affiliate advertising program designed to provide a means for us to earn fees by linking to Amazon .com and affiliated sites. We are a ThermoWorks affiliate, earning a small commission at no cost to you on purchases made through our links. This helps cover some of the costs of running the blog. Thank you for your support.

Jean

If you liked this post, please Pin it and share it!