Showing posts with label comfort food. Show all posts

11 May 2023

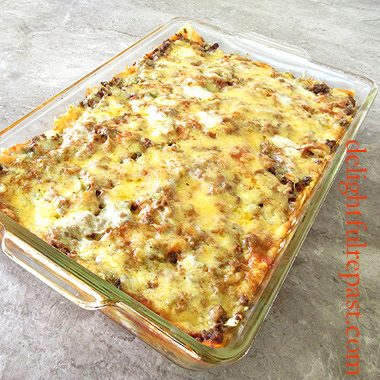
Enchilada Casserole - Enchilada Cazuela

Enchilada Casserole - Enchilada Cazuela / www.delightfulrepast.com

My Enchilada Casserole came on the heels of a binge of enchilada making. I made multiple batches of cheese enchiladas, chicken enchiladas, shredded beef enchiladas.
 
Then after a break from all that, I found myself craving enchiladas again, but not craving that much work. I mean, it's easy enough to roll a dozen enchiladas, but it can get a bit tedious.

I have a natural inclination to make things that take a lot of time, but I have other things I want to do with my limited time and energy right now, so I sat myself down and gave myself a good talking-to ...

... about streamlining, simplifying, coming up with ways to get the flavors I'm craving with less time and effort. The result, this Enchilada Casserole. Made with ground beef. Carne molida. One step.

And I decided to use a couple of other busy-day timesavers, frozen chopped onions and canned diced green chiles. Of course, you're welcome to chop your own onion and chiles, but remember, I was streamlining! 

I couldn't compromise on the sauce though, and homemade is really not that much trouble. It's a pretty basic and simple sauce that packs a lot of flavor. And you can adjust it however you like. If a canned sauce has too much of something for your taste, you can't do anything about it.

Do you love casseroles?


Enchilada Casserole - Enchilada Cazuela / www.delightfulrepast.com

If you like it, please Pin it and share it!


Enchilada Casserole


(Makes 4 to 6 servings)

The Beef

1 pound (16 ounces/454 grams) ground beef (I use organic grassfed 85% lean)
1/2 cup frozen chopped onions
1/2 teaspoon salt
1/2 to 1 4-ounce (113 grams) can diced mild green chiles

The Sauce

3 tablespoons (1.5 ounces/43 grams) unsalted butter 
3 tablespoons (27grams) unbleached all-purpose flour
2 teaspoons paprika
1 teaspoon cumin
1/4 teaspoon salt
1/4 teaspoon coarsely ground black pepper 
1/4 teaspoon cayenne
1/4 teaspoon oregano
3 tablespoons (2 ounces/57 grams) tomato paste 
2 1/2 cups (20 fluid ounces/591 ml) lower sodium beef or chicken broth

The Enchiladas

10 ounces (283 grams) cheese, shredded (I use half jack and half medium cheddar)
9 6-inch white corn tortillas
4 1/2 teaspoons extra virgin olive oil


1 In large skillet, cook the ground beef, breaking it up and browning it well. Remove the fat from the pan by your favorite means: covering pan with lid and draining it off, tilting the pan and spooning it out with a large metal spoon, or using a turkey baster. Then add the onions and salt, and cook for a few minutes. Then stir in the diced chiles. Remove from the heat.

2 In another skillet or wide saucepan, melt the butter and blend in the flour, paprika, cumin, salt, pepper, cayenne, and oregano. Cook over low heat, stirring constantly, for 2 to 3 minutes. Whisk in the tomato paste until smooth and fragrant. Whisk in the broth. Bring the sauce to a simmer. When it begins to bubble, continue cooking and whisking for about 10 minutes, until sauce is thickening. Remove from the heat. 

3 Spread 1/4 cup (2 fluid ounces/59 ml) of the sauce in a lightly greased 11x7x1.5-inch baking dish.

4 Heat a griddle (my square griddle can cook 2 tortillas at a time), put 2 little 1/2 teaspoon puddles of oil (about the size of a quarter) on the hot griddle. When oil is hot, lay down the 2 tortillas and cook for about a minute, turning them several times. Repeat to lightly cook all 9 tortillas. Stack them neatly and cut in half. 

5 Dip each tortilla half in the sauce as you assemble the casserole. Place 4 halves with cut edges against the long sides of the baking dish and then 2 halves down the middle. Top the first layer of tortillas with 1/3 of the meat mixture (about 1 cup), then 1/3 of the cheese mixture. Make second layer of tortillas, meat, and cheese. For the third layer, tortillas and meat, then pour over the remaining sauce, and top with cheese. Cover and refrigerate until an hour before baking time.

6 Preheat oven to 350F/180C/Gas4. Bake for about 45* minutes, or until bubbly. Let stand for 10 minutes before serving. Garnish with sour cream, a squeeze of lime, chopped cilantro, or sliced green onions. Serve with Mexican Rice, Pinto Beans or Refried Beans, and Broccoli Salad.

* If you're baking the enchiladas right after assembling them, just bake them for about 25 minutes, or until bubbly.

Disclosure: We are a participant in the Amazon Services LLC Associates Program, an affiliate advertising program designed to provide a means for us to earn fees by linking to Amazon .com and affiliated sites. This helps cover some of the costs of running the blog. Thank you for your support. 

Jean

If you liked this post, please Pin it and share it!

09 March 2023

Beef Stroganoff

Beef Stroganoff - A Comfort Food Classic / www.delightfulrepast.com


Beef Stroganoff is one of those classic dishes that seems to go in and out of fashion. It is said to have been invented in 1891 by French chef Charles Briere while in the employ of a Russian household. 

The first recipe for Beef Stroganoff in an English language cookbook was in 1932. It became very popular in the US after World War II, then again in the 1960s and at other points over the years. And it appears to be having a moment now, at least at my house. 

Various cuts of beef can be used for the dish to suit different budgets and schedules—meaning the less expensive cuts require longer cooking. I didn't have time for extended cooking to tenderize a cheaper cut, and since I was only making it for two, I used a boneless beef ribeye steak. If you really want to push the boat out, tenderloin or filet mignon is a good choice.

I decided years ago to cook the steak whole and then slice it—rather than the usual slice-and-then-cook method—for two reasons: 1. It's too easy to overcook those slices, and 2. searing the whole steak develops better browning for great fond and flavor without the risk of overcooking and toughening that expensive beef. If you're using a tougher cut that requires long cooking, slice the steak before browning. 

When was the last time you made Beef Stroganoff? As with other dishes I love, I tend to forget about it for a while and then make it frequently for a time, then it seems to "fall out of rotation" until it occurs to me again. I'm making it again this week!


Beef Stroganoff - A Comfort Food Classic / www.delightfulrepast.com

If you like it, please Pin it and share it!

 Beef Stroganoff


(Serves 2 or 3)

1 12- to 16-ounce (340 to 454 grams) boneless beef ribeye steak, trimmed of excess fat
3/4 teaspoon salt, divided (including noodle cooking water)
3/8 teaspoon coarsely ground black pepper, divided
1/4 cup diced or sliced yellow onion
2 tablespoons unsalted butter
8 ounces mushrooms, sliced
1 teaspoon Worcestershire sauce
1/3 of 12-ounce package (4 ounces/113 grams) wide egg noodles
2 tablespoons unbleached all-purpose flour
1/4 cup (2 fluid ounces/59 ml) brandy
1 cup (8 fluid ounces/237 ml) lower sodium beef broth
2 teaspoons tomato paste
1 teaspoon Dijon mustard
3 tablespoons sour cream
1 teaspoon unsalted butter
1 tablespoon minced fresh flat-leaf parsley

1 Add 2 teaspoons extra virgin olive oil to thoroughly preheated skillet, continue heating until oil shimmers, and cook the patted dry, salted (1/8 teaspoon) and peppered (1/4 teaspoon) steak to medium rare; it will cook further after being sliced and added to the sauce. Remove to cutting board and let rest for 10 minutes. 

2 In 2- to 3-quart saucepan, start boiling 1 quart of water with 1/2 teaspoon of salt.

3 Drain off most of the fat from pan, and add onion, cooking for about 5 minutes. Add butter, mushrooms, 1/8 teaspoon each salt and pepper, and the Worcestershire sauce. Cook, stirring frequently, for about 10 minutes. In the meantime, slice the rested steak about 1/8 inch thick across the grain; set aside. And stir the noodles into the rapidly boiling salted water; cook for length of time specified on the package.

4 Sprinkle the flour over the onion and mushrooms and cook, stirring, for a minute or two. Stir in the brandy and beef broth and cook, stirring, for a few minutes until thickening. Stir in the tomato paste and mustard.

5 Just before serving, stir in the sour cream, then the sliced steak. Cook over low heat just long enough to get heated through and steak to be to your preferred doneness; do not overcook and toughen the meat. Taste and adjust seasoning.

6 You can either add the cooked and drained noodles to the stroganoff or add the teaspoon of butter to the drained noodles and serve the stroganoff over a bed of buttered noodles. Garnish with minced fresh flat-leaf parsley.

Disclosure: We are a participant in the Amazon Services LLC Associates Program, an affiliate advertising program designed to provide a means for us to earn fees by linking to Amazon .com and affiliated sites. We are a ThermoWorks affiliate, earning a small commission at no cost to you on purchases made through our links. This helps cover some of the costs of running the blog. Thank you for your support. 

Jean

If you liked this post, please Pin it and share it!

27 May 2021

Classic Pot Roast

Classic Pot Roast - One-Pot Comfort Food Dinner / www.delightfulrepast.com

Why am I blogging about pot roast when everyone else is talking summer dishes? Two reasons.

One: Because, though it's nearly June, many parts of the country/world are still experiencing some cold days that call for traditional comfort food like this Classic Pot Roast.

When you make this satisfying one-pot meal for people, they are transported back to their childhoods when mothers and grandmothers cooked things many people now feel they haven't the time to cook themselves.

Although this recipe takes time, most of it is unattended. There are no tricky techniques, but you'll find that careful browning brings out the fullest flavor of these subtly seasoned simple ingredients.

Two: Another reason for posting this now is the recent social media kerfuffle about a popular food website that had stopped adding beef recipes to the site last year and were now formally announcing it, saying "our shift is solely about sustainability, about not giving airtime to one of the world’s worst climate offenders. We think of this decision as not anti-beef but rather pro-planet."

Well, I don't get involved in the politics of food—and I don't get self-righteous about my food choices or look down on anyone who doesn't feel the same—but I do give consideration to all that putting food on the table involves.

Classic Pot Roast - One-Pot Comfort Food Dinner / www.delightfulrepast.com


Knowing full well that this is a topic that won't win me any popularity contests—from those who for whatever reason aren't into organic, sustainable, etc, to those who are vegan—I'll repeat here something I wrote years ago:

Though I feel an organic, mostly plant-based diet is more healthful and earth-friendly, I occasionally indulge in a little carefully sourced grass-fed/grass-finished meat from ranches as close to local as possible that practice environmentally friendly agriculture methods and the ethical treatment of animals.

Yes, it is more expensive than conventional supermarket meat, but here are some ways I've found to better afford it:
  • By cutting our meat consumption in half. Most Americans eat more meat than is good for them, so I figure eating the good stuff in smaller portions or less frequently is better for us anyway!
  • I don't buy many "empty calorie" snacks and convenience foods, so more of the grocery budget can go toward whole ingredients.
  • I try very hard not to waste food and have gradually gotten to where I actually waste very little now. And, out of respect for the animals, I make a point to never waste meat.
Anyway ... I'm not here to tell you how or what to eat. You do you, as the saying goes. I'm just here to tell you about what I eat, and how I make it, in case you want to make it too. And if you have me over for dinner, I'm not going to sneer or lecture if you serve me conventional supermarket beef or non-organic imported fruit. You're probably doing other "healthy" or "pro-planet" things that I'm not!

I'd love to get your thoughts on any of this or just about pot roast and comfort food in general. What is your favorite comfort food meal? Is it the same as the one when you were a child?

Classic Pot Roast - One-Pot Comfort Food Dinner / www.delightfulrepast.com

If you like it, please Pin it and share it!

Classic Pot Roast


(Serves 6 to 8)

1 3- to 4-pound (1.36 to 1.81 kg) boneless chuck roast
1 1/4 teaspoon salt, divided
1 teaspoon coarsely ground black pepper, divided
1/2 teaspoon sugar
2 tablespoons (1 fluid ounce/30 ml) extra-virgin olive oil
1 large (12 ounces/340 grams) yellow onion, quartered and separated
1 cup (8 fluid ounces/237 ml) lower-sodium chicken broth
1/4 cup (2 fluid ounces/59 ml) water, wine, or broth
1 tablespoon Worcestershire sauce
1 tablespoon tomato paste or ketchup
1 bay leaf
3/4 teaspoon marjoram
1 pound (16 ounces/454 grams) baby carrots (or 6 carrots, quartered)
6 medium unpeeled potatoes, quartered (or 8 small, halved)
(I used 16 tiny Yukon golds that averaged 2 ounces each)
4 stalks celery, cut in 2-inch diagonal pieces
Optional: Turnips, rutabagas, parsnips in place of some of the potatoes
(I used a 12-ounce rutabaga*, cut into 8 equal pieces)

* Rutabagas are called swedes in England and neeps, I'm told, in Scotland.

1 Heat 5.5-quart (or larger) Dutch oven; heat oil. Pat beef dry and coat beef with 3/4 teaspoon salt, 1/2 teaspoon coarsely ground black pepper, and 1/2 teaspoon sugar. Brown well on all sides in hot oil, taking about 15 to 25 minutes; transfer to plate. Preheat oven to 300F/150C/Gas2. Add the onion to the pan and cook until browned, about 15 minutes. Add broth, other liquid, Worcestershire sauce, tomato paste or ketchup, bay leaf, and marjoram; bring to a boil. Put the meat back in the pan.

2 Cover pan with foil and lid, and simmer in preheated oven for 2 hours.

3 Stir in 1/2 teaspoon each salt and pepper, and add vegetables. Cover as before and return to oven for 2 hours. Discard bay leaf. Remove meat and vegetables to serving platter; cover. Thicken the sauce with a little slurry of water and flour or by just reducing it (boiling it down) to your preferred thickness.

Note: Sometimes I make this several hours or a day ahead so that I can chill the sauce thoroughly until the fat rises to the top, remove most of the fat, and then thicken the sauce. The fat could be used in the baking of Yorkshire Pudding.

Disclosure: We are a participant in the Amazon Services LLC Associates Program, an affiliate advertising program designed to provide a means for us to earn fees by linking to Amazon .com and affiliated sites. We are a ThermoWorks affiliate, earning a small commission at no cost to you on purchases made through our links. This helps cover some of the costs of running the blog. Thank you for your support.

Jean

12 March 2020

Chicken and Dumplings - Instant Pot (or Not)

Chicken and Dumplings - Instant Pot (or Not) / www.delightfulrepast.com

Chicken and Dumplings is a real comfort food classic! And if you’d like to make it on the stovetop rather than in the Instant Pot, go to my original Chicken and Dumplings post. 

Also, go to that post if you’d like to read about the great dumpling controversy—you know, fluffy versus flat, dropped versus rolled. As you can see, I make fluffy dumplings. 

And fluffy they are. Never stodgy (unpleasantly solid and heavy). Sometimes I use a tablespoon of apple cider vinegar in the milk, and sometimes not. Either way, they come out light, fluffy and delicious. 

Thing is, the Instant Pot is narrower in diameter than my Dutch oven, so there’s really only room for half the dumplings. If you’re serving it all at once (dinner for at least 6), you could transfer the finished stew to a wider pan that will hold all the dumplings. 


Chicken and Dumplings - Instant Pot (or Not) / www.delightfulrepast.com


I’ve often used bone-in chicken breasts and thighs rather than cutting up a whole chicken, but for this Instant Pot version I went with a whole chicken and did not cut it up. 

You see, I’m still on my Streamlined Cooking kick and not cutting up the chicken and not browning the pieces was a huge timesaver. The chicken comes out fall-apart tender and easy to remove from the bones. 

I was prepared to have to remove a lot of fat from the broth, but there didn’t seem to be a lot of fat, so I just went with it. That was another timesaver.

I hope you’ll try it soon and let me know how you like it. And, tell me, which dumpling team are you on, fluffy or flat?


Chicken and Dumplings - Instant Pot (or Not) / www.delightfulrepast.com


Chicken and Dumplings - Instant Pot


(Serves 6 to 8)

The Chicken Stew

1 whole organic free-range chicken (3.5 to 5 pounds/1.6 to 2.25 kg), giblets removed
1 teaspoon salt, divided
1 teaspoon coarsely ground black pepper, divided
1/2 teaspoon marjoram
1/2 teaspoon poultry seasoning
1 medium (about 12 ounces/340 grams) yellow onion, quartered and sliced (1 1/2 cups)
1 1/2 cups thinly diagonally sliced carrots (about 12 ounces/340 grams)
3 stalks (about 4 ounces/113 grams) celery, thinly diagonally sliced (1/2 cup)

2 cups (16 fluid ounces/473 ml) water
1/4 cup flour shaken with 1/2 cup water
2 tablespoons chopped flat-leaf parsley


The Dumplings


(Makes 18)

2 dip-and-sweep cups (10 ounces/283 grams) unbleached all-purpose flour
1 tablespoon non-GMO baking powder
1 teaspoon salt
4 tablespoons (2 ounces/57 grams) unsalted butter, melted
1 cup (8 fluid ounces/237 ml) milk (1 tablespoon of which can be apple cider vinegar)

1 In 6-quart Instant Pot inner cooking pot, place the chicken (mine was an even 4 pounds); sprinkle with 3/4 teaspoon salt, 3/4 teaspoon pepper, marjoram and poultry seasoning. Top with onions, carrots and celery; pour in the water.

2 Put the lid in place and turn the steam valve to Sealing. Plug in the Instant Pot. Press the Pressure Cook key. Leave the indicator lights on High Pressure and Normal temperature, and change the cooking time to 25 minutes.

Note: It took about 25 minutes to come up to pressure and begin the cooking time.

3 When the "It's done" beep sounds and the indicator says "Off," set a kitchen timer for 25 minutes and allow the pressure to release naturally, then do a quick release by turning the steam valve to Venting. 

4 When the float valve drops down, carefully remove the lid. Transfer the chicken to a large plate or bowl and let cool for about 20 minutes. When it's cool enough to handle, use 2 forks to remove the skin and take the meat off the bones. Cut it into bite-size (about 1-inch) pieces.

5 Shake together flour and water until mixture is as smooth as possible; then pour it through a strainer into the stew. Taste and adjust seasoning, adding the additional 1/4 teaspoon each salt and pepper, if needed; press Saute and continue cooking, stirring occasionally, for 5 minutes to thicken. Stir in the chicken.

Note: You can stop right here if you want to and finish the dish tomorrow or the next day. See the Note at the end before proceeding.

6 While stew returns to a simmer, make dumplings. In medium bowl, whisk together flour, baking powder and salt. Drizzle melted butter over flour mixture, stirring with large fork. Stir in milk. Let stand for 5 minutes before scooping onto stew.

7 Stir in the parsley (and a cup of frozen peas, if you like). Spray a #40 scoop (about 1.5 tablespoons) or round measuring tablespoon with cooking spray. Drop level scoops or rounded tablespoons of dough onto simmering stew. Cover and simmer dumplings for 20 minutes, then test one to see if toothpick inserted into the center comes out clean. If not, cover and simmer an additional 5 minutes.

Note:  Only half the dumplings will fit in the Instant Pot. If you want to cook all the dumplings, you will need to transfer the stew to a wider pot, such as a 5.5-quart Dutch oven. And, if you are not an experienced dumpling maker, you will likely find it easier to do that anyway because cooking the dumplings is a bit tricky in the Instant Pot. You have to go back and forth between Saute and Slow Cook to keep the stew at a simmer. I did it one time, just to see if and how it could be done, and it worked. But I'll do the dumplings on the stovetop next time.

Disclosure: We are a participant in the Amazon Services LLC Associates Program, an affiliate advertising program designed to provide a means for us to earn fees by linking to Amazon .com and affiliated sites. We are a ThermoWorks affiliate, earning a small commission at no cost to you on purchases made through our links. This helps cover some of the costs of running the blog. Thank you for your support. 

Jean

09 January 2020

Guinness Beef Stew

Guinness Beef Stew (with Dumplings, in these photos, or over Mashed Potatoes) / www.delightfulrepast.com

Beef stew is the perfect wintertime comfort food meal. Well-browned organic grass-fed beef gives it a depth of flavor that requires nothing more than the simplest ingredients to make a soul-satisfying stew.

This Guinness Beef Stew is a departure from my usual beef stews made with red wine. Even if I were a total teetotaler, abstainer from alcohol, I would use it in my cooking. A lot of my recipes call for wine, spirits or beer.

Though the alcohol is burned off in the cooking, if you prefer not to use alcohol at all just use some lower sodium chicken broth instead. For those who have allergy/sensitivity concerns, Guinness does not contain wheat but is made with barley.

Of course, you can put potatoes in this, just like my Beef Stew, but I decided to skip the potatoes this time and serve it over Mashed Potatoes. And I ended up making Dumplings as well—one of our guests was in need of serious comfort. Triple comfort food!

And I went old-school and cooked this on the stovetop this fine wintry day, but you can easily adapt it to slow cooker, (Slow Cooker Beef Stew) or pressure cooker (Pressure Cooker/Instant Pot Beef Stew).

Are you into wintertime comfort food?

Guinness Beef Stew (with Dumplings, in these photos, or over Mashed Potatoes) / www.delightfulrepast.com

Guinness Beef Stew


(Serves 6 to 8)

3 tablespoons extra virgin olive oil, divided
3 pounds (1.36 kg) lean beef chuck, cut into 1.5-inch pieces
3/4 teaspoon salt, divided
3/4 teaspoon coarsely ground black pepper, divided
3 teaspoons Worcestershire sauce, optional
1 medium (about 12 ounces/340 grams) yellow onion, quartered and sliced
2 tablespoons (1 ounce/28 grams) unsalted butter

2 tablespoons unbleached all-purpose flour
1 1/2 cups (12 fluid ounces/355 ml) water
1/4 cup (2 fluid ounces/59 ml) organic ketchup
1 14.9-ounce can (14.9 fluid ounces/440 ml) Guinness stout
3/4 teaspoon thyme leaves
3/4 teaspoon marjoram
1/2 teaspoon celery seed
1 pound (16 ounces/454 grams) organic “baby” carrots, halved OR about 5 medium carrots (1 pound), peeled, cut into 1-inch slices

1 In 5.5-quart Dutch oven (I use a Le Creuset 5.5-quart enameled cast-iron French oven), heat 1 tablespoon extra virgin olive oil over medium-high heat. You will brown the beef in 3 batches.

2 Dry the beef cubes a batch at a time with paper towels, add to hot oil and brown very well in single layer, sprinkling with 1/4 teaspoon each salt and pepper and 1 teaspoon Worcestershire sauce. Transfer browned beef to large bowl. Repeat 2 times, adding remaining oil only as needed.

3 Add another teaspoon of olive oil if needed, and cook sliced onion, sprinkled with 1/4 teaspoon each salt and pepper, over medium heat for 10 minutes. Add to browned beef in bowl. (BTW, this is my favorite kitchen timer ever.) 

4 In 2-cup glass measure, measure the water and whisk in the ketchup. (I know, I know, but I promise it adds a certain something and doesn't taste at all ketchup-y). AND adding it to the measured water measures IT without dirtying another measuring cup! 

5 Over medium heat, heat butter and whisk in flour, cooking about 3 to 5 minutes. Whisk in the water/ketchup mixture. Simmer, stirring frequently, until thickened, scraping up the brown bits, deglazing the pan. Add browned beef and onions to Dutch oven.

6 Stir in the Guinness, thyme, marjoram, and celery seed. Bring to boil; reduce heat, cover and simmer 1 hour and 15 minutes. 

Note: And, since you have a while before you need to prepare the carrots, you can read my stew-related story, Life Lesson in a Flame-Colored Pot.

7 Stir in carrots, cover (lid slightly ajar) and simmer another 1 hour and 15 minutes, if making ahead (then reheat and simmer for 30 minutes before serving); or 1 hour and 45 minutes, if serving now. 

8 During last 10 minutes, thicken with a mixture of 1 tablespoon flour and 1/4 cup water; taste and adjust seasoning. Serve over mashed potatoes.


Disclosure: We are a participant in the Amazon Services LLC Associates Program, an affiliate advertising program designed to provide a means for us to earn fees by linking to Amazon .com and affiliated sites. We are a ThermoWorks affiliate, earning a small commission at no cost to you on purchases made through our links. This helps cover some of the costs of running the blog. Thank you for your support. 

Jean

26 December 2019

Apple Bread and Butter Pudding

Apple Bread and Butter Pudding - Classic British Comfort Food / www.delightfulrepast.com

I love a well made Bread and Butter Pudding, don't you? I've never really cared for ones with raisins or other dried fruits, but I do love one with some lightly cooked apples. And, of course, I used all organic ingredients and far less sugar than most recipes call for, so it's practically health food!

It's the perfect traditional comfort food dessert to warm you up on a cold evening. And you can make it ahead, which always makes me happy. I made this one large batch to serve to guests on two different evenings, putting half in the refrigerator for the first guests and half in the freezer for the others.

Apple Bread and Butter Pudding - Classic British Comfort Food / www.delightfulrepast.com


My ingredient quantities exactly fill a 13x9x2-inch 3-quart Pyrex baking dish. So don't get all loosey-goosey with the measurements unless you don't mind using an additional dish for the extra mixture. You can freeze it whole or cut into servings. Either way, move it from freezer to refrigerator the night before and then reheat in oven or microwave just before serving.

Mr Delightful likes the pudding cold with whipped cream. I like it warm, not hot, with a small scoop of organic vanilla ice cream. What's your preference?

Apple Bread and Butter Pudding - Classic British Comfort Food / www.delightfulrepast.com
Don't forget to Pin it and share it, please!


Apple Bread and Butter Pudding


(Makes 12 servings)

16 ounces (454 grams) good sliced white bread
3 medium (about 6 ounces/grams each) Golden Delicious or other good baking apples, skin on, cut into 1/2-inch cubes
4 tablespoons (1 ounce/28 grams) unsalted butter
1/4 packed cup (1.75 ounces/50 grams) dark brown sugar
1 1/2 teaspoons cinnamon
6 large eggs (medium in UK)
1/2 cup (2.33 ounces/66 grams) sugar
1/4 teaspoon salt
1/4 teaspoon mace or nutmeg
2 cups (16 fluid ounces/473 ml) milk
1 cup (8 fluid ounces/237 ml) heavy cream
2 tablespoons (1 fluid ounce/30 ml) brandy
2 teaspoons vanilla extract

1 Butter a 13x9x2-inch baking dish. Using bread that's a few days old (I often use 12 slices from the 1 1/2-pound loaf of Arnold/Brownberry/Oroweat potato bread), leave the crusts on, stack the bread a few slices at a time and cut into cubes, 16 squares per slice.

Note: This Fallue - Norman Brioche is excellent for bread puddings. Cut 1-inch thick slices and cut them into 1-inch cubes.

2 In a very large skillet (or Dutch oven) over medium heat, cook apples, butter, brown sugar and cinnamon until butter and sugar are melted and apples are softening a bit, about 10 minutes or so. Remove from heat and let stand to cool a bit while preparing the custard.

3 In 2-quart bowl, whisk together eggs, sugar, mace, salt, milk, cream, brandy and vanilla extract.

4 Add bread cubes to apples in skillet, mixing gently (you may use your impeccably clean hands!). Pour mixture into prepared baking dish, and spread evenly. Pour custard over all. And I don't know if you really need to, but I like to press the top down gently just to settle everything in. Let stand for 30 minutes or so. During the last 10 or 15 minutes, preheat the oven to 350F/180C/Gas4.

5 Bake until puffed and golden and knife inserted in center comes out clean, about 45 minutes. Transfer dish to rack and cool about 20 to 30 minutes to serve warm with either ice cream or Custard Sauce. Or refrigerate for at least 3 hours to serve chilled with whipped cream. It's also delicious at room temperature. Will keep in refrigerator for 2 to 3 days; in the freezer, for 2 to 3 months.

Disclosure: We are a participant in the Amazon Services LLC Associates Program, an affiliate advertising program designed to provide a means for us to earn fees by linking to Amazon .com and affiliated sites. We are a ThermoWorks affiliate, earning a small commission at no cost to you on purchases made through our links. This helps cover some of the costs of running the blog. Thank you for your support. 

Jean

21 November 2019

Chunky Southern Sweet Potato Casserole

Chunky Southern Sweet Potato Casserole / www.delightfulrepast.com

I know people go mad for the Southern Sweet Potato Casserole, but oh my goodness! Even when people say, "I've cut way back on the sugar," it has way more sugar than I ever put in desserts. "Bless their hearts!" 

Sometimes I make my Maple-Pecan Sweet Potato Puree, but when I'm in the mood for more texture, I make this, which I've decided to call Chunky Southern Sweet Potato Casserole. Either one is more "side dishy" than most out there and allows you to enjoy your dessert more fully.

Don't give in to the temptation to add more cinnamon. It isn't meant to be noticed. The 1/4 teaspoon is just enough to add to the illusion of sweetness. You know, in case any of your guests are used to a high-sugar sweet potato casserole.

Chunky Southern Sweet Potato Casserole / www.delightfulrepast.com


Chunky Southern Sweet Potato Casserole


(Makes 12 servings)

The Sweet Potatoes 

3 pounds (48 ounces/1.36 kg) red-skinned orange-fleshed sweet potatoes, peeled, quartered lengthwise, sliced 1/3-inch thick
5 tablespoons (2.5 ounces/71 grams) unsalted butter, melted
1/4 cup (2 fluid ounces/59 ml) real maple syrup
1/4 teaspoon salt
1/4 teaspoon cinnamon

The Topping 

1/4 packed cup (1.75 ounces/50 grams) dark brown sugar
1/3 dip-and-sweep cup (1.67 ounces/47 grams) unbleached all-purpose flour
5 tablespoons (2.5 ounces/71 grams) unsalted butter, softened
1 cup (4 ounces/113 grams) chopped pecans

1/2 cup (2 ounces/57 grams) rolled oats OR dried Biscuit crumbs
1/8 teaspoon salt

1 Preheat oven to 350F/180C/Gas4. Lightly butter or spray with cooking spray a 13x9x2-inch baking dish. Put the sliced raw sweet potatoes in it.

2 In 1-quart saucepan or in 1- or 2-cup glass measure, melt butter and whisk in maple syrup, salt and cinnamon. Pour over sweet potatoes and toss until they are well coated. Cover tightly with foil and bake for 45 minutes.

3 In small mixing bowl, mix topping ingredients with a fork until it's clumping together into large crumbs. Sprinkle evenly over the sweet potato mixture. Bake uncovered right away for about 30 minutes, or cover and refrigerate until 45 minutes or so before serving time. 

4 Preheat oven to 350F/180C/Gas4. Bake uncovered for 45 minutes, or until heated through. 

Disclosure: We are a participant in the Amazon Services LLC Associates Program, an affiliate advertising program designed to provide a means for us to earn fees by linking to Amazon .com and affiliated sites. We are a ThermoWorks affiliate, earning a small commission at no cost to you on purchases made through our links. This helps cover some of the costs of running the blog. Thank you for your support. 

Jean

14 November 2019

Turkey and Dressing for Two - Classic Bread Stuffing

Turkey and Dressing for Two / www.delightfulrepast.com

We enjoy a turkey dinner a few times throughout the year, and since it's just the two of us most of the time, this is an easy way to do it. Just enough turkey for two and just enough dressing for two--if one of the two is crazy about dressing (that would be me!). 

My father would have appreciated this post. He was not a turkey fan, did not appreciate leftovers, and refused to eat turkey more than once a year. 

Do you call it stuffing or dressing? My family called it dressing, whether it was baked inside the turkey or in a dish. Like my mother before me, I've tried all kinds of variations/add-ins--sausage, dried fruits, nuts--someone even snuck an egg into it once; but my favorite is the classic bread stuffing.

Unfortunately, I'd used up my stash of Make-Ahead Turkey Gravy and Broth (in anticipation of having to switch everything to a new refrigerator last week), but we made do. But do make that first if you're going to be doing the full-on, big deal turkey dinner. 


To serve four people, use a 13x9x2-inch baking dish and two packages of cutlets; no need to double the dressing recipe. I might post just one more turkey dinner related recipe next week. What is your favorite item on the menu?

Turkey and Dressing for Two / www.delightfulrepast.com
May not look pretty or colorful in the baking dish, but when you plate
it up with gravy, sweet potatoes, cranberry sauce and green vegetables,
it looks verrrry photogenic!
Don't forget to Pin it and share it!

Turkey and Dressing for Two 


The Dressing

3/4 pound (12 ounces/340 grams) good white and/or French bread, sliced and cut into 1/2-inch cubes
1 stick (4 ounces/113 grams) unsalted butter
1 cup chopped celery
3/4 cup chopped onion
1/2 teaspoon salt, divided
1/2 teaspoon coarsely ground black pepper, divided
2 teaspoons poultry seasoning
1 3/4 cup (14 fluid ounces/414 ml) homemade turkey broth or low sodium chicken broth

The Turkey

1 14.4-ounce (408 grams) turkey breast cutlets (5 cutlets, boneless and skinless)

Note: Of course, you can skip the bread, salt, pepper and poultry seasoning AND Step 1 if you pick up a box of seasoned stuffing mix. There are even some organic brands now. It all depends on whether you can find one seasoned the way you like, and that might prove very difficult. 

1 Lay the cubed bread out on a sheet pan and place it in the cold oven for 48 hours, stirring twice a day, to dry it out. My mother always dried the bread out in a warm oven because she couldn't have her oven tied up for two days! Just preheat the oven to 325F/165C/Gas3, and pop the sheet pan in for 50 minutes or so, stirring halfway through; cool completely.

2 In a 3-quart saucepan, melt the butter and cook the chopped celery and onion, with 1/4 teaspoon each of the salt and pepper, until very soft, about 15 minutes. About 5 minutes in, preheat oven to 350F/180C/Gas4. Stir in the remaining 1/4 teaspoon each salt and pepper and the poultry seasoning. Add the bread cubes, lightly crushing some or all of the cubes, depending on what texture you prefer. Stir until bread and vegetable mixture are thoroughly combined, then gradually stir in broth. Taste and adjust seasoning. Add a bit more broth if you like a moister dressing. 

3 Transfer the dressing to a greased 8x8x2-inch baking dish, pressing it down lightly.* Season the cutlets on both sides with salt and pepper. Lay them on top of the dressing; they will be overlapping a bit. Cover the baking dish tightly with a square of aluminum foil. Bake for about 45 to 50 minutes. Both the cutlets and the dressing should register 165F/74C on an instant-read thermometer.

* You can do this a day ahead, then add the turkey cutlets just before baking.

Disclosure: We are a participant in the Amazon Services LLC Associates Program, an affiliate advertising program designed to provide a means for us to earn fees by linking to Amazon .com and affiliated sites. We are a ThermoWorks affiliate, earning a small commission at no cost to you on purchases made through our links. This helps cover some of the costs of running the blog. Thank you for your support.

Jean

31 October 2019

Make-Ahead Turkey Gravy and Broth

Make-Ahead Turkey Gravy and Broth / www.delightfulrepast.com

Turkey Gravy is the highlight of any turkey dinner. Whether you're hosting a turkey dinner or doing a make-and-take side for dinner at someone else's house, you can be in charge of the gravy!

(I first posted this three years ago, though I've been making it for decades. If you read it then but didn't try it, please read it again and give it a go now!)

If you've never made the gravy ahead of time, you're going to thank me for this. It's the only way to go when you've got a dozen things on the menu, some of which need doing at the last minute. 

You know what I'm talking about. The classic mashed potatoes are mashed at the last minute, the dinner rolls are heated at the last minute, so many things to see to. By the time you sit down at the table, you're exhausted! 

But you can get the turkey broth and gravy done well in advance. You'll have enough broth for stuffing/dressing as well as gravy. Just freeze both until a day or two before you need them. If you make it two or three days ahead, just refrigerate it.

Make-Ahead Turkey Gravy and Broth / www.delightfulrepast.com
Don't forget to Pin it! 


(You can make the Cranberry Sauce two days ahead. Try it! You'll never go back to canned! Actually, some people love the canned cut into slices, so I sometimes serve both.)

Though it's made with just 2 pounds of turkey, the gravy tastes wonderful. But, if you want added flavor or want to increase the amount of gravy, when you take your turkey out of the pan on the big day, combine the pan drippings (minus the fat) and make-ahead gravy for added oomph.

About the broth: I'm a huge fan of store-bought organic free-range low-sodium chicken broth, but NOT for anything to do with a turkey dinner. You MUST make turkey broth, whether this way or with the neck, etc, on the day you roast the turkey, or both.

Do you like to make things ahead or do it all on the day? My mother always did pretty much everything on the day, but she was made of sterner stuff. I have to stretch it out!

Make-Ahead Turkey Gravy and Broth (this photo - the roasted drumsticks) / www.delightfulrepast.com

Make-Ahead Turkey Gravy


(Makes about 4 cups)

The Turkey

2 turkey drumsticks* (about 2 pounds/0.91 kg total)
1/4 teaspoon salt
1/2 teaspoon coarsely ground black pepper

1 tablespoon dry sherry plus enough water to make 1/2 cup (4 fluid ounces/118 ml)


* Other parts might work, too, but I've only ever used drumsticks as they are more readily available where I shop.

The Broth


The Turkey, above, cooked
1 medium onion, peeled and halved
2 medium carrots, cut into 3-inch pieces
4 medium celery stalks, cut into 3-inch pieces
Handful of fresh parsley
1 bay leaf
1/2 teaspoon salt
1/2 teaspoon coarsely ground black pepper
1/2 teaspoon dried thyme leaves

2 1/2 quarts (80 fluid ounces/2.36 litres) water

The Gravy


1/3 dip-and-sweep cup (1.67 ounces/47 grams) unbleached all-purpose flour

4 cups (32 fluid ounces/946 ml) of The Broth

1 Preheat oven to 400F/205C/Gas6. Lightly oil (about 1/2 teaspoon) a heavy-duty quarter sheet pan. Pat the drumsticks dry and place them in the prepared pan. Sprinkle all sides with salt and pepper. Roast for 60 to 70 minutes. Sixty minutes would probably be enough, but I like to get maximum brown bits in the roasting pan.

Note: If you don't see lots of brown in your pan after 70 minutes, let it go longer. This is a crucial step. Just be sure you don't let it burn.

2 Transfer the drumsticks to a 5-quart pot (I use a Le Creuset 5.5-quart round French oven); set aside for the moment.

3 Place the roasting pan on the stove and pour in the liquid a little at a time, stirring and scraping up the browned bits. When pan is completely deglazed, pour the liquid into a jar, bowl or 1-cup glass measure; refrigerate. You'll see from the photo that I ended up with about 1/4 cup of fat, which is perfect!

Make-Ahead Turkey Gravy and Broth (this photo - pan drippings) / www.delightfulrepast.com


4 Add vegetables and seasonings to the pot, along with water. Bring to a boil, reduce heat and simmer with lid slightly ajar for 4 hours, checking liquid level after second and third hours and adding more water only if needed.

Make-Ahead Turkey Gravy and Broth (this photo - the broth) / www.delightfulrepast.com


5 Strain the broth into a 2-quart glass measure. You will have 6 to 8 cups of broth.

6 Transfer your refrigerated pan drippings to a 2-quart saucepan and begin heating. Add flour to pan drippings and cook, whisking or stirring constantly, for 2 minutes.

7 Add about 1/2 cup of the stock and whisk briskly until very smooth, then add remaining broth. Bring to a boil, whisking frequently, until the gravy thickens, 5 to 10 minutes. Taste and adjust seasoning.

8 Leave the gravy as is or strain into a 4-cup glass measure. Pour it into a 6-cup glass freezer container. Let cool a bit at room temperature, refrigerate until cold, then freeze until the day before you want to serve it.


9 The day before you want to use it, transfer the gravy from freezer to refrigerator. Reheat the thawed gravy, combining it with the defatted pan drippings for even more flavor.

Disclosure: We are a participant in the Amazon Services LLC Associates Program, an affiliate advertising program designed to provide a means for us to earn fees by linking to Amazon .com and affiliated sites. We are a ThermoWorks affiliate, earning a small commission at no cost to you on purchases made through our links. This helps cover some of the costs of running the blog. Thank you for your support. 

Jean