Showing posts with label food waste. Show all posts

21 March 2024

Coffee Grounds Chocolate Cookies

Coffee Grounds Chocolate Cookies / www.delightfulrepast.com

My coffee grounds chocolate cookies came about because I rarely make anything chocolate without enhancing it with a bit of coffee and because I liked the idea of using the grounds instead of throwing them away after making pour-over coffee. Yes, I know you can use them in the garden, but right now my garden, well, anyway ...

I remembered seeing a few years ago a weird recipe for a chocolate cookie with coffee grounds. It called for heating dark chocolate, a vanilla pod, and a tiny bit of butter over a double boiler; and I don't think it had any flour at all, very odd. So here's what I came up with. If you use a coarse grind coffee, I'm not sure how that would work in a cookie. I use a kind of fine grind, not superfine, maybe medium fine (?) for pour-over coffee, and I imagine fine espresso grounds would work as well.

Since I had walnuts on hand, I toasted some and added them to the cookies; but I think I prefer these cookies without nuts. The used grounds were well drained but still damp when I weighed and measured them; completely dry grounds would weigh less, so you would need to measure rather than weigh that ingredient.

What do you think? Is this a bit weird for you, or does it sound good? The cookies really do have a wonderful flavor and texture. I hope you'll try them and let me know how you liked them. Or leave me a comment telling me why you won't be making them! Happy Spring!


Coffee Grounds Chocolate Cookies / www.delightfulrepast.com

If you like it, please Pin it and share it!

Coffee Grounds Chocolate Cookies


(Makes 34 2-inch cookies)

1 1/4 dip-and-sweep cups (6.25 ounces/177 grams) unbleached all-purpose flour
1/4 cup (0.75 ounce/21 grams) unsweetened cocoa powder
1/2 teaspoon baking soda
1/4 teaspoon salt
1 stick (4 ounces/113 grams) unsalted butter, room temperature
1/2 cup (3.5 ounces/99 grams) sugar
1/3 packed cup (2.33 ounces/66 grams) dark brown sugar
1 large egg
1/2 teaspoon vanilla extract
1/3 cup (2.25 ounces/64 grams) well-drained, slightly damp, used fine coffee grounds

1 In 1- to 1.5-quart bowl, whisk together flour, cocoa, soda, and salt.

2 In 2- to 2.5-quart bowl, cream together well the softened butter and sugars. Beat in the egg, vanilla, and then the coffee grounds. Stir in the flour mixture. Cover and refrigerate the dough for 2 hours or so. It will make the sticky dough more scoopable.

3 Preheat the oven to 350F/180C/Gas4. Line a baking sheet with parchment paper. Using a #60 (1/2 ounce/1 tablespoon) scoop, drop 17 scoops of dough about 2 inches apart onto prepared baking sheet. Bake for about 10 minutes. Remove from oven and, with a smooth metal spatula or the smooth bottom of a metal measuring cup, press the cookies gently to flatten the tops. Cool on wire rack. Repeat. 

Disclosure: We are a participant in the Amazon Services LLC Associates Program, an affiliate advertising program designed to provide a means for us to earn fees at no cost to you by linking to Amazon .com and affiliated sites. This helps cover some of the costs of running the blog. Thank you for your support.

Jean

If you liked this post, please Pin it and share it! 

30 September 2021

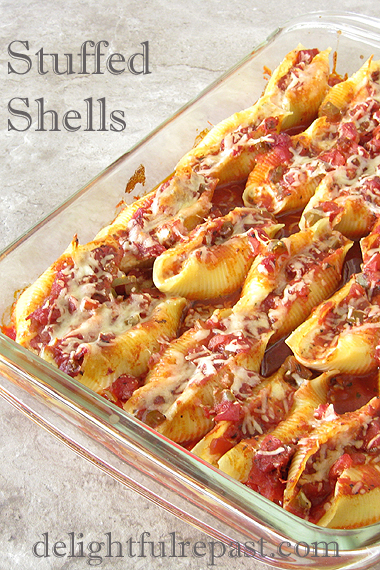
Stuffed Shells - Conchiglie Ripiene al Forno

Stuffed Shells - Conchiglie Ripiene al Forno / www.delightfulrepast.com

It had been several years since I last made stuffed shells, so I wanted to do a little research as to quantities. As my regular readers know, I hate food waste. I wanted to make 20 stuffed jumbo shells, and so I wanted to make exactly the amount of sauce and filling for those 20 shells. My research proved disappointing.

Most recipes I saw, including ones from companies that make jumbo shells, made far more filling than needed for the number of shells indicated. I remember one that made an enormous quantity of filling and then said to fill each shell with a level tablespoon! Well, I knew what I wanted to put in the filling, so I did my own math and got it right the first time.

Stuffed Shells - Conchiglie Ripiene al Forno - perfect for make-ahead freezer meals / www.delightfulrepast.com

I scaled down my basic marinara sauce to make exactly 3 1/2 cups so that there would be no leftover sauce either. Funny thing, too, was that the math on the Barilla box was wrong, too! The nutrition label on the 12-ounce box said "about 7 servings per container, serving size 5 pieces." On my planet, that adds up to 35 shells; there are actually 45 shells in a box.

Anyway ... This is my usual cheese-stuffed jumbo shells, which I really love. But next time I'm going to experiment with a sausage filling. What sort of fillings have you tried?

Stuffed Shells - Conchiglie Ripiene al Forno / www.delightfulrepast.com

If you like it, please Pin it and share it!

Stuffed Shells


(Makes 20 stuffed jumbo shells)

The Shells

1/2 12-ounce box Barilla jumbo shells (about 44 in a box)

The Sauce

1 tablespoon extra virgin olive oil
1/3 cup (1.5 ounces/43 grams) finely minced onion
1/3 cup (1.75 ounces/50 grams) finely minced green bell pepper
1/3 cup (1.75 ounces/50 grams) finely minced peeled carrot
1 14.5-ounce can organic fire roasted crushed tomatoes
1 8-ounce can tomato sauce
1/2 cup (4 fluid ounces/118 ml) drinkable dry red wine
1/2 cup (4 fluid ounces/118 ml) water
1 teaspoon sugar
1/2 teaspoon salt
1/4 teaspoon coarsely ground black pepper
1/4 teaspoon basil
1/4 teaspoon oregano
1/4 teaspoon parsley flakes
1/8 teaspoon crushed red pepper flakes

The Cheese Filling

1 15-ounce container ricotta
1 firmly packed cup (4 ounces/113 grams) finely shredded mozzarella
1/2 cup (2 ounces/ grams) grated parmesan
2 teaspoons parsley flakes
1/4 teaspoon coarsely ground black pepper
1/8 teaspoon nutmeg
3 tablespoons (1.5 ounces/44 ml) milk

The Top

1/2 firmly packed cup (2 ounces/57 grams) finely shredded mozzarella
1/4 cup (1 ounce/28 grams) grated parmesan


1 Put the salted water, 1 1/2 teaspoons salt and 2 quarts water, on to boil for cooking the shells according to package directions.

2 In 2-quart saucepan, heat the olive oil and cook the onion, bell pepper, and carrot until soft, about 5 minutes. Add remaining ingredients. Bring to boil; reduce heat to very low and simmer, loosely covered, for 45 minutes.

3 When shells are done, drain and place them on a quarter sheet pan to cool. When sauce is done, remove from heat and let cool.

4 In 1-quart glass measure, stir together the cheese filling ingredients; cover and refrigerate until ready to assemble. Preheat oven to 350F/180C/Gas4.

5 To assemble: very lightly oil a 13x9x2-inch baking dish. Spread 1 cup of the sauce over the bottom of the dish. Using a #40 scoop (2 tablespoons, slightly rounded), fill shells, handling them carefully. Place in baking dish, open side up. Pour remaining sauce evenly over shells. Cover with foil and bake for 25 minutes. Remove foil and top with a sprinkling of mozzarella and parmesan. Bake uncovered for 20 minutes. Let stand 5 minutes before serving.

Note: I like to use these Pyrex 3-cup rectangular storage dishes (shown in second photo) for my make-ahead freezer meals for two.

Disclosure: We are a participant in the Amazon Services LLC Associates Program, an affiliate advertising program designed to provide a means for us to earn fees by linking to Amazon .com and affiliated sites. We are a ThermoWorks affiliate, earning a small commission at no cost to you on purchases made through our links. This helps cover some of the costs of running the blog. Thank you for your support.

Jean

If you liked this post, please Pin it and share it!

27 May 2021

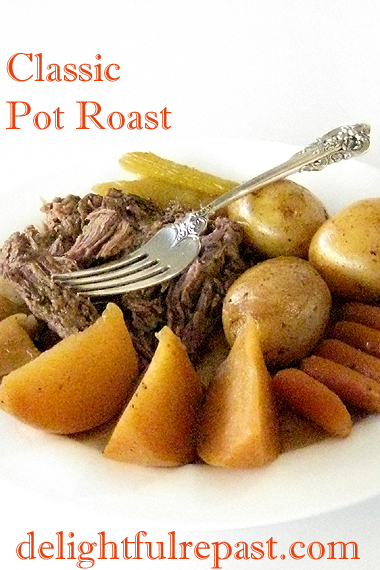
Classic Pot Roast

Classic Pot Roast - One-Pot Comfort Food Dinner / www.delightfulrepast.com

Why am I blogging about pot roast when everyone else is talking summer dishes? Two reasons.

One: Because, though it's nearly June, many parts of the country/world are still experiencing some cold days that call for traditional comfort food like this Classic Pot Roast.

When you make this satisfying one-pot meal for people, they are transported back to their childhoods when mothers and grandmothers cooked things many people now feel they haven't the time to cook themselves.

Although this recipe takes time, most of it is unattended. There are no tricky techniques, but you'll find that careful browning brings out the fullest flavor of these subtly seasoned simple ingredients.

Two: Another reason for posting this now is the recent social media kerfuffle about a popular food website that had stopped adding beef recipes to the site last year and were now formally announcing it, saying "our shift is solely about sustainability, about not giving airtime to one of the world’s worst climate offenders. We think of this decision as not anti-beef but rather pro-planet."

Well, I don't get involved in the politics of food—and I don't get self-righteous about my food choices or look down on anyone who doesn't feel the same—but I do give consideration to all that putting food on the table involves.

Classic Pot Roast - One-Pot Comfort Food Dinner / www.delightfulrepast.com


Knowing full well that this is a topic that won't win me any popularity contests—from those who for whatever reason aren't into organic, sustainable, etc, to those who are vegan—I'll repeat here something I wrote years ago:

Though I feel an organic, mostly plant-based diet is more healthful and earth-friendly, I occasionally indulge in a little carefully sourced grass-fed/grass-finished meat from ranches as close to local as possible that practice environmentally friendly agriculture methods and the ethical treatment of animals.

Yes, it is more expensive than conventional supermarket meat, but here are some ways I've found to better afford it:
  • By cutting our meat consumption in half. Most Americans eat more meat than is good for them, so I figure eating the good stuff in smaller portions or less frequently is better for us anyway!
  • I don't buy many "empty calorie" snacks and convenience foods, so more of the grocery budget can go toward whole ingredients.
  • I try very hard not to waste food and have gradually gotten to where I actually waste very little now. And, out of respect for the animals, I make a point to never waste meat.
Anyway ... I'm not here to tell you how or what to eat. You do you, as the saying goes. I'm just here to tell you about what I eat, and how I make it, in case you want to make it too. And if you have me over for dinner, I'm not going to sneer or lecture if you serve me conventional supermarket beef or non-organic imported fruit. You're probably doing other "healthy" or "pro-planet" things that I'm not!

I'd love to get your thoughts on any of this or just about pot roast and comfort food in general. What is your favorite comfort food meal? Is it the same as the one when you were a child?

Classic Pot Roast - One-Pot Comfort Food Dinner / www.delightfulrepast.com

If you like it, please Pin it and share it!

Classic Pot Roast


(Serves 6 to 8)

1 3- to 4-pound (1.36 to 1.81 kg) boneless chuck roast
1 1/4 teaspoon salt, divided
1 teaspoon coarsely ground black pepper, divided
1/2 teaspoon sugar
2 tablespoons (1 fluid ounce/30 ml) extra-virgin olive oil
1 large (12 ounces/340 grams) yellow onion, quartered and separated
1 cup (8 fluid ounces/237 ml) lower-sodium chicken broth
1/4 cup (2 fluid ounces/59 ml) water, wine, or broth
1 tablespoon Worcestershire sauce
1 tablespoon tomato paste or ketchup
1 bay leaf
3/4 teaspoon marjoram
1 pound (16 ounces/454 grams) baby carrots (or 6 carrots, quartered)
6 medium unpeeled potatoes, quartered (or 8 small, halved)
(I used 16 tiny Yukon golds that averaged 2 ounces each)
4 stalks celery, cut in 2-inch diagonal pieces
Optional: Turnips, rutabagas, parsnips in place of some of the potatoes
(I used a 12-ounce rutabaga*, cut into 8 equal pieces)

* Rutabagas are called swedes in England and neeps, I'm told, in Scotland.

1 Heat 5.5-quart (or larger) Dutch oven; heat oil. Pat beef dry and coat beef with 3/4 teaspoon salt, 1/2 teaspoon coarsely ground black pepper, and 1/2 teaspoon sugar. Brown well on all sides in hot oil, taking about 15 to 25 minutes; transfer to plate. Preheat oven to 300F/150C/Gas2. Add the onion to the pan and cook until browned, about 15 minutes. Add broth, other liquid, Worcestershire sauce, tomato paste or ketchup, bay leaf, and marjoram; bring to a boil. Put the meat back in the pan.

2 Cover pan with foil and lid, and simmer in preheated oven for 2 hours.

3 Stir in 1/2 teaspoon each salt and pepper, and add vegetables. Cover as before and return to oven for 2 hours. Discard bay leaf. Remove meat and vegetables to serving platter; cover. Thicken the sauce with a little slurry of water and flour or by just reducing it (boiling it down) to your preferred thickness.

Note: Sometimes I make this several hours or a day ahead so that I can chill the sauce thoroughly until the fat rises to the top, remove most of the fat, and then thicken the sauce. The fat could be used in the baking of Yorkshire Pudding.

Disclosure: We are a participant in the Amazon Services LLC Associates Program, an affiliate advertising program designed to provide a means for us to earn fees by linking to Amazon .com and affiliated sites. We are a ThermoWorks affiliate, earning a small commission at no cost to you on purchases made through our links. This helps cover some of the costs of running the blog. Thank you for your support.

Jean

06 August 2020

Crispy-Skinned Fluffy Baked Potatoes - Jacket Potatoes

Crispy-Skinned Fluffy Baked Potatoes - Jacket Potatoes / www.delightfulrepast.com

Baked potatoes (in the UK, jacket potatoes) are simply wonderful when done well and horrid if done wrong. There are all sorts of methods to achieving the "perfect" baked potato, some of which do not result in my idea of the perfect potato but might make your perfect potato.

First, you must select the proper baking potato, which is a starchy, floury (rather than waxy) potato. In the US, that means the russet potato (I always buy organic). In the UK, try Maris Piper, King Edward, or Estima. Wherever you are, you need a proper baking potato.

If you don't like eating the potato skin, it might not be important to you to achieve a crisp skin. But we enjoy a delicious crisp, slightly salty potato skin, without a leathery bottom, so this particular method works for us.


Crispy-Skinned Fluffy Baked Potatoes - Jacket Potatoes (this image, a watercolor sketch) / www.delightfulrepast.com
Couldn't resist doing a quick little watercolor sketch, since I've never
painted a potato, baked or otherwise, in my life!


The brining step is something I picked up when I was flipping through YouTube one day and happened onto the channel of Kent Rollins, a charming chuck wagon cook in Oklahoma. He was baking some really big potatoes, so made more brine than this. Brining is the only thing I did differently than usual, and it makes a difference.

Since we're not hardworking cowboys here, I consider the 7-ounce potatoes I used to be the perfect size baked potato. But if you like to use larger potatoes, you'll need to extend the initial baking time. 

But I hate serving people a huge potato they might not be able to finish. Scraping wasted food into the bin hurts my heart, so I'd rather leave 'em wanting more! Hey, dessert's still coming, they're going to be happy!

And someday, when we can have people over again, I think a baked potato bar would be fun, with a selection of toppings to suit everyone's taste: sour cream, shredded cheese, nacho cheese sauce, caramelized onions, snipped chives, green onions, fresh herbs, chili. What's your favorite topping? 

Crispy-Skinned Fluffy Baked Potatoes - Jacket Potatoes / www.delightfulrepast.com
Please Pin it and share it!

Crispy-Skinned Fluffy Baked Potatoes


(Makes 4, can be doubled)

The Potatoes

4 medium (6- to 8-ounce/170 to 227 grams) russet potatoes (outside US, choose another starchy, floury potato meant for baking)

The Brine

1/2 cup (4 fluid ounces/118 ml) water
2 tablespoons salt

The Finish

1 tablespoon extra virgin olive oil

1 With oven rack in middle of oven, preheat oven to 450F/230C/Gas8. Line a 13x9x1-inch quarter sheet pan with foil. Place a wire rack over the pan and rub a bit of oil on the rack.

Note: You might have a wire cooling rack that fits inside a quarter sheet pan, but I don't; mine just fits over it. If I were baking 8 medium potatoes, I'd use my 18x13x1-inch half sheet pan which does have a wire rack that fits down in it.

Crispy-Skinned Fluffy Baked Potatoes - Jacket Potatoes / www.delightfulrepast.com


2 Scrub the potatoes very well since you will want to eat the lovely crispy potato skin. Prick them all over with a fork. I always do 8 on this size potato, 3 on top, 3 on bottom and 1 on each side. In a bowl large enough to hold a potato, stir together the water and salt. Dip each potato in the brine, rolling it around to coat all surfaces. Place on the rack.

3 Bake for 45 minutes, at which point the potatoes should be done (though we're not going to stop there). Check one of the potatoes for doneness by your favorite method. An instant-read thermometer (Thermapen or ThermoPop) inserted in the center should register 205 to 210F/96 to 99C. If you use the same type, shape and size potato every time, you'll find the perfect timing for your oven.

4 Remove from oven. Brush tops and sides with the olive oil (or bacon grease, duck fat, goose fat, etc). Return to oven for an additional 10 minutes. As soon as you take them out of the oven after the second bake, slit the tops and give the ends a bit of a squeeze. Serve immediately.

Disclosure: We are a participant in the Amazon Services LLC Associates Program, an affiliate advertising program designed to provide a means for us to earn fees by linking to Amazon .com and affiliated sites. We are a ThermoWorks affiliate, earning a small commission at no cost to you on purchases made through our links. This helps cover some of the costs of running the blog. Thank you for your support. 

Jean

21 February 2019

Sheet Pan Chicken Parmesan

Sheet Pan Chicken Parmesan / www.delightfulrepast.com

The sheet pan dinner concept is such a timesaver and something I’ve embraced since I began my journey to what I call streamlined cooking, converting some of my favorite time-consuming recipes to simpler versions so that we can enjoy them more often.

Sheet Pan Chicken Parmesan is my latest. There's a simple little sauce that requires no chopping and that can be made days ahead. Just throw the ingredients in the pan and let it pretty much take care of itself for about half an hour while you go about your business.

The fresh breadcrumbs you can so easily make yourself are much better than what you can buy and really take no time at all. They can be made ahead as well if you’re heating up your oven for something else anyway.


Sheet Pan Chicken Parmesan / www.delightfulrepast.com
 Please Pin it and share it!

You can even buy organic boneless skinless chicken breasts thin sliced, but since I have a great knife for butterflying, I just do it myself. The thin sliced probably costs more as well, and I do try to be frugal. Speaking of which …

Many recipes for things that are dipped and breaded or coated with crumbs call for way too much egg mixture and way too much flour or breadcrumbs. And they’re simply wasted. I get quite precise with my measures of these things so that there is little to no waste.

Same with the sauce. You will have just enough sauce for the recipe and a bit to garnish the top. It’s my goal in 2019 to reduce my food waste to as close to zero as I can get. If you have small amounts of vegetables that need to be used up, just throw them on the sheet pan, too! 


Sheet Pan Chicken Parmesan / www.delightfulrepast.com


Sheet Pan Chicken Parmesan


(Makes 4 servings)


The Sauce

(Makes about 1 1/3 cups)

1 tablespoon olive oil
1 14.5-ounce can fire roasted crushed tomatoes
1/2 teaspoon sugar
1/4 teaspoon salt
1/4 teaspoon pepper
1/4 teaspoon basil
1/4 teaspoon marjoram
1/4 teaspoon oregano
1/4 teaspoon parsley
1/8 teaspoon crushed red pepper flakes


The Chicken

1 packed cup fresh breadcrumbs, from 3 ounces/85 grams sourdough or good white bread
1 tablespoon extra virgin olive oil
1/2 packed cup (1 ounce/28 grams) shredded parmesan
2 12- to 14-ounce/340 to 397 grams (each) boneless skinless chicken breast halves, butterflied and split to make 4 pieces
1 large egg
2 tablespoons mayonnaise
1/4 teaspoon salt
1 packed cup (4 ounces/113 grams) shredded mozzarella

1 In 1-quart saucepan, stir together all the ingredients. Bring to a boil. Reduce heat and simmer, loosely covered, for 30 minutes, stirring occasionally. Let stand at room temperature.

2 Use food processor to make perfect fresh breadcrumbs. Cut bread into 1-inch pieces. Process until it becomes breadcrumbs. Don't worry about overdoing it; it's pretty foolproof.

3 Preheat oven to 425F/220C/Gas7. Cover a 15x10x1-inch baking sheet with foil. Put the breadcrumbs on the baking sheet, sprinkle on the olive oil, toss the crumbs to coat, spread them out in an even layer, and bake until crisp and golden brown, about 5 to 7 minutes. Check at 5 minutes. If they’re not quite ready, give them a stir and bake another 2 minutes. Transfer to a 13x9-inch pan to cool. Mix the shredded parmesan with the cooled breadcrumbs.

4 In medium mixing bowl, whisk together egg, mayonnaise, and salt. Add the chicken to the bowl and coat the pieces thoroughly with the egg mixture. Then put them in the pan with the breadcrumbs and coat them thoroughly. Pat the crumbs in well, using every bit of them. No waste! 

5 Place the coated chicken pieces on the foil-lined 15x10x1-inch baking sheet (there should still be plenty of oil on the foil from the baking of the breadcrumbs). Bake for 20 minutes. Remove from the oven, and spread 1/4 cup of the sauce on each piece of chicken, and then 1/4 cup of the mozzarella on each. Return to the oven until cheese is melted, about 10 minutes.

Disclosure: We are a participant in the Amazon Services LLC Associates Program, an affiliate advertising program designed to provide a means for us to earn fees by linking to Amazon .com and affiliated sites. We are a ThermoWorks affiliate, earning a small commission at no cost to you on purchases made through our links. This helps cover some of the costs of running the blog. Thank you for your support. 

Jean

03 January 2019

Guildford Manchets - A British Historical "Receipt" (Recipe)

Guildford Manchets (Rolls) - A British Historical Recipe / www.delightfulrepast.com

A few weeks ago my heart was in southwest England, and I made Devon Flats. This week it moved over to the southeast, Surrey to be precise, and I made Guildford Manchets (pronounced man-chits).

Guildford Manchets are pastry-like bread rolls that date from Medieval times in Guildford, Surrey. They are flaky, buttery rolls that make a perfect continental breakfast or fit in at the finest dinner party. 

It makes me so happy to find an old ‘receipt’ (recipe) with directions like “Make the bread dough in the usual way” and imprecise (or sometimes no) measurements and turn it into something my dear readers can easily do.


Guildford Manchets (Rolls) - A British Historical Recipe / www.delightfulrepast.com


I found this one at Foods of England and couldn’t resist. I didn’t have any lard on hand and didn’t want to buy a pound of organic lard for the 1 ounce called for, so I used organic unsalted butter, which also makes the recipe vegetarian.

And, of course, bakers didn’t have instant yeast back in the Middle Ages. But I didn’t want to trouble any of my craft beer brewing friends for a bit of barm from the top of their vats, so I “made do” with store-bought yeast.

I love historical cooking, but only when it’s good! These are some seriously good rolls, and I hope you’ll try my updated version soon.


Guildford Manchets (Rolls) - A British Historical Recipe / www.delightfulrepast.com


Guildford Manchets


(Makes 16)

1 1/4 sticks (5 ounces/142 grams) unsalted butter, divided
3 dip-and-sweep cups (15 ounces/425 grams) unbleached all-purpose flour, divided
2 teaspoons (8 grams) sugar
2 teaspoons (7 grams) instant yeast
1 1/4 teaspoons (5 grams) salt

1 1/4 cups (10 fluid ounces/296 ml) milk and water, about the same amount of each, room temperature

Egg Wash: 1 large egg, 1 tablespoon water, pinch of salt*


* The egg wash “goes far” so there is lots left over; I just stuck it in the microwave for under a minute and had a scrambled egg snack so as not to waste that good organic egg--I hate food waste!

1 Take the butter out of the refrigerator. In a tiny bowl, melt 2 tablespoons (1 ounce) of the butter; let cool slightly. Put the remaining butter in a small bowl and let stand at room temperature until needed. In medium mixing bowl, whisk together the flour, sugar, yeast and salt. Make a well in the center of the flour, and pour the melted butter, milk and water into it, stirring to form dough. It might look like you need more liquid, but knead lightly with one hand, right in the bowl, to bring the dough together.

2 Turn the dough out onto lightly floured surface and knead for about 8 minutes. Use only as much flour as you need to keep dough from sticking to the counter (I measure out 1/8 cup in advance to work from so that I'm sure to not add too much) . The dough will feel sticky, but it won't actually stick. Place flattened ball of dough in a lightly oiled bowl (I use a 2-quart glass measure so I can quickly see when it has doubled) and cover loosely with lightly oiled lid or plastic wrap (no need to oil lid or plastic wrap if container is large enough that the doubled dough won't reach it). Let rise until doubled, about 1 to 1 1/2 hours.

Note: Rising time will vary with the temperature. We keep a rather cool house, which makes for a slower rise.

Guildford Manchets (Rolls) - A British Historical Recipe (this photo of the dough after first rise and the creamed butter)  / www.delightfulrepast.com


3 Meanwhile, in a small bowl, cream the room temperature butter. Turn the dough out onto lightly floured surface. Press and roll it out to a 16x8-inch/40x20 cm rectangle about 1/2 inch/1 cm thick. 


4 With short edge facing you, spread the butter over two-thirds of the rectangle. Fold the unbuttered third over the middle third, and then fold the remaining third over that. Pinch the edges to seal. Roll the dough again to the same size rectangle and fold. Repeat two more times.

5 Roll out the dough a final time into an 11-inch square. Cut the square of dough into 16 equal pieces. To shape the buns, take a square of dough and turn its corners under into the center, pressing down to seal, and form a round, flat bun. Place buns on a greased or parchment-lined 18x13x1-inch half sheet pan. Let rise until doubled, about 45 minutes.

6 Preheat oven to 400F/200C/Gas6. When buns have risen and are ready to go into the oven, whisk together the egg wash and brush it on the tops of the rolls. Bake them for about 20 minutes, or until golden brown.

Note: They keep well stored tightly covered at room temperature for a few days. Reheat loosely wrapped in foil for about 8 or 10 minutes in preheated 350F/180C/Gas4 oven.

Disclosure: We are a participant in the Amazon Services LLC Associates Program, an affiliate advertising program designed to provide a means for us to earn fees by linking to Amazon .com and affiliated sites. We are a ThermoWorks affiliate, earning a small commission at no cost to you on purchases made through our links. This helps cover some of the costs of running the blog. Thank you for your support. 

Jean