Showing posts with label minimalism and simplicity. Show all posts

21 December 2023

Wild Yeast Sourdough Simplified - A Tutorial

Wild Yeast Sourdough Simplified - A Tutorial / www.delightfulrepast.com

I developed my simplified sourdough a few years ago to shorten the process from the typical way I used to make sourdough bread, which was either a 28- or 36-hour process (from first feeding of the starter to time to shape the loaf). That was fine for me at that time, but when that became inconvenient I came up with my Sourdough Simplified method.

For quite some time, that was wonderful. Still is, but as my starter matured and the two rise times shortened, the bread was just not the same. While still good, it lost most of its characteristic tang and chewiness. And I'm afraid Mr Delightful has gotten spoiled with his homemade sourdough toast every morning of his life and has gotten quite particular!

Well, I was not inclined to go back to the original process, so I added a step—a pre-ferment—to my simplified sourdough process. And it worked! So I wanted to write up this postscript for you so that if you are working with a mature starter but want to speed things up as much as you can without sacrificing flavor and texture, you can. This shortens the usual method by 10 to 18 hours from start to shaping.

If you think sourdough is too much trouble, you will be amazed at how trouble-free this method really is. There is none of that annoying feeding and discarding, no having to cater to your starter to keep it going. Just put your little pint jar in the refrigerator and neglect it for weeks or months at a time until you want to make bread. Then stir it up, take out what you need, replenish it, and forget about it until next time.

The following schedule is my schedule. You can pick any time you want. And these times are approximate because there are many variables. The main thing is that you pick a time, probably in the morning, on a day that you want to make the bread; subtract 12 hours from that and start your pre-ferment at that time.

My schedule for this is: 
Day 1 —  6:00pm Make the pre-ferment and let rise for 12 hours. Replenish the jar of starter.
Day 2 —  6:00am Make the dough. Let rise until doubled (variable, but mine currently takes 5 1/2 hours). 
Day 2 —11:30am (variable) Shape the loaf. Let rise until doubled (variable, but mine currently takes 2 hours).
Day 2 —  1:30pm (variable) Bake.

For me, this schedule means I can stir up the pre-ferment after dinner (I do Intermittent Fasting and don't eat after 6:00pm) and forget about it till I get up the next morning and make the dough. Then I have several hours to myself before it's time to shape the loaf and then 2 hours till I need to preheat the oven, bake, and take it out of the oven. So by 2:15pm, the finished loaf is cooling off and so am I!


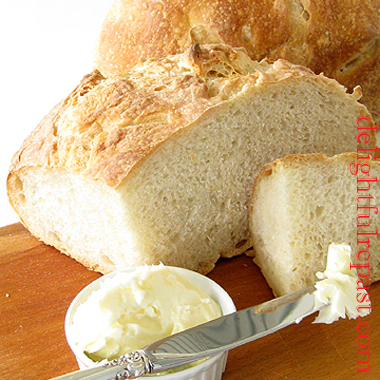
Wild Yeast Sourdough Simplified - Sandwich Loaf - A Tutorial / www.delightfulrepast.com


If you're new to wild yeast (no added commercial yeast) sourdough baking or you just don't currently have a starter, I've outlined my streamlined starting a starter process in the Sourdough Simplified post. If you already have a starter but want to learn how to maintain it in a pint canning jar with no discarding or other faffing about (basically, just ignoring it!), see the directions below. Happy baking! 


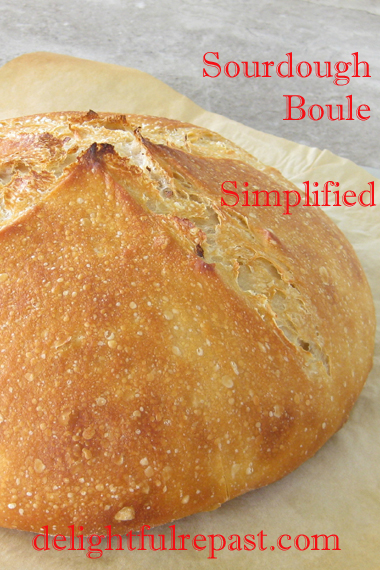
Wild Yeast Sourdough Simplified - Boule - A Tutorial / www.delightfulrepast.com

 If you like this post, please Pin it and share it!


Sourdough Sandwich Loaf or Boule


(Makes one large loaf)

The Pre-Ferment

1/2 cup (4.5 ounces/128 grams) mature stirred-down 100% hydration starter
5.5 fluid ounces (163 grams or ml) room temperature water
1 dip-and-sweep cup (5 ounces/142 grams) unbleached all-purpose flour 

The Dough

7 fluid ounces (207 grams or ml) room temperature water
1 1/2 teaspoons to 1 3/4 teaspoons (0.35 ounce/10 grams) salt (I use 1 1/2 teaspoons)
3 dip-and-sweep cups (15 ounces/425 grams) unbleached all-purpose flour

Note: Before we get started, let me say one more thing. If you do not have a kitchen scale, get one. It is something else that will simplify your life. I've used one for decades, probably because I grew up with English cookery books, and switched to this digital one, OXO Good Grips 11-pound digital scale (pictured below), when I found it years ago.

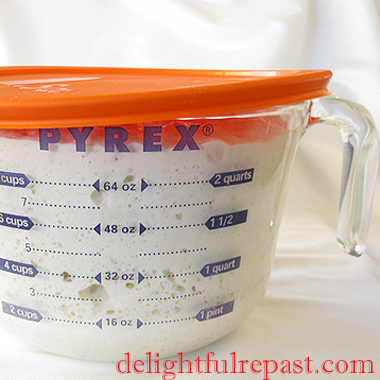
1 For the pre-ferment: At 6:00 pm (or whatever your chosen time is), in 2-quart glass measure, stir together the starter and water, then flour. Cover loosely and let stand at room temperature for 12 hours. Replenish the starter.

Maintaining Starter: Unless you're baking bread every day or two, keep the starter in the refrigerator and feed only to replenish. I keep about 3/4 cup (6.75 ounces/192 grams) of starter in a pint canning jar. Though I won't be feeding the starter, after taking out 1/2 cup (4.5 ounces/128 grams) for the loaf, I need to replenish the starter in the jar and so feed it with 2.25 ounces (64 grams) each flour and water, stir it vigorously and let stand at room temperature for about 1 to 4 hours (you should see some bubbles, but not too many), then refrigerate until the next bake.


Wild Yeast Sourdough Simplified - Starter / www.delightfulrepast.com


2 At 6:00 am (or 12 hours after your chosen start time), make the dough. Stir water and salt into the pre-ferment, then the flour. Cover loosely with lid or lightly oiled plastic wrap and let stand at room temperature about 6 hours, or until the dough has doubled. It all depends on variables like your starter and the temperature of your kitchen.

As the starter matures, the rise time shortens. At some point, the first rise might take only 5 hours and the second, less than 2 hours. If longer rise times better suit your schedule, you can reduce the amount of starter used in the dough.

Wild Yeast Sourdough Simplified - A Tutorial / www.delightfulrepast.com

  
3a For Sandwich Loaf: Grease the bread pan. I use a 9x4x4-inch (1.5-pound) pullman pan. It's about the same capacity as a 9x5x3-inch loaf panUsing no more than 1/8 cup altogether, sprinkle countertop with some flour. Gently scrape the dough onto the floured countertop. Sprinkle with flour. Press gently into a roughly 12-by-8-inch rectangle. Using a bench scraper, fold one third of the rectangle toward the center, then fold the other end to the center, like a letter. With the bench scraper, place folded dough in the pan, pressing it into the corners. Brush on a little water. Cover it loosely with an oiled or cooking-sprayed piece of plastic wrap.

3b For Boule: Place a square of parchment paper on a rimless baking sheet (which will act as a "peel" later). Sprinkle 1/2 teaspoon of flour in a 9-inch circle in the center of the parchment and 2 tablespoons of flour on your work surface. Scrape the dough out onto the work surface. Put a little of the flour on top of the dough and with floured hands, press dough lightly into a 10-inch square. Fold it in thirds like a letter; then fold that rectangle into thirds, forming a square. Tuck the edges under, working the dough into a smooth round. Place the dough on the parchment. Turn a large glass bowl over it, or cover it loosely with an oiled or cooking-sprayed piece of plastic wrap.

4a Let rise until doubled. If using 9x5x3-inch loaf pan, it should rise an inch or two above the rim of the pan. If using the 9x4x4-inch pullman pan (minus its lid), the dough should rise to below or just even with the top of pan. This can take anywhere from 2 to 5 hours. The dough needs to rise until the dough doesn't quickly spring back when poked with a floured finger or knuckle. 

4b The boule will spread as well as rise and not appear to rise very high. Not to worry! It will rise in the oven (called oven spring) and be a lovely, well-risen loaf. 

Tip: Check on the dough's progress regularly. After making it a few times, you'll have a better idea of how long it will take. And that will change as the weather changes.

5a Toward the end of the rising time, preheat oven to 450F/230C/Gas8. Just before baking, brush the loaf with a little water. Bake for 10 minutes. Reduce heat to 400F/205C/Gas6 and continue baking for about 30 minutes or until crust is beautifully golden and middle of loaf registers 210F/99C on instant-read thermometer. Remove from pan immediately and let cool on wire rack for 1 1/2 to 2 hours before slicing.

5b When you’ve got about 30 to 45 minutes left, place oven rack in lower-middle position and place pizza stone or Lodge Pro-Logic 14-Inch Cast Iron Pizza Pan on rack. Preheat oven to 475F/245C/Gas9 for at least 30 minutes. With a sharp blade, cut a "+" about 1/4-inch deep on the top and slide the boule on its parchment square onto the hot stone. Reduce temperature to 425F/220C/Gas7. Bake for about 45 minutes, or until crust is beautifully golden and middle of loaf is 210F/99C. If it's getting too brown, cover loosely with foil. Remove from oven, using the rimless baking sheet or pizza peel to lift the boule off the pizza stone. Let cool on wire rack for 1 1/2 to 2 hours. 

PS For those who care about such things, this is a 69% hydration dough. 

Disclosure: We are a participant in the Amazon Services LLC Associates Program, an affiliate advertising program designed to provide a means for us to earn fees at no cost to you by linking to Amazon .com and affiliated sites. This helps cover some of the costs of running the blog. Thank you for your support.

Jean

If you liked this post, please Pin it and share it! 
04 August 2022

Veering Out of My Lane - Talking About Clothes


Veering Out of My Lane - Talking About Clothes - Curating a Wardrobe / www.delightfulrepast.com

A wardrobe post at Delightful Repast? That's right. No food today! For the first time in 12.5 years, I'm posting about something besides food. And that is because the weather has made me lose all interest in cooking and even eating this week, so instead I've been spending time "curating" my wardrobe, weeding out the unworn clothing.

Some people who know me would call me a minimalist, but I recently saw the word 'enoughism' and decided that I'm really more of an enoughist. Of course, if you could see all my kitchen equipment, you'd question how I could call myself an enoughist! I wrote a bit about minimalism six years ago in this Pasta with Chicken and Spring Vegetables recipe post.

And the year before that I wrote about conquering a very specific type of clutter in this In My Kitchen post. I hope you'll read these two posts if you're at all interested in the topics of decluttering, organizing, minimalism, or enoughism.

There are many ways to pare down one's wardrobe. One is the capsule wardrobe, great for some people, but it would take up way more time than I’m willing to spend. I've always limited my wardrobe to what would fit in my small closet and chest of drawers by practicing the one-in-one-out rule, but I decided to take it a step further. 

My 90-Hanger Closet

I started by measuring my closet rods. There is one rod for long items on the right side, and an upper and lower rod on the left side for short items. The three rods total 90 inches, so I decided to have 90 hangers. Sounds like a lot, but I also decided to stop storing any clothes in drawers. So now ...  

All of my clothes—except underwear, swimsuits and coats—go on a hanger. No folded garments on a shelf or in a drawer. Every item, including scarves and belts and my workout pants and tops, is on a hanger. Nothing gets rotated in or out for seasons or any other reasons. It’s all there, all the time. 

If I want to add a new garment, it has to replace an old garment that will be promptly relegated to the rag bag, if it's worn out or damaged, or donated to a charity shop, if it no longer fills a need.

It would be grand if I had the "bandwidth" to deal with consignment shops or other methods of selling things, but I don't. So the ordinary items go to an ordinary thrift store and the really good stuff to a special thrift store that is very particular about what they sell.

A Working Closet, Not a Warehouse

I purged 13 items that had been taking up space for far too long, most of which were going to require altering if I was going to wear them. Six of those pieces were three rather elegant pantsuits that I wore regularly for years in a business that called for that level of dressing. It was hard to let them go, but it made no sense to go to the expense of alterations for things I no longer needed.

Three hangers out of the 90 are empty. Three have skirts that need altering. And I have resolved to get that done before the end of the year. If I don't, they must go. The empty hangers can stay empty! If I find I can whittle those 90 hangers down even more, that will be wonderful. I don't want anything in my closet that isn't getting worn somewhat regularly.

I need business-type dresses or skirts and tops (including blazers, jackets, and cardigans), a few times a week; dresses that can be worn for special occasions every couple of months; dressy-casual (also called, smart casual) pants and tops; casual pants/jeans and tops; workout pants and tops. I am not likely to have need of a ball gown or evening gown ever again, so no need to keep one of those on hand.

What is your take on this subject? I hope you'll tell me all about how you handle your wardrobe. And then, I promise, I'll get back in my lane—food! The cake above, by the way, is French Almond-Rum Cake, and you need to make it! 

Jean

Veering Out of My Lane - Talking About Clothes / www.delightfulrepast.com

If you liked this post, please Pin it and share it!

03 September 2020

Simple Roasted Tomatoes for the Freezer

Simple Roasted Tomatoes for the Freezer / www.delightfulrepast.com

Freezing oven-roasted tomatoes is one way to take advantage of a bumper crop. Of course, if you're growing a lot of tomatoes, you might need to can them. 

Simple Roasted Tomatoes for the Freezer (this image, a watercolor sketch) / www.delightfulrepast.com
My watercolor sketch of a tomato from the garden

But for me it was just a matter of having several pounds more than I needed all ripe at the same time. So early this morning before it got hot, I preheated the oven and roasted two half sheet pans of tomatoes yielding 5 half-pint jars. I'll likely be doing another batch in a few days.

You can freeze the roasted tomatoes in whatever size portion you need for the recipes you make. In my case, I went with half-pint jars. Whatever size you choose, be sure they are straight-sided jars. Jars with "shoulders" are more prone to breaking in the freezer.

Why nothing more than extra virgin olive oil, salt and coarsely ground pepper on the tomatoes? Because I'll be using them in American, British, Indian, Italian and Mexican dishes, each requiring different aromatics, herbs and spices. So just keeping it simple! 

Simple Roasted Tomatoes for the Freezer / www.delightfulrepast.com
Please Pin it and share it!

Oven-Roasted Tomatoes


(Makes 1 half sheet pan, 2 or 3 half-pint jars)

2 tablespoons (1 fluid ounce/30 ml) extra-virgin olive oil, divided
About 2.5 to 2.75 pounds/1.13 to 1.25 kg ripe tomatoes
1/8 teaspoon or more salt
1/8 teaspoon or more coarsely ground black pepper

1 Line a half sheet pan with parchment paper. Brush with 1 tablespoon of olive oil. Preheat oven to 400F/205C/Gas6.

2 Wash and dry tomatoes, cut away the stem and stem scar. Slice tomatoes about 1/3 inch/1 cm thick. Place in a single layer on the parchment-lined and oiled half sheet pan. Drizzle 1 tablespoon of olive oil over the tomatoes, rubbing it around with your fingers, or brush it on. Sprinkle with salt and pepper.

3 Place in preheated oven for about 45 minutes or more, depending on the thickness and juiciness of the tomato slices. When they are done to your liking, at least shrunken and a bit shriveled, let them cool on the pan for a few minutes. Spoon them into jars, leaving about 1/2 inch of headroom, put on the lids.

Simple Roasted Tomatoes for the Freezer / www.delightfulrepast.com


Disclosure: We are a participant in the Amazon Services LLC Associates Program, an affiliate advertising program designed to provide a means for us to earn fees by linking to Amazon .com and affiliated sites. We are a ThermoWorks affiliate, earning a small commission at no cost to you on purchases made through our links. This helps cover some of the costs of running the blog. Thank you for your support. 

Jean

05 July 2018

Tomatillo Salsa Verde - For Streamlined Cooking

Tomatillo Salsa Verde - For Streamlined Cooking / www.delightfulrepast.com

My Tomatillo Salsa Verde might be a little different from those meant to be used as a salsa. I developed this formulation to be used in my recipes. It’s such a timesaver having jars of this in the freezer for days when I’m craving Chili Verde, for example, but don’t have the time or energy to make it the regular way.

As you might recall, I was crestfallen when Muir Glen discontinued their jarred crushed organic tomatillos that were such a timesaver. So my initial idea was to make my own and freeze it in jars. Then I thought how convenient it would be to have all the ingredients except the pork and the cilantro garnish made ahead.

So, working off my Chili Verde recipe, I came up with this recipe that makes just the right amount for two batches of Chili Verde. I divide it between two wide-mouth quart jars and pop them in the freezer, or use one now and freeze one.

Some of my favorite recipes can be quite time consuming, and I'm actually in the process of streamlining some of them so that we can enjoy them more often. So if that sounds good to you, be sure to follow me and stay tuned!


Tomatillo Salsa Verde - For Streamlined Cooking (this photo - the raw ingredients in a saucepan) / www.delightfulrepast.com

Tomatillo Salsa Verde


(Makes a little more than 6 cups)

2 pounds tomatillos, husked and quartered
1 medium (about 12 ounces/340 grams) yellow onion, cut into 1-inch chunks
1 27-ounce can whole mild green chiles
1 4-inch jalapeno pepper, halved lengthwise, seeds and ribs removed, coarsely chopped
1 teaspoon salt
1 teaspoon cumin
1 teaspoon oregano
1 cup (8 fluid ounces/237 ml) water
2 tablespoons fresh lime juice

1 In 3- to 3.5-quart saucepan, bring all ingredients to a boil. Reduce heat and simmer uncovered for 15 minutes or until tomatillos are tender and starting to fall apart. Let cool for 15 minutes.

2 Using an immersion blender, blend mixture until it reaches desired texture. If you don’t have an immersion blender, let it cool more and then transfer to a blender or food processor.

3 Refrigerate, if using within a few days. To freeze, put in wide-mouth quart jars or other glass freezer containers. When ready to use frozen salsa, transfer from freezer to refrigerator about 24 hours before.

Canning Jar Info: Sometimes I use four pint jars rather than two quart jars. A wide-mouth pint jar is freezer safe, but a pint jar does not hold a pint of food. The pint (2 cups or 16 fluid ounces) is the to-the-brim measure. The fill line for freezing is just a bit above the 12-ounce line, so you can put just a bit over 1.5 cups of food to be frozen.

Tomatillo Salsa Verde - For Streamlined Cooking / www.delightfulrepast.com
Don't forget to Pin it and share it!

Disclosure: We are a participant in the Amazon Services LLC Associates Program, an affiliate advertising program designed to provide a means for us to earn fees by linking to Amazon .com and affiliated sites

Jean

15 June 2017

Coronation Chicken Tea Sandwiches

Coronation Chicken Tea Sandwiches (my version is less sweet than most) / www.delightfulrepast.com

Coronation Chicken Tea Sandwiches popped into my head this week, mainly because I wanted an excuse to use my new tea set. Our dear friends in New Mexico came for a visit and brought me their Old Country Roses tea set, something they no longer use, having gone over to the dark side, coffee!

Like me, these friends run a tight ship - and do a far better job of it than I! They don't like to have unused things cluttering up their cupboards or garage. So Julia asked me before they left home if I'd like to have the set. But of course, darling! But it meant making a place for it by getting rid of at least as many pieces.

Several days before they arrived I boxed up the teapot and other items to be donated and said goodbye to them. They were all things I liked, but not as much as I was going to like the Old Country Roses tea set and thinking of our friends every time we use it.

I don't have the time or energy just now for a tea party, so I just made some sandwiches and tea and pulled some Bakewell Tart Traybake squares from the freezer. Didn't make Scones, which is a shame since I also have a jar of my homemade Clotted Cream in the freezer.

Many recipes for Coronation Chicken call for Major Grey's chutney, but I don't always have that product on hand. Certainly didn't want to buy a jar (and have most of it go to waste!) just for a small batch of Coronation Chicken. So I just used some of the chutney ingredients in my recipe.

Are you a Coronation Chicken fan? When it's made with chutney, it's much too sweet for my taste. But made my way, I really like it. What is your favorite tea sandwich?

Update 05/30/18: I just discovered Fallue - The Traditional Norman Brioche, which is the perfect bread for these sandwiches!

Coronation Chicken Tea Sandwiches (my version is less sweet than most) / www.delightfulrepast.com
Don't forget to Pin it!

Coronation Chicken Tea Sandwiches


1/4 cup sliced (flaked) or slivered almonds
2 tablespoons extra virgin olive oil
1 pound (454 grams) boneless, skinless chicken breasts
1/4 teaspoon salt
1/4 teaspoon coarsely ground black pepper
2 tablespoons finely chopped onion

1/4 cup finely chopped dried mango or apricot
2 tablespoons dried currants
3/4 to 1 1/4 teaspoons curry powder
1/8 to 1/4 teaspoon dry mustard
1 tablespoon red wine vinegar

1 teaspoon apricot preserves, optional (for those who want to add a bit more sweetness) 
1/2 cup mayonnaise
1 tablespoon freshly squeezed lemon juice
16 slices buttermilk bread (or other soft, "wide" bread)
1 stick (4 ounces/113 grams) unsalted butter, very soft


1 In dry skillet, toast the almonds over medium heat, stirring frequently. Remove to bowl to cool.

2 In same skillet, still hot, heat the olive oil. Add the chicken breasts and cook, loosely covered, over medium-low heat about 15 minutes on each side, depending on the thickness of the pieces. Season each side of chicken with 1/8 teaspoon each salt and pepper. Remove to plate to cool.

3 Add onion to skillet and cook until very soft, about 5 minutes. Stir in dried fruits, curry powder, dry mustard, red wine vinegar and apricot preserves; cook over low heat for about 3 minutes. Remove to bowl to cool.

4 Chop the cooled toasted almonds and put in a 1.5-quart bowl. Chop the cooled chicken and add it to the bowl. Stir in the onion-dried fruit mixture. Stir in the mayonnaise and lemon juice. Taste and adjust seasoning. Cover and chill for at least an hour before assembling sandwiches.

5 Spread each slice of bread thinly with softened butter. Divide the chicken salad (about 1/4 cup each) among the 8 bottom bread slices. Top with remaining buttered bread slices. Trim off crusts and cut each sandwich into four fingers or triangles, arranging on a plate in about three layers.

6 Lay a good-quality un-dyed paper towel on top of the sandwiches. Wet and wring out well another paper towel; lay the damp paper towel on top of the dry paper towel. Never place the damp paper towel directly on top of the sandwiches or they will become soggy. Wrap rather snugly with plastic wrap; refrigerate for at least an hour or up to several hours. This will make your sandwiches “hold together” and keep them from drying out. Remove from refrigerator and uncover sandwiches just before serving.

Jean

05 May 2016

Pasta with Chicken and Spring Vegetables - and Why I'll Never Be a Minimalist


Pasta with Chicken and Spring Vegetables / www.delightfulrepast.com

I've been reading a lot about minimalism and decluttering in recent years. I admire minimalists, but I know I'll never be a real one. Though I like to keep my possessions down to MY minimum, I'll never get them pared down to the point where I can actually count them. 

Having grown up with a mother who, shall we say, kept a huge inventory, I was always determined to not get carried away. Since a very dear maternal aunt, unchecked by a husband as my mother was, really had a problem, I figure a predisposition to hoarding is in my genes, so I am ever vigilant.

When my adult life began, I knew instinctively that having a small house, small garage and no storage sheds or off-premise storage units would help keep a lid on things. And I've followed the one-in-one-out rule for decades, so my limited storage space is never outgrown.

In a post at the beginning of 2015 I wrote about tackling a specific issue (no, I'm not going to tell you here, you'll just have to read it!). It took nearly the entire year, but the gradual process not only solved the problem but actually seems to have cured the root cause.

Lately I've been feeling the need to get rid of more things, not to make space for new things, but just to enjoy the space. Please understand that I do not mean this as a criticism of people who are enjoying their stuff. I'm not one of those people who feels superior about whatever it is I'm up to at any given time.

Here's something (actually, 20 "somethings") that's going out in this latest purge. Snack sets. They were given to me by the aforementioned dear aunt many years ago. 

Vintage Snack Set / www.delightfulrepast.com
Hazel-Atlas Glass Company, Pattern Number 1305, Ball & Ribbed Design
Snack Plate and Cup Set aka Snack Sip and Smoke Set

Can you see that slot where the handle of the little spoon is resting? That was actually made to hold a cigarette! That little section of the snack plate is, yes, a built-in ashtray! (I googled "glass snack set with built-in ashtray" and found a seller on Etsy calling them "Snack Sip and Smoke Sets.") My aunt couldn't recall what year she bought these, just that they were from the heyday of smoking during the 40s and 50s. She never smoked (and, consequently, lived to nearly 95) but was fascinated by that feature.

When I used them for tea parties, I got the brilliant idea of using that slot for the tiny spoons I use for tea. These snack sets are really lovely for bridal and baby showers because the cup can be used for punch, coffee or tea, and the plate is large enough to hold some serious snacks.

But I no longer do events like that in my home. I will make food or bake and decorate a cake for such occasions held at a friend's house, but I don't foresee ever again having more than a dozen people over. So these, lovely as they are, can go. It's time. I still have plenty of china for my afternoon teas and dinners.

Why will I never be a minimalist? I'm in the business of food, and that involves a lot of equipment. But I'll be cutting back. Really. I will. In the meantime, finally, here's ...

The Recipe


Springtime Pasta / www.delightfulrepast.com

Springtime Pasta

Farfalle with Chicken and Spring Vegetables


(Serves 4)

8 ounces farfalle (bow-tie pasta), cooked according to package directions
3 tablespoons extra-virgin olive oil
1 pound boneless, skinless chicken breast, cut into bite-size pieces

3/4 teaspoon salt, divided
3/4 teaspoon coarsely-ground black pepper, divided
2 tablespoons finely minced shallot
3/4 pound thin asparagus, cut into 1½-inch pieces
1/2 pound young sugar snap or Chinese pea pods
1 large red bell pepper, julienned
1/2 cup dry white wine
1/2 cup heavy cream (I use Organic Valley)
1 to 3 tablespoons chopped fresh dill, more for garnish
1/2 cup freshly grated (not shredded) Parmesan


1 Forty-five minutes before serving time, start heating 4 quarts water with a tablespoon of salt for cooking pasta. Prepare ingredients. 

2 Five minutes before adding pasta to the boiling water, start sauce. In 12-inch skillet which has a lid, heat olive oil. Pat dry the chicken pieces and season with 1/4 teaspoon each salt and pepper. Add to hot oil and cook, stirring, over medium-high heat until lightly browned, about 5 minutes.

3 Add minced shallot and continue cooking for a minute or two. Add wine and deglaze pan. Add asparagus (except tips), pea pods, red bell pepper and 1/2 teaspoon each salt and pepper. Cover and cook over medium heat until vegetables are nearly crisp-tender, about 2 or 3 minutes. 

4 Uncover and stir in asparagus tips, cream and dill. Simmer for 2 minutes. Stir in Parmesan; taste and adjust seasoning (it's important to stir in the Parmesan before adding more salt). Pour over hot, drained pasta. Mix well, divide onto four warm plates, and garnish with more dill and Parmesan. 


(Recipe first posted 09 May 2013. I was making it this week and thought I'd see if I couldn't take a better photo of it than I did three years ago. Not sure that I did! New one at top of post, old one just above the recipe.

01 January 2015

In My Kitchen - January 2015


I was invited by Celia at Fig Jam and Lime Cordial to write a post to link to her In My Kitchen, a series that gives us a peek into the kitchens of food bloggers around the world. Celia started her blog in February 2009, one year before Delightful Repast debuted in February 2010. She tells wonderful stories and shares my passion for bread. 
"If thou tastest a crust of bread, thou tastest all the stars and all the heavens." ~ Robert Browning
In My Kitchen ... 

... January means it's time to make marmalade. Though I'm in the US, I follow the British tradition of making marmalade in January. If I can get my hands on some organic Seville oranges (the highly acidic orange of marmalade tradition), I'd like to make a batch and see how it compares to my Kumquat Marmalade. The pantry (or larder) is down to just a few jars of Satsuma and Meyer Lemon Marmalade.


And, of course, marmalade calls for excellent toast. Though I love my English Muffin Toasting Bread for toast, this month the sourdough saga continues! My Sourdough Starter is very vigorous, producing fabulous loaves of Sourdough Sandwich Bread as well as other loaves I've not yet blogged about. If you haven't tried it yet, I hope you will soon. 


January is a great month for organizing. I'll be collecting things from all over the house to donate. From the kitchen, a pair of bread pans I haven't used in decades because I upgraded. There's more stuff, but I'm afraid that little project will have to be postponed until later in the month as I have finally tackled a huge project in my office: magazines

Over the years I have accumulated more than a thousand magazines, and it's time for them to go! Some are issues of magazines I've written for, some are magazines that my mother had collected and I've held onto for sentimental reasons. Mind you, these are all housed on bookshelves in an orderly fashion; nevertheless, I've decided they are clutter that is weighing me down. 

A lifelong magazine lover, I have an eclectic collection. Of course, there are many years' worth of Bon Appetit, Saveur, Food and Wine, etc. And I love British magazines, which are so expensive here that I tend to hang onto them forever. I just pulled out a few British editions of House Beautiful and Ideal Home that are from 1993! You think it's time to let them go?! 

In 2015 I will not be subscribing to any magazines, and I will be letting all existing subscriptions lapse. No matter how fantastic the deal is, I'm going to Just Say No! I'm going cold turkey, baby! I keep telling myself it's just for one year. Hope I can do it. "One day at a time" and all that, right? 

Whew! After that confession I might have to go have a bit of a lie-down. If you're an "out-there," "tell-all" extravert, that might not seem like a big deal to you. But to an introvert like me, that was a real gut-wrenching soul-baring of epic proportions! Yes, a bit of a lie-down is definitely what's needed. Oh, and could someone fetch me a nice cuppa tea?