Showing posts with label French food. Show all posts

16 December 2022

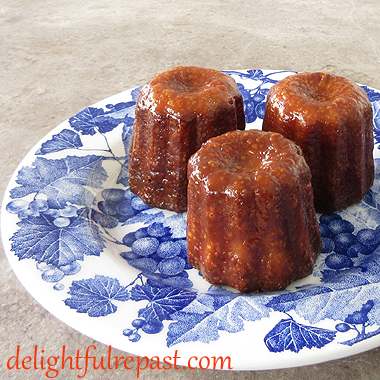
Cannelés - A Small French Pastry That Originated in Bordeaux

Canneles - A Small French Pastry That Originated in Bordeaux / www.delightfulrepast.com

Cannelés
(sometimes spelled canelés, and pronounced CANuhLEE, actually not quite LEE and not quite LAY) have been on my must-make list for literally (and I don't use that word lightly) decades. 

But every time they occur to me happens to coincide with a time when I am trying mightily to not add another specialty item to my batterie de cuisine collection! Some of you know what I'm talking about, right?

As recently as perhaps 15 years ago, I would have only been satisfied with the very pricey individual tin-lined copper molds and would have gone to great lengths to procure food-grade beeswax to coat the interiors, etc, etc. Well, I am soooo over all that!

When my latest reminder of cannelés came from David at Cocoa and Lavender, well, I could hold out no longer and ordered the same pan he recently acquired. He started his blog at the same time I did, with recipes ranging from simple to complex, like mine; and a love of food that, like mine, goes back to his childhood and his mother's amazing cooking. He also has an allergy, like mine, to garlic! So naturally I assumed that I could trust his choice of cannelés molds.


Canneles - A Small French Pastry That Originated in Bordeaux / www.delightfulrepast.com


So I ordered a pan and started digging through my files, remembering that I had come up with a recipe many years ago that was a mishmash of ones I had looked at and added my own touches to. The main differences between recipes is in the baking time and temperature. 

Most call for at least the first 10 to 20 minutes at a very high (some as high as 500F/260C/Gas10) temperature. One recipe said to bake at 400F/205C/Gas6) for 2 hours! Really?! 

Every recipe I've seen calls for way more sugar than I like. First batch I made, I cut the sugar to 3/4 cup but found them still a bit too sweet (you won't!), so next time I went to 1/2 cup. It was plenty sweet enough for me, but it made the texture all wrong, no longer cannelés, so I'm going to stick with my original 3/4 cup.

One type of cannelés molds I never considered is the silicone. I have never tried a silicone baking "pan" of any kind. They just do not appeal to me in any way. If you like them, fine. But I just, no, just, no. A baking tin, or pan, should not be squishy!

A delightful after-dinner dessert or coffee go-with, cannelés are perfect for the afternoon tea table, along with Fruit Tartlets and petite Cream Puffs.  

So tell me, have you ever made cannelés? What kind of molds—silicone, tin-lined copper, other metal? What degree of caramelization do you prefer—golden, light brown, dark brown, black?


Canneles - A Small French Pastry That Originated in Bordeaux / www.delightfulrepast.com

If you like it, please Pin it and share it!

Cannelés


(Makes 12, if you're using the same size molds)

2 cups (16 fluid ounces/473 ml) milk
3 tablespoons (1.5 ounces/43 grams) unsalted butter
3/4 dip-and-sweep cup (5.25 ounces/106 grams) unbleached all-purpose flour
3/4 cup (5.25 ounces/149 grams) sugar
1/4 teaspoon salt
2 large eggs (medium, in UK and some other places)
2 large egg yolks
1/4 cup (2 fluid ounces/59 ml) dark rum
2 teaspoons vanilla extract

1 In 1-quart saucepan, heat the milk and butter until the butter is melted and the milk is up to a simmer; do not boil.

2 In medium mixing bowl, whisk together the flour, sugar, and salt vigorously for 1 minute to "sift."

3 Add the eggs, yolks, rum, and vanilla extract to the flour mixture and whisk vigorously until smooth. When smooth, whisk in the hot milk a third at a time. This ensures a lump-free batter that doesn't need straining.

4 Cover and refrigerate for 24 to 72 hours.

5 When ready to bake, put a sheet of aluminum foil on the shelf beneath the shelf you'll be placing the pan on (the foil will catch any butter drips) and preheat oven to 425F/220C/Gas7. In small bowl (microwave) or pan (stovetop), melt 2 teaspoons of solid shortening* and brush the molds with it.

* I keep a stick of Crisco in my refrigerator strictly for greasing certain pans. Many pans do a great job of releasing cakes that have been buttered, buttered and floured, oiled, or sprayed. But for pans that are molds (such as these and Bundt cakes), shortening always gives me a good result and does not gum up the pan as some oils do.

6 Whisk the batter a bit. If a skin has formed, just whisk it in. Fill each mold to within about 3/8 inch (1 cm) of the top.

Note: For this pan, I use a 1/3-cup measuring cup as a ladle to fill the molds with the 1/4 cup of batter they need. Using a 1/4-cup measuring cup as a ladle actually fills them with less than 1/4 cup due to the concave meniscus of the liquid (or something like that!). 

7 Place the cannelés pan in the preheated oven. Bake for 20 minutes, then reduce heat to 375F/190C/Gas5 and bake for about 50 to 60 minutes, or until they are as deeply caramelized as you like them. Some people go for nearly black. Rotate pan halfway through for more even baking.

8 Turn the cannelés out onto a wire rack to cool. If any of the cannelés are not adequately or evenly caramelized, set them right side up on a small baking sheet and return them to the oven for 5 minutes or so. Allow them to cool for 2 hours before serving. This allows time for the exterior to crisp and the interior to set to the proper consistency. The crispy exterior will last for perhaps 6 hours. After that it will soften, and the cannelés will still be delicious but the characteristic crunch will be gone. They can be reheated and left to cool again to refresh them.

* Pan details: ChefMade WK9158 carbon steel 12-cup nonstick cannele mould, oven safe up to 450F/230C/Gas8, handwash only, made in China.

Disclosure: We are a participant in the Amazon Services LLC Associates Program, an affiliate advertising program designed to provide a means for us to earn fees by linking to Amazon .com and affiliated sites. We are a ThermoWorks affiliate, earning a small commission at no cost to you on purchases made through our links. This helps cover some of the costs of running the blog. Thank you for your support.

Jean

If you liked this post, please Pin it and share it!

10 December 2020

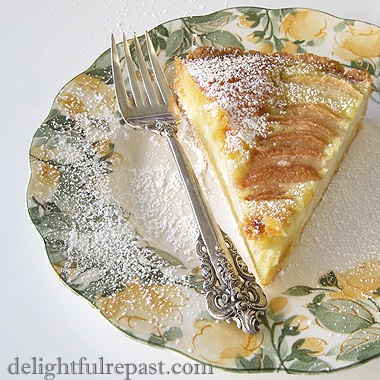
Pear Frangipane Tart - Tarte a la Frangipane aux Poires

Pear Frangipane Tart - Tarte a la Frangipane aux Poires / www.delightfulrepast.com

Pear Frangipane Tart is the perfect "something different" autumn and winter dessert. Of course, I would have made it easier on myself if I'd just sliced the pear halves instead of deciding to get cute and do pear quarters, which gets a bit fiddly.

Some people poach the pears first, but it's not necessary and I actually prefer the tart made with raw pears. And regular readers know I love to use wine, sherry, brandy, rum, and liqueurs in my cooking and baking, but not in this. The delicate flavor of the pears is easily overwhelmed. 

Pear Frangipane Tart - Tarte a la Frangipane aux Poires (this image my original watercolor painting) / www.delightfulrepast.com
I have fun posing the produce for my watercolor sketching
while I wait for it to reach the perfect stage of ripeness.

And if you're tempted to splash in more than the 1/4 teaspoon of almond extract, please resist. It's a very powerful flavoring, and just the tiniest bit is needed to enhance the flavor of the almond filling. The crisp buttery pastry is the third delicate flavor in this delightfully subtle tart.

I like pairing this with a nice cup of Darjeeling, a tea with subtleties of its own! How about you?   


If you like it, please Pin it and share it!

Pear Frangipane Tart

(Makes one 9-inch/23cm tart, 8 servings) 

The Pastry - Pâte Sucrée (a sweet shortcrust pastry) 

1 1/4 dip-and-sweep cup (6.25 ounces/177 grams) unbleached all-purpose flour
1/8 packed cup (0.5 ounce/14 grams) unsifted powdered sugar
1/4 teaspoon salt
1 stick (4 ounces/113 grams) cold unsalted butter, cut into 1/2-inch cubes
1 large egg yolk (reserve white for filling)
1 tablespoon water, milk or cream 

The Filling - Frangipane

1/2 cup (4ounces/113 grams) unsalted butter
1/2 cup (3.5 ounces/99 grams) sugar
1 firmly packed cup (4 ounces/113 grams) super-fine almond flour (ground almonds)
2 large eggs, room temperature
1 large egg white
1/4 teaspoon almond extract
1/8 teaspoon salt 

The Pears 

2 medium (7 ounces/198 grams each) firm-ripe pears (Anjou, Bartlett, Bosc, Comice)
1/4 cup apricot preserves, heated and strained


1 Add flour, powdered sugar and salt to work bowl of food processor; turn on for about 3 or 4 seconds to combine. Add chunks of butter; pulse to a crumb texture. Add egg yolk and liquid; pulse until the dough starts clumping together. This is to be a crisp, more cookie-like crust, rather than a flaky pastry; so there's not quite the concern about over-processing. Flatten slightly into a 4- to 6-inch round disc, wrap and refrigerate for 30 to 60 minutes. 

2 Lightly butter a 9-inch/23cm tart tin (1-inch deep) and set it on a baking sheet. On lightly floured 12-inch square of baking parchment paper or aluminum foil, roll out the pastry to a 12-inch circle. Transfer dough to tart tin, pressing dough (but not stretching it) to fit the tin. Save the parchment or foil; you're not done with it. With scissors or knife, trim the overhanging pastry to 1/2 inch all around. Fold it in and press it to the sides to form a thicker side crust. Trim the edges* by rolling the rolling pin over the top. Press the pastry into the flutes so that it rises a bit above the edge (in case of shrinkage). Pop it in the freezer for 15 minutes while you preheat the oven to 375F/190C/Gas5.

3 Cover chilled pastry with the reserved piece of parchment or foil, clean side up, pressing it to fit well (the parchment works best if you was it up then smooth it out). Spread 2 cups of ceramic pie weights (that's two packages of Mrs. Anderson's ceramic pie weights), also called ceramic baking beans in the UK, over the parchment or foil. Bake for 15 minutes. Remove parchment or foil and weights; continue baking for 10 minutes, until lightly browned to a pale golden. Let stand to cool a bit.

4 While pastry is cooling, make the filling. In 2-quart saucepan over medium heat, melt the butter. Take off heat, and stir in the sugar, then the ground almonds, eggs, almond extract and salt until well combined. 

5 Peel, half, and core the pears. Slice each half in half again vertically and then horizontally into 1/4-inch slices 1/8-inch (3 mm) slices; keep together. Pour frangipane filling into cooled pastry. Lift each quarter and place evenly in the filled tart shell and flatten and fan the quarters slightly.  

6 Bake (with tart tin on baking sheet) for about 35 to 45 minutes (Love my TimeStick timer). Transfer to wire rack to cool.

7 Optional: In small saucepan over low heat, melt the apricot jam and strain it into a small bowl. With a pastry brush, apply a thin coating of jam to just the pears. 

8 Cool to room temperature, about 1 hour. Remove from tin. Serve at room temperature. Dust with sifted powdered sugar just before serving.

Disclosure: We are a participant in the Amazon Services LLC Associates Program, an affiliate advertising program designed to provide a means for us to earn fees by linking to Amazon .com and affiliated sites. We are a ThermoWorks affiliate, earning a small commission at no cost to you on purchases made through our links. This helps cover some of the costs of running the blog. Thank you for your support. 

Jean

13 February 2020

French Almond-Rum Cake - Gateau Nantais

French Almond-Rum Cake - Gateau Nantais / www.delightfulrepast.com

Gateau Nantais (pronounced GAT-toe nahn-tay, sort of) is a traditional cake of Nantes, a city on the delta of the Loire in western France. The city is famous for its fleur de sel and its salted butter, so its inhabitants might be outraged that I have made the famous cake with unsalted butter, but organic unsalted butter is the only kind of butter I ever use.

If you make this recipe with salted butter, reduce the salt from 1/2 teaspoon to 1/4 teaspoon. Most versions of the recipe call for a good deal more rum than I've used, though I think I've used a drop more of it than did Phil, from whose blog, As Strong As Soup, I first heard of the cake some years ago. So I'll leave the amount of rum up to you.


French Almond-Rum Cake - Gateau Nantais / www.delightfulrepast.com


With mostly almond flour and just a tiny amount of wheat flour, the cake is so close to gluten-free I thought I'd just use a gluten-free flour blend and make it a cake I can serve to my GF friends. But you can just use regular all-purpose flour as well. It's lovely and delicious with toasted sliced almonds on top, but I went traditional with this one.

Of course, you can eat it right away, but this cake is even better the next day. So do make it the day before you plan to serve it. And, if you like, please Pin it and share it. This was a lovely cake to celebrate my 10th blogiversary!


French Almond-Rum Cake - Gateau Nantais / www.delightfulrepast.com
  

French Almond-Rum Cake - Gateau Nantais


(Makes one 7-inch round cake)

The Cake

1/3 dip-and-sweep cup (1.67 ounces/47 grams) gluten-free 1 to 1 Baking Flour or unbleached all-purpose flour
3/4 teaspoon non-GMO baking powder
1/2 teaspoon salt
3 large eggs (medium in UK)
1 stick (4 ounces/113 grams) unsalted butter, room temperature
3/4 cup (5.25 ounces/149 grams) sugar (I use 1/2 cup)
1 1/4 cups (4.5 ounces/128 grams) almond flour*
1 to 2 tablespoons (0.5 to 1 fluid ounce/15 to 30 ml) dark rum

1/8 teaspoon almond extract

* I use Bob's Red Mill Super-Fine Almond Flour From Blanched Whole Almonds

The Syrup

1 1/2 tablespoons (0.64 ounce/18 grams) sugar
3 tablespoons (1.5 fluid ounces/ml) water
1 tablespoon dark rum

The Glaze

3/4 packed cup (3 ounces/85 grams) powdered sugar
1/16 teaspoon (a pinch) salt
2 teaspoons dark rum

2 teaspoons water, a bit more if needed

The Optional Garnish

1/4 cup (1.125 ounces/32 grams) sliced almonds, toasted


1 Preheat oven to 350F/180C/Gas4. Generously butter a 7-inch/18 cm round cake tin or removable-bottom pan. Put a round of baking parchment paper in the bottom and butter it as well. 


2 In a small bowl, vigorously whisk together the flour, baking powder and salt. In a 2-cup glass measure or small bowl, lightly beat the eggs.

3 In a stand mixer, or using an electric hand mixer and large bowl, cream the butter and sugar together until light and fluffy, about 3 to 5 minutes. Scrape the bowl, then add the almond flour, beating on medium speed just until incorporated, about 1 minute.

4 Add the eggs, about a third at a time, beating for about 20 seconds after each addition. On medium-high speed, beat until light and fluffy, about 3 minutes. On low speed, gradually mix in the flour just until incorporated. With silicone spatula, stir in the rum and almond extract and scrape the bowl. 

5 Scrape the batter into the prepared pan and smooth the surface. Bake for 50 to 55 minutes, until golden brown. 

6 During the last 20 minutes of baking, make the syrup. In 1-quart saucepan, combine the sugar and water. Bring to a boil, stirring until the sugar is dissolved, then boil for 3 minutes. Off heat, stir in the rum. Then simmer for 2 minutes.

7 When the cake is done, cool in pan on a wire rack for 5 minutes then turn it out onto a wire rack, bottom side up. Immediately peel away the baking parchment paper and brush the top and sides of the cake with the rum syrup. Cool completely, about 1 hour. Transfer to serving platter.


8 Make the glaze in a 1.5-quart mixing bowl. Vigorously whisk the powdered sugar and salt and smoosh out the big lumps, then whisk in the dark rum. Gradually whisk in enough water to make a rather thick (not too runny), smooth glaze. Pour the glaze onto the center of the cake, then spread it out toward the edges, letting a bit drip down the sides. An offset spatula (OXO Good Grips calls theirs a bent icing knife) is handy for the task. 

9 Optional: Sprinkle top with toasted sliced almonds. Let stand at room temperature for at least an hour. Cover with a cake dome and store at room temperature. Will keep for a few days, I suppose; but I don't know because I put half the cake in the freezer.

Disclosure: We are a participant in the Amazon Services LLC Associates Program, an affiliate advertising program designed to provide a means for us to earn fees by linking to Amazon .com and affiliated sites. We are a ThermoWorks affiliate, earning a small commission at no cost to you on purchases made through our links. This helps cover some of the costs of running the blog. Thank you for your support. 

Jean

12 December 2019

Pâte Brisée - Pie and Tart Crust

Pate Brisee - Classic French Pastry - perfect for pecan pie (as pictured), tarts, and quiches / www.delightfulrepast.com

Pie and tart crust is something I've been making since I was a teenager and, with the exception of Pâte Sucrée which is not supposed to be flaky, always with the aim of visible butter in the dough for maximum flakiness. I make my basic non-sweet pie crust, or pâte brisée, by whatever method suits my mood, by hand or in the food processor.

I know some people make it in a heavy-duty stand mixer, but all I've seen are still aiming for visible butter and a flaky crust. Then I saw Thomas Keller's recipe at The Splendid Table

As I commented at that site, "This flies in the face of everything I've read and practiced in many years of pie crust making, but I'm going to try it because Thomas Keller and Sebastien Rouxel said so! Sounds far easier to incorporate all the butter than to keep from incorporating it! Wonder how it will compare to my lovely flaky pastry. We shall see!" 


Pate Brisee - Classic French Pastry - perfect for quiches (as pictured here) or very sweet pies and tarts / www.delightfulrepast.com


So I put on my lab coat and headed into my laboratory, dusted off the stand mixer and tried it his way. He said this pâte brisée reflects his enduring respect for classical technique and is used for savory tarts, such as quiches, and for very sweet tarts. I used it for my Pecan Pie - Without Corn Syrup. And will use it for my Pecan Tart - Without Corn Syrup and Vegetable Quiche

I liked it! Have you tried it? What do you think?


Pate Brisee - Classic French Pastry - perfect for quiches or very sweet pies and tarts / www.delightfulrepast.com

Pâte Brisée 


Adapted from Bouchon Bakery Pate Brisee recipe 

(Makes 20 ounces/567 grams)

2 1/8 dip-and-sweep cups (10.625 ounces/301 grams) unbleached all-purpose flour, divided 
1/2 teaspoon salt 
2 sticks (8 ounces/227 grams) cold unsalted butter, cut into 1/4-inch cubes and chilled until very cold 
1/4 cup (2 fluid ounces/59 ml) ice water

1 Place 1 cup (5 ounces/142 grams) of the flour and the salt in the bowl of a stand mixer fitted with the paddle attachment; mix to combine. With the mixer running on low speed, add the butter a small handful at a time. When all the butter has been added, increase the speed to medium-low and mix for about 1 minute, until the butter is thoroughly blended. 

2 Scrape down the sides and bottom of the bowl. Turn the speed to medium-low, add the remaining 1 1/8 cup (5.625 ounces/159 grams) of flour, and mix just to combine. Add the water and mix until incorporated. The dough will come up around the paddle and should feel smooth, not sticky, to the touch. 

3 Remove the dough from the mixer and check to be certain that there are no visible pieces of butter remaining; if necessary, return the dough to the mixer and mix again briefly. 

4 Divide the dough into two equal pieces, pat each into a 5-inch disk and wrap in plastic wrap. Refrigerate for at least 1 hour, but preferably overnight. (The dough can be refrigerated for up to 1 day or frozen for up to 1 month.)

Disclosure: We are a participant in the Amazon Services LLC Associates Program, an affiliate advertising program designed to provide a means for us to earn fees by linking to Amazon .com and affiliated sites. We are a ThermoWorks affiliate, earning a small commission at no cost to you on purchases made through our links. This helps cover some of the costs of running the blog. Thank you for your support. 

Jean

19 September 2019

Fig Clafoutis - Clafoutis aux Figues

Fig Clafoutis - Clafoutis aux Figues / www.delightfulrepast.com

As the long hot summer seques into autumn, I'm still favoring easy but elegant recipes that will get me out of the hot kitchen as quickly as possible. Summer's cherries have been replaced in my affections by black mission figs.

Fig Clafoutis - Clafoutis aux Figues / www.delightfulrepast.com


Got in a supply today and thought of making a Fig and Frangipane Galette or a Fig Upside-Down Cake, but they both seemed like too much work on a hot day, so I went with that northern French classic we love, clafoutis (pronounced cla-foo-TEE). 

Fig Clafoutis - Clafoutis aux Figues / www.delightfulrepast.com


It's shocking to me the number of people who make a funny little face whenever figs are mentioned and claim to not like them, even though most of them have never tasted one. The flavor is like nothing else, sort of jammy, fruity, earthy. Though it looks "seedy," the interior is soft.

And they're such lookers! Beautiful inside and out. The velvety purple skin of the black mission fig is edible, so don't even think of peeling it. And the flesh comes in such beautiful shades of pink. The fig is actually an inverted flower, so it's no wonder it's so photogenic.

Are you a fan of figs?

Fig Clafoutis - Clafoutis aux Figues / www.delightfulrepast.com

Fig Clafoutis - Clafoutis aux Figues


(Makes 8 servings)

1/2 tablespoon unsalted butter, softened
1 tablespoon unsalted butter
3/4 pound (12 ounces/340 grams) fresh figs, halved lengthwise (quartered, if large)
1/2 cup (3.5 ounces/99 grams) sugar, divided
1/4 teaspoon cardamom or ginger, optional
3 large eggs

1 tablespoon brandy
1 teaspoon vanilla extract
1 teaspoon finely grated fresh orange zest
1/8 teaspoon salt
1/2 dip-and-sweep cup (2.5 ounces/71 grams) unbleached all-purpose flour
1 1/4 cups (10 fluid ounces/296 ml) milk
Garnish: powdered sugar

1 Preheat oven to 350F/180C/Gas4. Butter a Pyrex Easy Grab 9.5-Inch Deep Dish Pie Plate, not the standard 9-inch pie plate, with the 1/2 tablespoon softened butter. In a small dish, melt the tablespoon of butter and leave to cool slightly.

2 Place the halved (or quartered, as mine were) figs cut side up in prepared dish in a single layer. Stir together 1/8 cup sugar and cardamom; sprinkle evenly over the fruit.

3 In a 1-quart glass measure, whisk together the eggs, all but 1 tablespoon of the remaining sugar (save it to sprinkle on top), melted butter, brandy, vanilla extract, orange zest and salt. Whisk in the flour and then the milk, adding it gradually at first, to make a smooth batter. If it’s not as smooth as it should be, you can hit it with an immersion blender. Don’t drag out your blender for this one; a whisk will get the job done.

4 Pour the batter over the fruit. Sprinkle on the reserved tablespoon of sugar. Bake for about 45 minutes, until puffed and golden and browning around the edges and pulling away from the edges of the pan. Then it falls; that is perfectly normal.

5 Let stand 10 to 20 minutes before serving warm. Add a dusting of powdered sugar, if you like, just before serving. 


Disclosure: We are a participant in the Amazon Services LLC Associates Program, an affiliate advertising program designed to provide a means for us to earn fees by linking to Amazon .com and affiliated sites. We are a ThermoWorks affiliate, earning a small commission at no cost to you on purchases made through our links. This helps cover some of the costs of running the blog. Thank you for your support.

Jean

06 June 2019

Nonnettes - French Gingerbread Cakes

Nonnettes - French Gingerbread Cakes (or you can use other spices) / www.delightfulrepast.com

Nonnettes (pronounced no-net) are individual spiced cakes filled with a bit of marmalade, jam or curd. They originated in the Burgundy region of France during the Middle Ages. And to think, I've only just recently heard of them! So of course I had to make some. My starting point was the three versions posted by Phil of the delightful blog As Strong As Soup.

Les Nonnettes are moist and sticky and can be made with different combinations of spices, zests and fillings for variety. I've gone with the classic ginger and orange in this case, but plan to also make them with cardamom. There are no eggs in the recipe. But I might add one next time anyway.

I was going to use homemade marmalade in these, but I discovered the only marmalade left in my jam cupboard was a jar of kumquat marmalade I'd made in April 2014! It looked fine but tasted a bit off, so I used apricot jam instead. I don't think the marmalade would have killed us--at least I hope not, since I tasted it! 

I don't know what nonnettes were baked in back in the Middle Ages, but I used a 12-cup standard muffin tin because heaven knows I'm the last person who needs to be buying another specialty pan! 

As always, I've formulated my recipe to exactly fill that standard pan. If you use a different sort of pan, you will likely come up with a different number of cakes than my own precisely twelve.

Have you ever made, had, or even heard of, nonnettes? Please tell me I've not been alone in my ignorance!


Nonnettes - French Gingerbread Cakes (or you can use other spices) / www.delightfulrepast.com

Nonnettes - French Gingerbread Cakes


(Makes 12)

1/2 cup (3.5 ounces/99 grams) dark brown sugar
1/3 cup (4 ounces/113 grams) honey
1/3 cup (2.67 fluid ounces/79 ml) milk
1/3 cup (2.67 fluid ounces/79 ml) water
6 tablespoons (3 ounces/85 grams) unsalted butter
1 3/4 dip-and-sweep cups (8.75 ounces/248 grams) unbleached all-purpose flour
2 teaspoons non-GMO baking powder
1 teaspoon baking soda
1/2 teaspoon salt
1 1/4 teaspoons ginger
3/4 teaspoon cinnamon
1/4 teaspoon allspice
1/4 teaspoon cloves
Finely grated zest of a medium orange
6 teaspoons orange marmalade or a jam
5 tablespoons (1.25 ounces/35 grams) powdered sugar

About 4 teaspoons of juice of the zested orange

1 Butter well a 12-cup standard muffin tin. In a 3-quart saucepan, heat together the brown sugar, honey, water, milk and butter until the butter is melted and the mixture is smooth. Remove from heat.

Note: Why such a large saucepan for that small quantity, you might ask. Because then you can add the flour mixture to the pan, instead of the other way around, and just have one messy thing to clean up.


2 In 1.5-quart mixing bowl, whisk together flour, baking powder, baking soda, salt and spices, whisking well to "sift." 

Note: I rarely sift flour anymore. It really only needs aerating, which can be done quite easily with a half minute or so of vigorous whisking.

3 Add the flour mixture to the warm honey mixture and whisk together until combined. Stir in the orange zest. 

4 Using a 1/4-cup measuring cup, divide batter evenly among the 12 muffin cups. If the batter feels quite warm, cover* the muffin tin and refrigerate for 15 to 30 minutes. Preheat the oven to 350F/180C/Gas4.

* I love that my muffin tin comes with a cover!

5 With your oiled finger or similar sized object, make a hole in the center of each cup and put in 1/2 teaspoon of marmalade or jam. Bake for about 16 to 20 minutes, until they are golden brown and spring back when pressed gently in the center. Let the cakes cool in the tin for about 5 minutes so you can handle them. They have to be removed individually from the pan, rather than just turning them out, so that the jam doesn't run out. 


Note: I used the handle of a wooden spoon and rubbed olive oil on it about every three cakes. You need to put the jam in shortly after making the hole or it will simply close up. Next time, I'll make the hole about an inch deep and bring the batter back over the hole after it is filled.

6 While still warm, whisk together a simple glaze of sifted powdered sugar and orange juice. Apply the thin glaze to the warm cakes with a pastry brush. Cool completely before storing in an airtight tin. Good served right away, they are said to be even better after being stored in the airtight tin for a day or two and will keep for up to a week. 

Disclosure: We are a participant in the Amazon Services LLC Associates Program, an affiliate advertising program designed to provide a means for us to earn fees by linking to Amazon .com and affiliated sites. We are a ThermoWorks affiliate, earning a small commission at no cost to you on purchases made through our links. This helps cover some of the costs of running the blog. Thank you for your support. 

Jean

18 April 2019

Cherry Clafoutis - Clafoutis aux Cerises

Cherry Clafoutis - Clafoutis aux Cerises - the classic rustic yet elegant French dessert / www.delightfulrepast.com

Cherry Clafoutis (pronounced cla-foo-TEE) is the original clafoutis from the Limousin region of France. Limousin is also the home of the famous oak used in barrels for aging wine and brandy. But that is neither here nor there. We’re talking dessert. One so good it spread from there all over the country in the 19th century.

Throughout winter I was making Cranberry-Apple Clafoutis—I like to eat with the seasons—but now that cherry season is nearly upon us, I could no longer put off the classic Cherry Clafoutis. But the season isn’t quite here, so I used frozen cherries for this one. I have no patience.


Cherry Clafoutis - Clafoutis aux Cerises - the classic rustic yet elegant French dessert / www.delightfulrepast.com


The texture of this rustic yet elegant dessert, somewhere between a cake and a custard, needs to be right. Where cooks can go wrong is adding too much flour, making the clafoutis decidedly cakey or at least cakier than it should be. But, to paraphrase Hamlet:

To pit, or not to pit: that is the question. Traditionally the pits are left in, supposedly to allow them to impart a bit of almond-y flavor to the dish; but I think it was because some lazy busy cook decided to skip that step, made up that little story and, voilà, people fell for it! You know I love tradition, perhaps more than most, but I’m also fond of my teeth.

Not to mention, Mr Delightful does not like dealing with pits privately, let alone publicly. Nor would he like sitting at the dinner table watching several people dealing with pits simultaneously. And where would they put them, I ask you.


Cherry Clafoutis - Clafoutis aux Cerises - the classic rustic yet elegant French dessert / www.delightfulrepast.com
Don't forget to Pin it and share it!

Cherry Clafoutis


(Makes 8 servings)

1/2 tablespoon unsalted butter, softened
1 tablespoon unsalted butter
2 to 2 1/2 cups pitted fresh sweet cherries, (from about 16 ounces/454 grams whole cherries)
OR 1 10-ounce bag frozen organic pitted sweet cherries
1/2 cup (3.5 ounces/99 grams) sugar, divided
1/8 teaspoon cinnamon
3 large eggs
1 tablespoon brandy

3/4 teaspoon vanilla extract
1/4 teaspoon almond extract
1/8 teaspoon salt
1/2 dip-and-sweep cup (2.5 ounces/71 grams) unbleached all-purpose flour
1 1/4 cups (10 fluid ounces/296 ml) milk

Garnish: powdered sugar

1 Preheat oven to 350F/180C/Gas4. Butter a Pyrex Easy Grab 9.5-Inch Deep Dish Pie Plate, not the standard 9-inch pie plate, with the 1/2 tablespoon softened butter. In a small dish, melt the tablespoon of butter and leave to cool slightly.

2 Spread the pitted cherries (if using frozen cherries, there’s no need to thaw) in prepared dish in a single layer. Stir together 1/8 cup sugar and cinnamon; sprinkle evenly over the fruit.

3 In a 1-quart glass measure, whisk together the eggs, all but 1 tablespoon of the remaining sugar (save it to sprinkle on top), melted butter, brandy, vanilla extract, almond extract and salt. Whisk in the flour and then the milk, adding it gradually at first, to make a smooth batter. If it’s not as smooth as it should be, you can hit it with an immersion blender. Don’t drag out your blender for this one; a whisk will get the job done.


4 Pour the batter over the fruit. Sprinkle on the reserved tablespoon of sugar. Bake for 45 to 50 minutes, until puffed and golden and browning around the edges and pulling away from the edges of the pan. Then it falls; that is perfectly normal.

5 Let stand 10 to 20 minutes before serving warm. Add a dusting of powdered sugar, if you like, just before serving. 

Disclosure: We are a participant in the Amazon Services LLC Associates Program, an affiliate advertising program designed to provide a means for us to earn fees by linking to Amazon .com and affiliated sites. We are a ThermoWorks affiliate, earning a small commission at no cost to you on purchases made through our links. This helps cover some of the costs of running the blog. Thank you for your support.

Jean

11 April 2019

Grated Carrot Salad - Salade de Carottes Rapees

Grated Carrot Salad - Salade de Carottes Rapees - French Bistro Classic My Way / www.delightfulrepast.com

A simple grated carrot salad, Salade de Carottes Râpées, is one of the classics of modern French cuisine, found on every bistro menu, or so I’m told. Of course, I’ve put my own spin on it, so I should probably delete that French name.

Lemon juice is the acid for the classic version, but I think sweet carrots are just calling out for a good red wine vinegar. And I’ve skipped the chopped flat-leaf parsley and added chopped capers (I love capers). Les câpres.


Grated Carrot Salad - Salade de Carottes Rapees - French Bistro Classic My Way / www.delightfulrepast.com


It’s a salad that’s not supposed to be swimming in dressing, and this small amount of dressing is perfect for this amount of carrots. Doing a pound and a half of carrots? Just up the oil and vinegar to 3 tablespoons each.

This is one of those dishes that is so fast and so easy, you can’t quite believe it could possibly be so good. Are you a carrot salad fan?


Grated Carrot Salad - Salade de Carottes Rapees - French Bistro Classic My Way / www.delightfulrepast.com


Grated Carrot Salad - 

Salade de Carottes Râpées


(Makes 4 to 6 servings)

1 pound (16 ounces/454 grams) carrots
2 teaspoons capers, rinsed and drained, chopped
2 tablespoons (1 fluid ounce/30 ml) extra virgin olive oil
2 tablespoons (1 fluid ounce/30 ml) red wine vinegar
1/8 teaspoon salt
1/8 teaspoon coarsely ground black pepper

1 Scrub, peel and grate the carrots. 

Note: For long shreds, I cut the carrots into about 4.5-inch lengths to fit the big feed tube and use the medium shredding disc on my Cuisinart DLC-2011CHBY food processor.

2 Put the carrots in a 1.5-quart bowl and add the capers.

3 In 1-cup glass measure, whisk together the olive oil, vinegar, salt and pepper. Add to the carrots and toss to mix well. This small amount of dressing is exactly the amount needed for this amount of carrots. Taste and adjust seasoning.

Disclosure: We are a participant in the Amazon Services LLC Associates Program, an affiliate advertising program designed to provide a means for us to earn fees by linking to Amazon .com and affiliated sites. We are a ThermoWorks affiliate, earning a small commission at no cost to you on purchases made through our links. This helps cover some of the costs of running the blog. Thank you for your support. 

Jean