Showing posts with label stand mixer recipes. Show all posts

12 December 2019

Pâte Brisée - Pie and Tart Crust

Pate Brisee - Classic French Pastry - perfect for pecan pie (as pictured), tarts, and quiches / www.delightfulrepast.com

Pie and tart crust is something I've been making since I was a teenager and, with the exception of Pâte Sucrée which is not supposed to be flaky, always with the aim of visible butter in the dough for maximum flakiness. I make my basic non-sweet pie crust, or pâte brisée, by whatever method suits my mood, by hand or in the food processor.

I know some people make it in a heavy-duty stand mixer, but all I've seen are still aiming for visible butter and a flaky crust. Then I saw Thomas Keller's recipe at The Splendid Table

As I commented at that site, "This flies in the face of everything I've read and practiced in many years of pie crust making, but I'm going to try it because Thomas Keller and Sebastien Rouxel said so! Sounds far easier to incorporate all the butter than to keep from incorporating it! Wonder how it will compare to my lovely flaky pastry. We shall see!" 


Pate Brisee - Classic French Pastry - perfect for quiches (as pictured here) or very sweet pies and tarts / www.delightfulrepast.com


So I put on my lab coat and headed into my laboratory, dusted off the stand mixer and tried it his way. He said this pâte brisée reflects his enduring respect for classical technique and is used for savory tarts, such as quiches, and for very sweet tarts. I used it for my Pecan Pie - Without Corn Syrup. And will use it for my Pecan Tart - Without Corn Syrup and Vegetable Quiche

I liked it! Have you tried it? What do you think?


Pate Brisee - Classic French Pastry - perfect for quiches or very sweet pies and tarts / www.delightfulrepast.com

Pâte Brisée 


Adapted from Bouchon Bakery Pate Brisee recipe 

(Makes 20 ounces/567 grams)

2 1/8 dip-and-sweep cups (10.625 ounces/301 grams) unbleached all-purpose flour, divided 
1/2 teaspoon salt 
2 sticks (8 ounces/227 grams) cold unsalted butter, cut into 1/4-inch cubes and chilled until very cold 
1/4 cup (2 fluid ounces/59 ml) ice water

1 Place 1 cup (5 ounces/142 grams) of the flour and the salt in the bowl of a stand mixer fitted with the paddle attachment; mix to combine. With the mixer running on low speed, add the butter a small handful at a time. When all the butter has been added, increase the speed to medium-low and mix for about 1 minute, until the butter is thoroughly blended. 

2 Scrape down the sides and bottom of the bowl. Turn the speed to medium-low, add the remaining 1 1/8 cup (5.625 ounces/159 grams) of flour, and mix just to combine. Add the water and mix until incorporated. The dough will come up around the paddle and should feel smooth, not sticky, to the touch. 

3 Remove the dough from the mixer and check to be certain that there are no visible pieces of butter remaining; if necessary, return the dough to the mixer and mix again briefly. 

4 Divide the dough into two equal pieces, pat each into a 5-inch disk and wrap in plastic wrap. Refrigerate for at least 1 hour, but preferably overnight. (The dough can be refrigerated for up to 1 day or frozen for up to 1 month.)

Disclosure: We are a participant in the Amazon Services LLC Associates Program, an affiliate advertising program designed to provide a means for us to earn fees by linking to Amazon .com and affiliated sites. We are a ThermoWorks affiliate, earning a small commission at no cost to you on purchases made through our links. This helps cover some of the costs of running the blog. Thank you for your support. 

Jean

31 May 2018

Fallue - The Traditional Norman Brioche

Fallue - The Traditional Norman Brioche - Regional French Baking / www.delightfulrepast.com

Fallue is a traditional French brioche loaf from Normandy. And I can’t believe it’s taken me all these years to finally hear of it! Blogger Phil’s Fallue post at As Strong As Soup had me sputtering about “How have I never heard of this before now?!”

Just as I was sputtering when PBS presented Island at War on Masterpiece Theatre and I learned for the very first time that one of the Channel Islands had been occupied during WW2! (I like to know stuff!) Anyway… 

Breadaholic that I am, I wanted to make this immediately. Phil uses his bread machine to mix the dough, but I decided to use the stand mixer. I nearly always make bread by hand, but I thought I’d break out the heavy-duty stand mixer...

...and make this historical loaf in a modern way SINCE I ONLY JUST HEARD OF IT! (I know, I’m shouting, but you should’ve heard me during Island at War!) 

The recipe actually calls for crème fraiche, but I use only organic dairy products (and eggs and flour and everything else) and couldn’t find any organic crème fraiche, so I came up with my own little “faux” version: 1/2 cup organic heavy whipping cream with 1 teaspoon apple cider vinegar stirred in, left to thicken a bit for 5 or 10 minutes or so. 

Crème fraiche is higher in fat than sour cream and is not nearly as tangy, so I didn’t think sour cream would make a good substitute. My faux version seemed to have just the right amount of tang. I think I’ll be finding lots more ways to use it.

You know what popped into my head when I took my first bite of Fallue? I immediately thought, This is the perfect bread for Coronation Chicken Sandwiches

So tell me, is Fallue a new one on you as well? I'm sure I would remember if Julia or Jacques (Child and Pepin) had mentioned it. I don't mind telling you, I'm a bit miffed with Jacques right now. Thank goodness Phil clued me in! 


Fallue - The Traditional Norman Brioche - French Regional Baking / www.delightfulrepast.com

Don't forget to Pin it and share it!


La Fallue – Brioche Normande 


(Makes one large loaf)

The Dough 

3 1/2 cups (17.5 ounces/496 grams) unbleached all-purpose flour (plus 1/2 cup – 2.5 ounces/71 grams to “work from”) 
1/4 cup (1.75 ounces/50 grams) sugar 
2 teaspoons (7 to 8 grams) instant yeast 
1 1/2 teaspoons (8 grams) salt 
1 stick (4 ounces/113 grams) unsalted butter, thoroughly softened 
1/2 cup (4 fluid ounces/118 ml) heavy whipping cream with 1 teaspoon apple cider vinegar stirred in, room temperature 
5 large (medium in UK) eggs, room temperature, beat 1 of them and reserve 2 tablespoons of it for the egg wash 

The Egg Wash 

Reserved 2 tablespoons beaten egg 
1 teaspoon water 

1 In the mixer bowl, whisk together flour, sugar, instant yeast and salt. With fingers or a pastry cutter, cut softened butter into flour mixture until it looks like fine crumbs. Attach the dough hook and mixer bowl to the stand mixer. Add the thickened soured cream and eggs (don't forget to beat one and reserve 2 tablespoons). Mix on speed 3 for 10 to 15 minutes, adding flour during the last 5 minutes, if needed, from the 1/2 cup a tablespoon at a time until the dough is not quite so sticky. I used half of the 1/2 cup.

Note: The dough will not come together into a ball like other bread doughs. Resist the urge to keep adding more flour; too much flour will turn your soft and fluffy brioche into something entirely different. 

2 Transfer dough to lightly oiled 2-quart glass measure and cover with silicone lid or plastic wrap; let rise until nearly doubled, about 2 1/2 hours. You could leave the dough in the mixer bowl, but it’s easier to monitor the dough’s rise in a straight-sided clear glass container. Besides, since the dough will be going into the refrigerator overnight, you might want to free up your mixing bowl for something else. 

3 When the dough has not doubled but has risen by 75% (from the 4-cup level to the 7-cup line—see what I’m sayin’ about using a 2-quart glass measure?), put it in the refrigerator overnight (18 hours, actually, in this case). This will slow the fermentation, improving flavor and texture, and chill the butter, making shaping the sticky dough much easier. 

4 Line a large baking tray (I use a heavy-duty 18x13x1-inch half-sheet pan) with parchment paper. Turn the chilled dough out onto lightly floured surface (working from the remains of the 1/2 cup) and press it into a smooth 9-inch (23 cm) square; it will soften a bit as you handle it. Starting at the edge farthest away from you, roll the dough rather tightly into a log, sealing the seam (which will go on the bottom) and turning the ends under, shaping into a long oval loaf, about 12 inches (30 cm) by 3 to 3.5 inches (8 to 9 cm).


Fallue - The Traditional Norman Brioche - Regional French Baking (this photo - the loaf's final rise) / www.delightfulrepast.com


5 Place diagonally on the prepared baking tray. Cover lightly. Let rise until doubled and very puffy, about 2 to 2 1/2 hours. 


Fallue - The Traditional Norman Brioche - French Regional Baking (this photo - loaf risen and glazed) / www.delightfulrepast.com


6 Preheat the oven to 350F/180C/Gas4. 375F/190C/Gas5. In small bowl, beat together egg and water with a fork. Brush the dough with the egg wash. Use kitchen scissors to snip the dough all around the top edge of the loaf to make the traditional spikey effect.* Bake for 30 to 35 minutes, until golden brown and sounding hollow when tapped on the bottom, or when an instant-read thermometer inserted into the center bottom of the loaf registers 195F/90C.

* My spikey effect wasn't very spikey, but I don't mind! 

7 Cool completely on wire rack, 1 to 2 hours, before slicing. Serve with butter and preserves or with its traditional Norman accompaniment, Teurgoule


La Fallue - Brioche Normande / www.delightfulrepast.com

Disclosure: We are a participant in the Amazon Services LLC Associates Program, an affiliate advertising program designed to provide a means for us to  earn fees by linking to Amazon .com and affiliated sites.

Jean

18 February 2016

One-Bowl Orange Vanilla Butter Cake

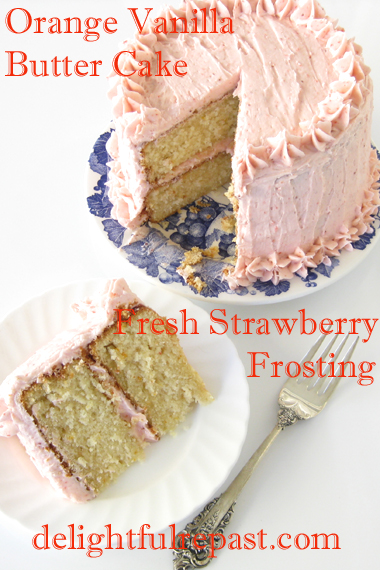
Orange Vanilla Butter Cake with Fresh Strawberry Frosting / www.delightfulrepast.com

This one-bowl orange vanilla butter cake, iced with Fresh Strawberry Frosting, is the one I made last week in celebration of my sixth blogiversary. Can you see the fluffy texture? 

Don't let anyone tell you that you must use bleached cake flour for a tender cake. I don't like bleached flours for health reasons, and it simplifies my life a great deal to use just unbleached all-purpose flour for all my non-gluten-free baking. This cake couldn't be more tender and still hold together. 

My recipe is calculated to make two 6-inch layers, a large enough cake to serve 8 people. If you want to make a larger cake, here's my Best One-Bowl Yellow Cake. The 6-inch cake looks ever so much nicer on the afternoon tea table and makes 3-inch wedges that fit so prettily on smaller plates.


One-Bowl Orange Vanilla Butter Cake / www.delightfulrepast.com

If you like it, please Pin it and share it!


Of course, if you've never made a wedding cake, you probably don't have 6-inch pans! Since this is such a handy size cake, I'd really recommend that you get a pair of these heavy-gauge aluminum 2-inch deep 6-inch round cake pans.

I like to point out to my UK readers from time to time that what we call large eggs in the US are just medium eggs in the UK. Large eggs UK are extra large eggs US. It can make a difference in a cake recipe.

What is your favorite size cake to make, and the most requested flavor in your family? 


Orange Vanilla Butter Cake with Fresh Strawberry Frosting / www.delightfulrepast.com


One-Bowl Orange Vanilla Butter Cake 


(Makes two 6-inch layers) 

1 1/2 dip-and-sweep cups (7.5 ounces/213 grams) unbleached all-purpose flour
1 cup (7 ounces/198 grams) sugar
1 tablespoon baking powder
1/2 teaspoon salt
1 stick (4 ounces/113 grams) unsalted butter, room temperature
2/3 cup (5.33 fluid ounces/158 ml) milk, room temperature
2 large eggs, room temperature (medium eggs in the UK)
1 1/2 teaspoons vanilla extract
Finely grated zest of 1 orange 

1 Preheat oven to 350F/180C/Gas4. Grease well and lightly flour two 6-inch round layer pans

2 In large mixing bowl (I use a Cuisinart stand mixer or a hand mixer), combine flour, sugar, baking powder and salt; and mix on low speed for 30 seconds to blend. Add the softened butter and about half of the milk. Mix on low speed until the dry ingredients are moistened. With mixer on medium-high speed, beat for 1 1/2 minutes. Scrape down the sides. 

3 Add the eggs, vanilla extract and remaining milk. With mixer on low speed, beat for 30 seconds to combine. Scrape down the sides. Increase speed to medium-high and beat for 1 minute. Stir in the orange zest by hand; fresh citrus zest tends to get tangled up in beaters and whisks. 

4 Divide evenly* between the prepared pans. Bake at 350F/175C/Gas4 for 25 to 35 minutes, until toothpick inserted into center comes out clean. 

* Most people just "eyeball" it, but when I'm feeling particularly persnickety I actually use the digital kitchen scale to be precise. 

5 Cool in pans on wire racks for 5 minutes. Remove from pans and cool on racks for at least an hour, until completely cool, before frosting.

Disclosure: Some posts contain links to my affiliate account at Amazon.com. If you purchase something from Amazon through one of my links, I receive a small commission, at no additional cost to you, which I use toward the expenses of running this blog. Thanks for supporting Delightful Repast when you shop at Amazon! 

Jean

22 October 2015

Jam Thumbprint Cookies

Jam Thumbprint Cookies / www.delightfulrepast.com

Doesn't everyone have fond memories of jam thumbprint cookies? And those of us who grew up with British baking also remember jam tarts. These cookies are much like jam tarts, only less fiddly to make, even with the optional added step of rolling the dough balls in egg whites and nuts. I like to make half with nuts and half without.

Filled with red jam, they look quite festive and make a colorful addition to the tea table. I made these with blackberry jam, which lacks the jewel-like appearance of the red jams, but it tastes really good. The jam firms up as they bake, so the cookies actually stack quite well if, for example, you wanted to fill a tin with them for gifting. And they can be frozen for up to a month.

Jam Thumbprint Cookies / www.delightfulrepast.com


They're really good with apricot preserves, too, but the preserves need to be heated (to thin), strained and cooled first. They go splendidly with a cup of tea which, as you probably know, is a must for anything I bake. What cookies will you be baking?


Jam Thumbprint Cookies / www.delightfulrepast.com


Jam Thumbprint Cookies


(Makes 3 dozen)

2 cups (10 ounces/283 grams) unbleached all-purpose flour
1/4 teaspoon salt
8 ounces (227 grams) unsalted butter, room temperature
1/3 cup sugar
1/4 cup dark brown sugar
2 large eggs, separated
1 1/2 teaspoons vanilla extract
3 tablespoons jam (redcurrant, raspberry or strawberry, etc)
Optional: 3/4 cup very finely chopped walnuts or pecans (for half) 

1 Preheat oven to 350F/180C/Gas4. Line a large baking sheet (I do half at a time on a heavy-duty half-sheet pan) with baking parchment. In small bowl, whisk together flour and salt to "sift." (And, no, there is no baking powder or baking soda in this recipe.)

2 In the bowl of a stand mixer fitted with the flat beater, cream butter and sugars* on medium speed for 2 minutes, or until very light and fluffy. Add egg yolks and vanilla extract; beat on medium speed for 1 minute. On low speed, mix in the flour, beating until just combined. Cover and chill for 1 hour.

* Tip: Be sure there are no hard lumps of brown sugar that go unmixed because they will be visible in the finished cookie and spoil its appearance.

3 Using a #60 scoop, scoop dough onto baking sheet. Then go back and roll each scoop into a smooth ball. For the nut-coated* option, roll each ball first in slightly beaten (until frothy) egg whites, then in chopped nuts. Place 3 inches apart on baking sheet.

Note: You will get precisely 36 cookies if you use a #60 scoop, packed and leveled.

* Of course, you could probably achieve the same crunchification by simply mixing the nuts into the dough. But then what you do with those egg whites?!

4 With thumb (I use the end of the handle of a wooden honey dipper dipped in flour each time), make an indentation in the top of each cookie about 1/2 inch wide and 1/2 inch deep. Carefully spoon 1/4 teaspoon of jam into each indentation.

5 Bake for about 15 to 17 minutes, or until edges are lightly browned. Cool on wire racks. Store in airtight container at room temperature for up to 1 week. May be frozen for up to 1 month.


Disclosure: Some posts contain links to my affiliate account at Amazon.com. If you purchase something from Amazon through one of my links, I receive a small commission, at no additional cost to you, which I use toward the expenses of running this blog. Thanks for supporting Delightful Repast when you shop at Amazon!

Jean

05 March 2015

Prune Spice Cake - Just Call It Spice Cake

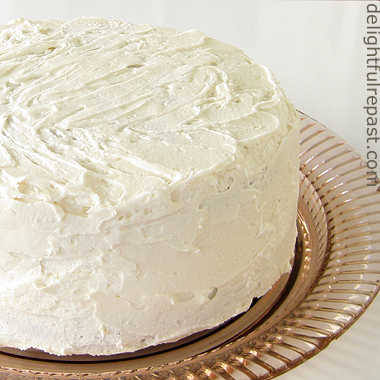
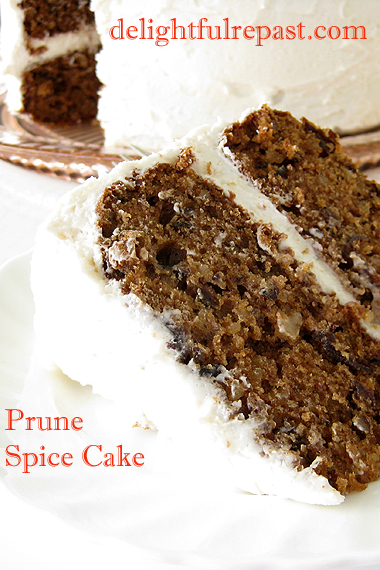
Prune Spice Cake - Just Call It Spice Cake / www.delightfulrepast.com

Prune Spice Cake is a name I avoid using because the word "prune" puts so many people off. Unless you enjoy imploring your picky eater to "Just try it, you'll like it," I'd suggest you call it Spice Cake and skip all that nonsense. 

I first came up with this cake when I was a teenager. Over the years, I tinkered with it until I settled on this formula. If I hadn't needed a frosted cake for a particular reason this week, I would have skipped the frosting and just served it with some barely sweetened whipped cream.


Prune Spice Cake - Just Call It Spice Cake / www.delightfulrepast.com


It's a lovely moist and tender cake that keeps well at room temperature for a few days or even freezes well. I needed to cook a week ahead for an upcoming lunch for friends, so sliced half the layer cake into six slices and laid them on a parchment-lined, indispensable 13x9x1-inch quarter sheet pan, covered it with foil and popped it into the freezer. 

What size/shape cake do you make most often? I have all sorts of pans: 6-, 7-, 8-, 9-, 10-, 12- and 14-inch rounds, 8- and 11-inch squares, not to mention the rectangles and loaf pans; but I make a 7-inch round cake most often these days. 


Prune Spice Cake - Just Call It Spice Cake / www.delightfulrepast.com

If you like it, please Pin it and share it!


Prune Spice Cake 

(Makes one 13x9-inch cake or 2 8-inch round layers) 

1 8-ounce (227 grams) package pitted prunes
1 1/4 cups (10 fluid ounces) water
2 dip-and-sweep cups (10 ounces/283 grams) unbleached all-purpose flour
1 cup (7 ounces/198 grams) sugar
1 1/2 teaspoons baking soda
1/2 teaspoon salt
1 teaspoon cinnamon
1/2 teaspoon nutmeg
1/4 teaspoon cloves
8 tablespoons (4 ounces/113 grams) unsalted butter, melted
1/4 cup (2 fluid ounces) extra virgin olive oil or organic* canola oil
3 large eggs
1 cup (4 ounces/113 grams) finely diced walnuts

1 Spray one 13x9x2-inch pan with organic* canola cooking spray, or butter and flour two 8-inch round layer pans.

* Of course, I use organic everything, but I mention it specifically for the canola oil because canola oil that is not organic is sure to be genetically modified (GMO or GE).  

2 In 1-quart saucepan, combine prunes and water. Cover and simmer about 20 minutes. Drain, reserving 2/3 cup of the liquid (add water if necessary). Chop prunes. They wind up a rough puree. You could use the food processor to make a perfectly smooth puree. Preheat oven to 350F/180C.

3 In 2-cup glass measure, microwave butter until just melted. Stir in oil. 

In bowl of stand mixer, combine all the dry ingredients and mix on low speed for one minute. Add reserved prune liquid and the butter and oil. Mix to blend; at medium speed, beat for 2 minutes. Add eggs. Mix to blend; beat for 1 minute. Stir in prunes and walnuts. 

5 Pour into prepared pan(s). Bake at 350F/180C for about 40 minutes (single) or about 30 minutes (layers). 

6 Serve single cake directly from pan. For layer cake, cool in pans on wire rack for 10 minutes. Remove from pans and cool on wire racks for an hour or more. When completely cooled, frost with vanilla butter frosting.

Jean

12 June 2014

Best One-Bowl Yellow Cake

Best One-Bowl Yellow Cake / www.delightfulrepast.com

Everybody needs a basic yellow cake recipe. And if it just happens to be an easy one-bowl cake, so much the better. In my recipe the inimitable flavor of butter comes through loud and clear, accented with vanilla extract.  

I love the texture of this cake. Despite what you may have heard, you don't need to used bleached cake flour to make a tender cake. I use organic unbleached flour for all my baking (except the gluten-free baking, of course).

This one is frosted with chocolate, but I really love it with the Caramel Flour Frosting I posted last week. You'll find my gluten-free version under Velvety Vanilla Cupcakes - That Just Happen to Be Gluten-Free.

What is your favorite cake flavor / frosting flavor combination?  

Best One-Bowl Yellow Cake


(Makes two 8-inch layers or 24 cupcakes)
  
2 dip-and-sweep cups (10 ounces/283 grams) unbleached all-purpose flour
1 1/2 cups (10.5 ounces/298 grams) sugar
3 1/2 teaspoons baking powder
1/2 teaspoon salt
1 1/2 sticks (6 ounces) unsalted butter, room temperature
3/4 cup and 1/4 cup milk, room temperature
3 large eggs, room temperature
2 1/2 teaspoons vanilla extract
       
1 Preheat oven to 350F/180C/Gas4. Grease well and lightly flour two 8-inch layer pans.      

2 In large mixing bowl (I use a Cuisinart stand mixer), combine flour, sugar, baking powder and salt; and mix on low speed for one minute to blend. Add the softened butter and 3/4 cup of the milk. Mix on low speed until the dry ingredients are moistened. With mixer on medium-high speed, beat for 1 1/2 minutes. Scrape down the sides.
       
3 Add the eggs, vanilla extract and 1/4 cup milk. With mixer on low speed, beat for 30 seconds to combine. Scrape down the sides. Increase speed to medium-high and beat for 1 minute. Scrape down the sides.
       
4 Pour into prepared pans. Bake for 30 to 35 minutes.

5 Cool in pans on wire racks for 10 minutes. Remove from pans and cool on racks for at least an hour, until completely cool, before frosting.

05 June 2014

Caramel Frosting - Variation on Old-Fashioned Flour Frosting

Caramel Flour Frosting / www.delightfulrepast.com

You might think Old-Fashioned Flour Frosting is just for those times when you don't have powdered sugar on hand for the usual American buttercream frosting, as was sometimes the case for my Southern grandma who lived through the Great Depression (which, I'm told, is when this kind of frosting was invented).

But I like this frosting ever so much more than American buttercream, and it is just as easy. No eggs, no temperature monitoring, no complications. And no raw cornstarchy powdered sugar taste. The texture is amazing, soft enough to spread on the cake and firm enough for piping. Best of all, it uses less than half the sugar of the typical American buttercream and, though plenty sweet, is not cloyingly so.

There are different methods to make this type of frosting, but I've only ever made it this way and have found no reason to try others. Some people just cook the flour, salt and milk and then cream the sugar with the butter. I can't imagine how long I'd have to beat that to get the grittiness of the sugar out of it. Why not just cook the sugar with the flour and avoid any possibility of grittiness?

I was in the mood for caramel cake
--yellow cake with caramel icing--and decided to make it as cupcakes. Instead of my traditional caramel icing, I thought I'd try to come up with a caramel version of old-fashioned flour frosting. Instead of using granulated sugar, I used an equal measure of dark brown sugar. 

What are your favorite cupcake and frosting flavors?

Caramel Flour Frosting

(Makes enough for 8-inch 2-layer cake or 24 cupcakes)

1 cup dark brown sugar
1/3 dip-and-sweep cup (1.67 ounces) unbleached all-purpose flour
1/4 teaspoon salt
1 cup milk (I use Organic Valley 2% milk and unsalted butter)
2 teaspoons vanilla extract
1 cup (8 ounces) unsalted butter, room temperature

1 In heavy-bottomed 2-quart saucepan, whisk together dark brown sugar, flour and salt. Gradually whisk in milk until mixture is smooth. Cook over medium heat, whisking constantly, until mixture bubbles and thickens; it should be very, very thick. Remove from heat; leave the whisk in it and give it a stir from time to time (helps it cool and prevents a skin from forming) and let cool to room temperature. Stir in vanilla.

2 In stand mixer fitted with the flat paddle, cream the butter until light and fluffy. Add the cooled flour mixture (I have always added it in three additions, but I don't know if that's really necessary) and beat on medium-high until it all combines and resembles whipped cream. With my Cuisinart stand mixer, that's speed 7 for 7 minutes, pausing halfway through to scrape down the sides of the bowl.

3 If you're going to be piping a border or anything, put a little of the frosting into a piping bag and refrigerate the bag while you're frosting the cake. For these cupcakes, I didn't even chill the frosting at all, just used it straight from the mixer.

4 Refrigerate cupcakes until about an hour before serving time. Refrigerate a cake until three hours before serving time; it should stand at room temperature for about three hours before slicing and serving.

24 April 2014

Snickerdoodles - Not Just Cinnamon Sugar Cookies

Snickerdoodles

Snickerdoodles have been around for more than a hundred years (at least 40 years more than the Snickers candy bar that has nothing at all to do with snickerdoodles!) and are a favorite among us classic comfort food types.

You'll find a lot of recipes that call for baking powder rather than cream of tartar. Ignore them. Cream of tartar is not just a leavening agent, it is what gives snickerdoodles their characteristic tang.

There are also a lot of snickerdoodle recipes that call for half butter and half shortening. Ignore those, too. There is nothing to be gained by using the shortening, so why dilute the wondrous flavor of butter? Baked until just the edges start to brown, the cookies are crisp on the outside and soft, kind of cakey, inside.

Need I tell you, these cookies are fabulous with a nice cuppa tea!


Snickerdoodles

Snickerdoodles

(Makes 32 3-inch cookies)

The Dough

2 3/4 dip-and-sweep cups (13.75 ounces) unbleached all-purpose flour
2 teaspoons cream of tartar
1 teaspoon soda
1/4 teaspoon salt
2 sticks (1 cup) unsalted butter, room temperature (2 1/2 hours)
1 1/3 cups sugar
2 large eggs
1 1/2 teaspoons vanilla


The Coating

3 tablespoons sugar
2 1/4 teaspoons cinnamon

1 In medium bowl, whisk together flour, cream of tartar, soda and salt.

Note: I've given the directions for using a stand mixer, but I've made these many time
s with a hand mixer or just a spoon before I got my Cuisinart stand mixer

2 In stand mixer fitted with flat beater, beat butter on medium speed for 30 seconds. Add sugar and beat until light and fluffy, about 3 minutes. Beat in eggs, one at a time, and vanilla. Stir in flour mixture and beat on low speed just until dough comes together. Cover and refrigerate for 2 hours, or until dough is easy to handle.

3 Preheat oven to 400 degrees. Line baking sheets with parchment paper. Shape #40 scoops (0.8 ounces or approximately 1.5 tablespoons) of dough into 1 1/4-inch balls; roll in sugar mixture. Place 3 inches apart on parchment-lined baking sheets. Using a flat-bottomed glass (or a stainless steel measuring cup), slightly flatten the dough balls. Bake for 10 to 12 minutes, or until edges are lightly browned.


Snickerdoodles

Note: I use a gigantic baking sheet, called a 3/4 sheet pan, sometimes called a 2/3 sheet pan. It is the maximum size pan that will fit in my oven (in a 30-inch gas range). With it I can bake 24 cookies this size (4 rows of 6) or 35 smaller cookies (5 rows of 7) all in one batch. Since this recipe makes 32 cookies, I froze 8 cookies to be baked another day.

4 Cool on baking sheet for 1 minute, and then remove to wire racks to cool completely. May be stored in airtight container for a week.


Disclosure: Posts may include links to my affiliate account at Amazon.com, and Delightful Repast earns a few cents on the dollar if readers make a purchase, so thanks for supporting my blog when you shop at Amazon!

21 November 2013

Gluten-Free Pull-Apart Dinner Rolls

Gluten-Free Pull-Apart Dinner Rolls / www.delightfulrepast.com

Gluten-Free Pull-Apart Dinner Rolls that are as wonderfully fluffy as gluten-free gets! A festive meal must have dinner rolls! With so many people on gluten-free diets these days, I thought I better post these rolls today. If you're not gluten-free, here's my regular Pull-Apart Dinner Rolls recipe.

If dinner's not for a couple more hours, you've still got time to make these. They are so easy and come together quickly. If you haven't already stirred up a batch of my favorite gluten-free blend, do so just as soon as you get the ingredients. Adjustments would likely have to be made to this dinner roll recipe to work with another blend. 

Jean's Favorite Gluten-Free Blend: I use Bob's Red Mill gluten-free flours and starches. If you use a different brand, the package sizes might be different, in which case you would need to use a scale to duplicate this formula. In large bowl, whisk together until thoroughly combined: a 24-ounce package potato starch, a 22-ounce package sorghum flour and a 20-ounce package tapioca flour. Pour into air-tight container and store in refrigerator or freezer, depending upon how often you use it.

If you don't have a scale, I would encourage you to get one. It doesn't cost that much and it will really improve your baking. Since I got the OXO Good Grips 11-Pound Digital Scale, I think I've used it every single day for one thing or another. 

Why weigh? Everybody measures flour differently. Some spoon the flour into the measuring cup and level it off. Some dip the measuring cup into the flour and level it off. Try it and you'll see that the weight will be different every time. I've found the most consistent measure to be what I call a dip-and-sweep cup. It's pretty much 5 ounces/142 grams every time for a cup of unbleached all-purpose flour. But that isn't necessarily true of all the various gluten-free flours and starches. Since the weights of a given volume can vary substantially, weighing is the most accurate way of measuring flour.

Do you need a stand mixer? Yes, you really do need a stand mixer to make gluten-free yeast doughs. Since the doughs have no gluten and are not kneaded, they need to be beaten vigorously to develop structure. I don't think it can be done adequately by hand or with a hand mixer, at least not by me!

Gluten-Free Pull-Apart Dinner Rolls / www.delightfulrepast.com


Gluten-Free Pull-Apart Dinner Rolls

(Makes 9)

4 tablespoons unsalted butter, softened
3 dip-and-sweep cups (15 ounces/425 grams)) Jean's favorite gluten-free blend
1/4 cup (1.75 ounces/50 grams) sugar
1 tablespoon instant yeast
2 teaspoons xanthan gum
1 teaspoon salt
1 cup (8 fluid ounces/237 ml) warm (105 to 115 degrees) water
2 eggs, room temperature
1 teaspoon cider vinegar

1 Start the dough about 2 hours before serving time. Put a square of parchment paper in an 8x8x2-inch square glass baking dish; grease parchment and sides of dish with 1/2 tablespoon of the softened butter. In bowl of stand mixer with flat beater attached, mix together dry ingredients for about 30 seconds.

2 Put water and 3 tablespoons butter in 2-cup glass measure. Microwave on high power until water is warm (105 to 115 degrees), about 2 minutes, depending on your microwave oven. Stir until all the butter is melted. If the liquid is too hot it will kill the yeast, so I always check it with my Thermapen instant-read thermometer.

3 Add it, along with the egg and vinegar, to the dry ingredients and mix on low speed until combined. Scrape down sides of bowl. Mix on medium to medium-high speed for 3 1/2 minutes to develop structure in the dough. It will be a sticky dough, somewhere between a regular bread dough and a batter.

Gluten-Free Pull-Apart Dinner Rolls / www.delightfulrepast.com


4 Using an oiled or cooking sprayed size 12 disher/scoop or 1/3 cup measure, place 9 scoops of dough in the prepared pan. Melt 1/2 tablespoon of butter and brush the tops with it, smoothing the tops as you go. Cover loosely with a square of oiled parchment paper and let rise until doubled (I don't bother to cover the pan when I can just set it in the microwave), about 1 1/4 hours, depending on the temperature of the room. During the last 15 minutes, preheat oven to 375 degrees.

Note: While perhaps not exactly "doubled" when you're talking about gluten-free dough, the rolls will have expanded to the point of filling the pan and being nearly as high as the top of the pan and looking very puffy.

5 Bake at 375 degrees for about 25 minutes, or until well browned. Remove from oven and, keeping rolls together, turn them out of the pan and cool on wire rack a few minutes before serving. Serve promptly--gluten-free rolls never really reheat very well; but if you have leftovers you'd like to reheat the next day, wrap them in foil and heat at 350 degrees in a preheated oven.

Disclosure: Some links in this post are affiliate links. If you purchase something from Amazon through one of my links, I receive a small commission, at no additional cost to you, which I use toward the expenses of running this blog. 

Jean

17 October 2013

Gluten-Free Angel Food Cake


More of my friends are going gluten-free, so I've been stepping up my gluten-free recipe development. One gluten-free friend just handed me an angel food cake pan she'd been given and asked me to figure out what she can do with it, so this angel food cake is bigger than my regular Angel Food Cake that I make in a loaf pan.

And, of course, that gave me an excuse to use my new Cuisinart stand mixer! In fact, it was the first time I used it with the wire whip. You could also make it with a hand mixer. I can't believe anyone ever made it by hand, but angel food cake predates even hand-cranked egg beaters.   

Berries and Custard Sauce - Crème Anglaise go beautifully with angel food cake, and custard sauce is a perfect way to make use of 7 of the leftover egg yolks. How do you like to serve angel food cake?

   
Gluten-Free Angel Food Cake

(Makes one 9- or 10-inch cake)


1 packed cup (5.5 ounces) gluten-free blend*
3/4 packed cup unsifted powdered sugar
1 1/2 cups (11 or 12 large) egg whites, room temperature
1 1/2 teaspoons cream of tartar
1/4 teaspoon salt
2 teaspoons vanilla extract
3/4 cup sugar

Note: Separate the eggs cold. Cover and refrigerate the yolks for another use; let the whites stand at room temperature for 30 minutes.


1 Place oven rack in lowest position (I didn't bother--no problem), and preheat oven to 350 degrees. Prepare a 9- or 10-inch angel food tube pan (2-piece with "legs") by simply making sure it is completely grease-free. Also, make sure your mixing bowl and wire whip (or beaters) are squeaky clean.

2 Using two small bowls, sift together gluten-free blend* and powdered sugar three or four times. If you have a food processor, just process for 30 seconds instead of sifting.


*Gluten-Free Blend: I use Bob's Red Mill gluten-free flours and starches. If you use a different brand, the package sizes might be different, in which case you would need to use a scale to duplicate this formula. 

In large bowl, whisk together until thoroughly combined: a 24-ounce package potato starch, a 22-ounce package sorghum flour and a 20-ounce package tapioca flour. Pour into air-tight container and store in refrigerator or freezer, depending upon how often you use it.

3 In mixer bowl with wire whip in place, starting on speed 1 and gradually going up to speed 6, beat together the egg whites, cream of tartar, salt and vanilla until egg whites have thickened and increased in volume (mixture looks like a bowl of suds!) and are nearly at soft peaks stage.

4 On speed 8 gradually beat in sugar, a tablespoon at a time, until egg whites are stiff enough to hold up in soft peaks but are still glossy and moist. Watching carefully, continue beating until whites just reach stiff peaks but are not dry.

5 Sift about 1/3 of flour mixture over egg whites and fold in lightly, with a rubber spatula, just until incorporated. Repeat two times.

6 Spoon batter into pan and smooth the top. Gently make a few knife cuts through the batter to break up any large air bubbles.

7 Bake at 350 degrees for about 40 to 45 minutes, or until it is well browned and springs back when lightly touched. Invert pan; let stand upside down as it cools, about an hour. Remove cake from pan.