03 March 2022

Chicken Biryani

Chicken Biryani / www.delightfulrepast.com

Chicken Biryani is a popular dish of India and beyond that originated in Persia. Biryani is also made with other meats, but I prefer chicken thighs. It varies from region to region (and from cook to cook) in both ingredients and method, and (disclaimer here) I make no claims whatever to authenticity!

If you have made, or even had, biryani of any type, I'd love to hear about it. I have much to learn. There's a great long list of spices used in biryanis, but no one recipe includes them all. I checked my bottle of garam masala to remind myself which spices were included in that blend and then added two that were not in it and extra of a couple that were.


Chicken Biryani / www.delightfulrepast.com


Many people add garlic, but I am allergic. And many people add way too much garlic, which can easily overpower a dish. So if you do add garlic, use just one small clove or even less, so your finished dish will have some subtlety! But it is very flavorful without it, and I doubt that you would miss it.

The Naan - Classic Yeasted Flatbread of India and Beyond that I posted a month ago is the perfect accompaniment.

Have you tried any new dishes or cuisines lately? I think many of us have during the last two years!
 

Chicken Biryani / www.delightfulrepast.com

If you like it, please Pin it and share it!

Chicken Biryani

(Makes 4 servings)

The Chicken

1 1/2 to 2 teaspoons garam masala
1/2 teaspoon fennel seeds, toasted and crushed
1/2 teaspoon salt
1/4 teaspoon coarsely ground black pepper
1/4 teaspoon cumin
1/8 teaspoon cayenne
1/3 cup (2.88 ounces/82 grams) plain yogurt
1 teaspoon grated fresh ginger
1 small clove garlic, crushed, optional
1 1/4 pounds (20 ounces/567 grams) boneless skinless chicken thighs, cut into 1-inch pieces
3/4 cup tomato puree (fresh or half a 14.5-ounce can diced tomatoes, pureed)

The Rice

1 cup (6.625 ounces/188 grams) white basmati rice
1 1/2 cups (12 fluid ounces/355 ml) water
1 tablespoon unsalted butter
1/4 teaspoon salt
1 small bay leaf 
1/2 teaspoon turmeric

The Onion

1 tablespoon extra virgin olive oil
1 tablespoon unsalted butter
1 medium (12 ounces/340 grams) onion*, quartered and thinly sliced 

* I used a yellow onion, but red or white are fine.

The Garnish

2 packed tablespoons cilantro (fresh coriander)


1 In 1.5-quart mixing bowl, whisk together garam masala, fennel, salt, pepper, cumin, and cayenne. Gradually whisk in yogurt and grated ginger. Add chicken, coating well. Cover and refrigerate several hours or overnight.

2 In 2-quart saucepan, bring rice, water, butter, salt, bay leaf, and turmeric to a boil. Stir once and cover tightly with lid. Reduce heat to maintain a low simmer and cook for 15 minutes. Remove from heat, leave covered, and let stand for 10 minutes. Fluff with fork and remove bay leaf. Cover and set aside. 

3 In 12-inch skillet (that has a lid), heat oil and butter over medium-high heat and fry the onion slices until golden brown; this might take up to 20 minutes. Drain on paper towels. Set aside 1/3 of the prettiest fried onions for the garnish.

4 Add the chicken and marinade to the skillet and cook over medium to medium-high heat for about 7 minutes. Add the tomato puree and continue cooking for about 3 minutes. Stir in half of the remaining fried onions to the mix and continue cooking for 3 minutes.

5 Spread the rice over the chicken. Scatter the remaining onions (but not the 1/3 reserved for the garnish) over the rice. Cover with lid and cook over low heat for 15 minutes.

6 Stir lightly. Leave in skillet or transfer to serving dish. Garnish with reserved fried onions and chopped cilantro. The cilantro is not just a garnish, it is an important part of the dish, so don't skip it or substitute parsley (unless you're one of those people who really don't like cilantro).

Disclosure: We are a participant in the Amazon Services LLC Associates Program, an affiliate advertising program designed to provide a means for us to earn fees by linking to Amazon .com and affiliated sites. We are a ThermoWorks affiliate, earning a small commission at no cost to you on purchases made through our links. This helps cover some of the costs of running the blog. Thank you for your support. 

Jean

If you liked this post, please Pin it and share it!

  

17 February 2022

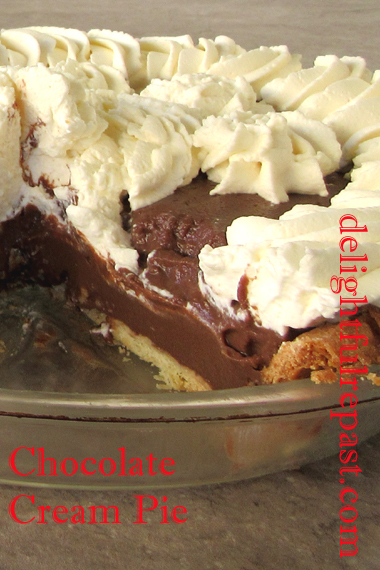
Chocolate Cream Pie

Chocolate Cream Pie - Made with Cocoa / www.delightfulrepast.com

Chocolate Cream Pie turned up on my to-do list when a friend told me she had been craving it, didn't have a good recipe, and couldn't find a single restaurant in town that made a good one.

You'll see recipes that call for huge amounts of expensive dark chocolate. I've had those pies, and they're good. But I make mine with cocoa and it gets raves.

I developed my recipe many years ago when I was a chocolate fan but haven't made it in several years. I made it for my friend this week and she loved it, so I'm posting it on the blog.

Speaking of the blog, this week is my 12th blogiversary. For 10 years I posted every week, and for 2 years every other week. I had no idea when I started Delightful Repast that I would still be doing it 12 years later!

Do leave a comment about pie or anything at all. I hope, wherever you are, you're enjoying life each day despite the difficulties. 
 

Chocolate Cream Pie - Made with Cocoa / www.delightfulrepast.com

If you like it, please Pin it and share it!

Chocolate Cream Pie 


(Makes one 9-inch/23cm pie, 8 servings) 

The Pastry - Pâte Sucrée (a sweet shortcrust pastry) 

1 1/4 dip-and-sweep cups (6.25 ounces/177 grams) unbleached all-purpose flour
1/4 packed cup (1 ounce/28 grams) unsifted powdered sugar 
1/4 teaspoon salt 
8 tablespoons (4 ounces/113 grams) cold unsalted butter, cut into 1/2-inch cubes
1 large egg
1/2 teaspoon vanilla extract, optional

The Custard

3 cups (24 fluid ounces/710 ml) whole or 2% milk
1 cup (7 ounces/198 grams) sugar 
1/2 packed cup (1.5 ounces/42 grams) natural unsweetened cocoa
1/3 dip-and-sweep cup plus 1 tablespoon (2 ounces/57 grams) unbleached all-purpose flour
1/4 teaspoon salt
3 large eggs
2 tablespoons (1 fluid ounce/30 ml) Kahlua or triple-strength coffee*
3 tablespoons (1.5 ounces/43 grams) unsalted butter, cold
2 teaspoons vanilla extract

* For triple-strength coffee, I put a tablespoon of ground coffee in a one-cup paper filter and pour over 1/4 cup boiled water. (I don't really know if that's precisely "triple-strength," but that's what I decided to call it!

The Whipped Cream

1 1/2 cups (12 fluid ounces/355 ml) heavy whipping cream
2 tablespoons sugar
1 teaspoon vanilla extract


1 Add flour, powdered sugar, and salt to work bowl of food processor; turn on for about 3 or 4 seconds to combine. Add chunks of butter; pulse to a crumb texture, leaving some visible chunks of butter. Add egg and vanilla extract; pulse until the dough starts clumping together. This is to be a crisp, more cookie-like crust, rather than a flaky pastry, so there's not quite the concern about over-processing. Flatten slightly into a 5-inch round disk, wrap in square of plastic wrap and refrigerate for 30 to 60 minutes.

2 Very lightly butter a 9-inch glass pie plate; I usually just run the butter wrapper over it. On a lightly floured piece of parchment, roll out disk to a 13-inch circle about 1/8 inch thick. Place pastry in pie plate, being careful to not stretch the dough. Leave a 1-inch overhang of dough. Crimp and flute the edge. (Sometimes you need to chill the pastry a bit before crimping.) Cover loosely with the piece of plastic wrap and place in freezer for 15 minutes. Preheat oven to 375F/190C/Gas5.

3 Fit a square of baking parchment paper that has been crumpled into a ball then opened, or aluminum foil, in the shell and fill with ceramic pie weights (baking beans). Set on a rimmed baking sheet (to catch any butter drips). Bake the thoroughly chilled crust for 15 minutes, then remove the foil and pie weights, pop on the pie crust shield and bake for another 15 minutes.

Note: I use two boxes of the ceramic pie weights, and they just fit nicely into a 200-gram tea tin. If you're not a loose leaf tea drinker, though, a quart canning jar works.

4 Remove fully pre-baked pie shell from the oven; let cool completely before filling, at least 30 minutes or hours ahead, whatever suits your schedule.

Note: I have the Le Creuset stainless steel 3.5-quart saucier, but they seem to be out of stock. Here is an alternative, and it is less expensive: Demeyere 5-ply stainless steel 3.5-quart saucier. A saucier is far better than a straight-sided saucepan for making custards and sauces. No "corners" that your whisk can't reach! 

5 Make filling while pie shell is cooling. In 2-quart saucepan, heat the milk just to a simmer. (If you don't heat the milk, the custard will take three times longer.) In heavy-bottomed 3.5-quart saucier or 3-quart saucepan, whisk together sugar, cocoa, flour, and salt. Whisk in eggs and Kahlua or coffee until thoroughly combined. Gradually add hot milk, whisking constantly. Cook over medium-high heat, whisking constantly, until you see bubbles forming at the edge and the mixture thickening, about 5 minutes or so. Custard should be very thick, with the whisk leaving trails.

Note: Food safety guidelines are that any mixture with eggs should be cooked until it registers 160F/72C on instant-read thermometer.

6 Remove from heat. Whisk in cold butter and vanilla extract until butter is completely melted. Let cool at room temperature for 15 minutes, whisking occasionally, before whisking well and pouring into pie shell. Pour into cooled crust and smooth top. Press a piece of plastic wrap or a circle of parchment onto the surface of the custard and let cool at room temperature for 30 to 60 minutes, until cool; place in refrigerator for at least 6 hours or up to 24 hours before piping on the whipped cream, garnishing, and serving.

7 With a mixer, beat cold cream, sugar, and vanilla extract on medium speed. Pay attention when you start to see the cream thickening. Continue to beat at medium speed, watching for the soft peaks stage, then the firm peaks stage. If you're just spreading the whipped cream on the pie, stop there. If you want to pipe the whipped cream, beat to the stiff peaks stage. Pay close attention at every stage; it can turn to butter before you know it!

8 With a pastry bag fitted with a 2D tip or 1M tip, pipe rosettes of whipped cream onto pie.

Disclosure: We are a participant in the Amazon Services LLC Associates Program, an affiliate advertising program designed to provide a means for us to earn fees by linking to Amazon .com and affiliated sites. We are a ThermoWorks affiliate, earning a small commission at no cost to you on purchases made through our links. This helps cover some of the costs of running the blog. Thank you for your support. 

Jean

If you liked this post, please Pin it and share it!
03 February 2022

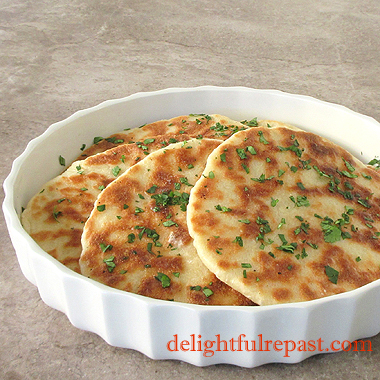
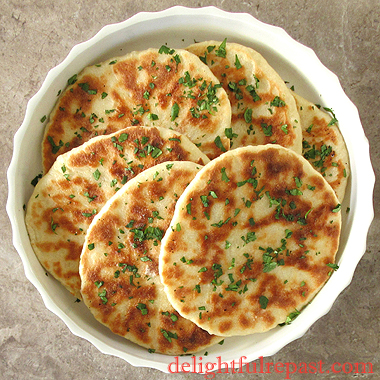
Naan - Classic Yeasted Flatbread of India and Beyond

Naan - Classic Yeasted Flatbread of India and Beyond / www.delightfulrepast.com

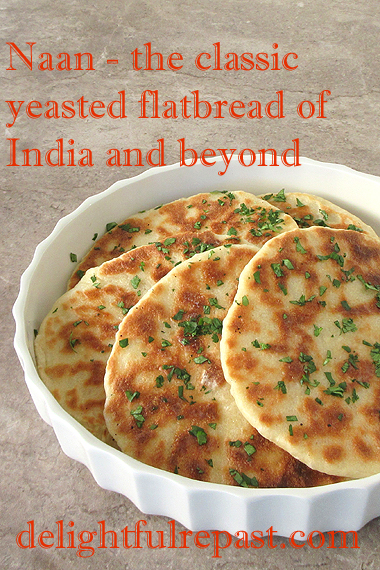
Naan is India's, and other parts of Asia's, classic yeasted flatbread that I love so much! Not that I'm an expert, but it's my understanding that yeast is traditional, but you'll see baking powder and/or baking soda in more modern variations.

I will likely never try those variations because I like the yeasted version so much. The bread is soft and pillowy and, at the same time, chewy. I like to spread the top with unsalted butter and sprinkle it with finely chopped fresh cilantro leaves. You might like a sprinkle of finely minced garlic as well, but I'm allergic and must refrain. 

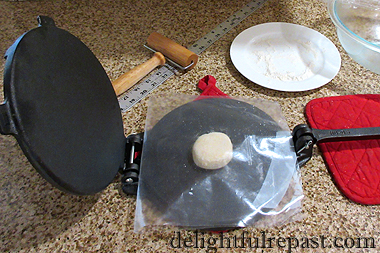
You know how much I've been enjoying my cast iron tortilla press, making batch after batch of both corn and flour tortillas. So, naturally, I was going to try pressing the naan. And I am thrilled to report that it worked beautifully! But you can also roll them out with a rolling pin as most people do.

I did a lot of research on this and saw much disagreement on how thick/thin to roll the dough. Most said 1/8 to 1/4 inch. While that might be fine for non-yeasted versions, I found that the yeasted dough starts puffing up right after rolling so needs to be rolled as thin as possible, certainly no more than 1/8 inch (3 mm). 


Naan - Classic Yeasted Flatbread of India and Beyond / www.delightfulrepast.com


Naan can be any shape. To mimic the shape they might naturally assume hanging on the sides of a tandoor (cylindrical oven), you can roll them into ovals or teardrop shapes. I just make mine round because everybody's going to know I don't have a tandoor anyway!

Roll them out or press them one at a time. While the first one is cooking, roll out the second one, and so on. Since the yeast dough rises quickly, give each a final roll/press just before cooking. So easy because you get into a real rhythm. I've put cooking tips for both stainless steel and cast iron pans in step 5 of the directions.

In my research, I found all kinds of tips that different cooks swear by. Cover the pan with a lid for cooking the first side only, cover with lid for cooking the second side only, grease the pan, don't grease the pan. I tried it all. The only one that made a difference to me was this: Rub water on one side before placing it in the hot pan water side down. Doing that and then tapping fingertips over the surface right away really increased the bubbling.

These will be great with my limited repertoire of Indian dishes: Chicken Tikka Masala, Slow Cooker Chicken Tikka Masala, and Dal Makhani. And being such a bread lover, the naan will inspire me to try more Indian recipes. And I look forward to working up a gluten-free naan for my GF friends.

Are you a bread fan? Have you made naan or other flatbreads? Tell me all about it in the comments below.


Naan - Classic Yeasted Flatbread of India and Beyond / www.delightfulrepast.com

If you like it, please Pin it and share it!


Naan - Classic Yeasted Flatbread

(Makes 8)

2 dip-and-sweep cups (10 ounces/283 grams) unbleached all-purpose flour
2 teaspoons (8 grams) sugar
1 teaspoon (4 grams) instant yeast
1 teaspoon (5 grams) salt
3/4 cup (6 fluid ounces/177 ml or grams) hot but not boiling water
1/4 cup (2.16 ounces/61 grams) plain yogurt
2 tablespoons (1 fluid ounce/30 ml/25 grams) extra virgin olive oil
For kneading and shaping: Up to 1/3 dip-and-sweep cup (1.67 ounces/47 grams) unbleached all-purpose flour


1 In a 1.5- to 2.5-quart mixing bowl (I like to use the Pyrex 2-quart glass measure), measure or weigh the flour. Whisk in the sugar, yeast and salt. 

2 In a 2-cup glass measure, measure the water; heat in the microwave until very hot but not boiling. Whisk in the yogurt and oil. Check that the temperature of the mixture is very warm (120 to 130F/49 to 54C).

3 Make a well in the center of the flour, then add the warm liquid to the well. With a spoon, slowly stir until soft, shaggy dough comes together. Turn out onto lightly floured (from that 1/3 cup) counter for about 5 minutes, adding only enough flour to keep it from sticking a great deal to your hands. (Set aside the remainder of that flour; you'll need it.) With very lightly oiled hands, make a ball of the soft, tacky dough. Place it in the bowl and cover the bowl with a lid, plate, or wrap. Let dough rise until doubled, about 1 to 1.5 hours.

Note: Naan can be made ahead up to this point (step 3). Just pop the risen dough into the refrigerator for up to 24 hours. Bring out of the refrigerator 2 to 3 hours ahead of the time you want to be shaping the dough for its second brief rise (actually just a 20-minute rest).

4 On lightly floured surface (from that 1/3 cup), shape the dough into a rectangle and cut the dough into 8 fairly equal parts. (I, of course, am so persnickety that I weigh the dough, divide by 8, and have realllly equal parts! These were 69 grams each.) Shape each into a smooth little 2-inch disk. Place on lightly floured plate and sprinkle lightly with flour. Cover and let rest for 20 minutes. 

5 Cast iron: Preheat cast iron pan gradually until it is super-hot (see Note); I use the Lodge Pre-Seasoned 14-Inch Cast Iron Baking Pan with Loop Handles that has lived in my oven for more than 12 years now. To preheat cast iron pan evenly, place over medium heat for 10 minutes, rotating every once in a while. Then wipe on a teaspoon of olive oil with a paper towel and continue heating for 2 minutes. 

Stainless steel: Preheat heavy-bottomed 12-inch stainless steel skillet over medium-high heat until very hot, about 3 to 5 minutes.

6 Naan can be any shape. To mimic the shape they would naturally assume hanging on the sides of a tandoor (cylindrical oven), you can roll them into ovals or teardrop shapes. I make mine round. They should be rolled or pressed very thin, not more than 1/8 inch (3 mm).


Naan - Classic Yeasted Flatbread of India and Beyond / www.delightfulrepast.com


If using a tortilla press, place a very lightly floured disk of dough between the two layers of plastic* in the center of the tortilla press. Then gently press the dough ball. Turn it 90 degrees and press again. Press and turn until it is about 7 inches (18 cm) in diameter. 

* I use a 1-gallon zip-top bag cut into an open-on-three sides 8-inch square "folder" to line the press. Wash and save the bag for next time; it will last for many, many batches.

7 Peel back the top layer of plastic, turn it on your hand, and peel back the other layer; or pick up the rolled naan and lay it over your non-dominant hand. Brush, or with your fingertips rub, water on one side of the dough. Lay it on the hot pan, water side down, and press the surface all over with your fingertips. Cook for about a minute when the naan gets bubbles on top and is well browned on the underside. Turn and repeat. You can give it another turn, if you like. Put on a plate and cover with a kitchen towel to keep warm.

8 If serving right away, brush the top of each naan with butter and sprinkle on a little chopped cilantro. If serving later, do that after reheating the naan. 

9 The naan reheats beautifully. Wrap the completely cooled naan in foil and store at room temperature for a day or two. 

Disclosure: We are a participant in the Amazon Services LLC Associates Program, an affiliate advertising program designed to provide a means for us to earn fees by linking to Amazon .com and affiliated sites. We are a ThermoWorks affiliate, earning a small commission at no cost to you on purchases made through our links. This helps cover some of the costs of running the blog. Thank you for your support. 

Jean

If you liked this post, please Pin it and share it!
20 January 2022

Creamy Potato Casserole - also known as Funeral Potatoes

Creamy Potato Casserole - also known as Funeral Potatoes / www.delightfulrepast.com

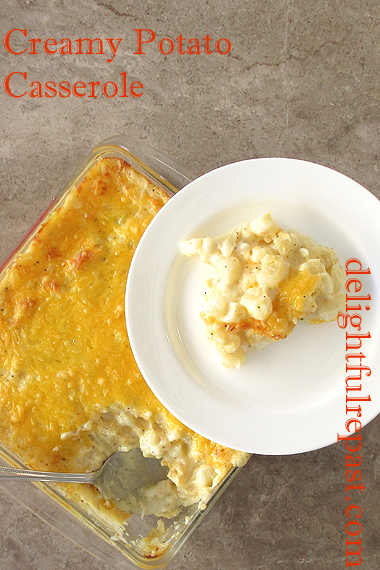
Versions of this Creamy Potato Casserole have been around since before I was born and seem to enjoy a "revival" or surge in popularity every so many years. In some cultures and regions, the dish is called Funeral Potatoes because they are an absolute must at every funeral reception.

Many recipes call for frozen hash browns, which certainly would be a timesaver, but I've always made them with fresh potatoes. Most recipes call for a can of condensed cream of chicken, or cream of mushroom, soup. That's not something I ever buy, but I always have organic chicken broth on hand and so make up a sauce with that.

Super easy, and open to many variations, it's always a crowd pleaser at any event, not just funeral luncheons. So perhaps a more pleasant name for the dish would be Party Potatoes. But we just call it Potato Casserole. Instead of making it in a 13x9x2-inch baking dish, I used two smaller ones this time.

I meant to make one and freeze one so that I could tell you how well the dish freezes, but we ended up devouring both, so maybe you can tell me how well it freezes!


Creamy Potato Casserole - also known as Funeral Potatoes / www.delightfulrepast.com

If you like it, please Pin it and share it!


Creamy Potato Casserole


(Serves 12 to 16)

The Potatoes

4 pounds (1.8 kg) russet potatoes

The Sauce

4 tablespoons (2 ounces/57 grams) unsalted butter
1/4 cup finely chopped onion
1/4 cup (1.25 ounces/35 grams) unbleached all-purpose flour
1 cup (8 fluid ounces/237 ml) milk
1 cup (8 fluid ounces/237 ml) chicken broth
1/4 teaspoon salt
1/4 teaspoon coarsely ground black pepper
1/4 teaspoon marjoram
1/4 teaspoon thyme leaves
1/4 teaspoon nutmeg

The Assembly

1 8-ounce (227 grams) container sour cream
1/2 teaspoon salt
1/2 teaspoon coarsely ground pepper
1 packed cup (4 ounces/113 grams) shredded Monterey jack cheese
1 packed cup (4 ounces/113 grams) shredded cheddar cheese


1 In 5- to 6-quart Dutch oven, cook well scrubbed (but not peeled—they are much easier to peel after cooking) potatoes in boiling salted (1 teaspoon salt) water until tender but not overly so, about 30 minutes for large potatoes. Drain, remove from pan, and let cool a bit.

Note: My 5.5-quart Le Creuset enameled cast iron Dutch oven is too heavy for things like this that need draining. A lighter weight stainless steel 6-quart pot makes draining the potatoes so much easier.

2 While potatoes are cooling, make the sauce in the same pan the potatoes were cooked in. Melt the butter, cook the onions for about 5 minutes, stir in the flour, cook the flour for a minute or so. Stir in the milk, broth, and seasonings; cook, stirring frequently, until thickened.

Note: I know that seems like such a tiny amount of onion, but don't be tempted to increase it. It's supposed to add a subtle hint of onion to the dish, not completely take it over.

3 When potatoes are cool enough to handle, peel (or not) and cut into small cubes. Add to the sauce. Stir in the sour cream, salt and pepper, and shredded Monterey jack cheese until well combined. Taste and adjust seasoning. Turn into greased 13x9x2-inch baking dish. Top with shredded cheddar. Refrigerate until 1 hour before serving.

4 Preheat oven to 350F/180C/Gas4. Bake uncovered until hot and bubbly, about 55 minutes, if chilled, or 45 minutes, if baking right after preparation.

Disclosure: We are a participant in the Amazon Services LLC Associates Program, an affiliate advertising program designed to provide a means for us to earn fees by linking to Amazon .com and affiliated sites. We are a ThermoWorks affiliate, earning a small commission at no cost to you on purchases made through our links. This helps cover some of the costs of running the blog. Thank you for your support. 

Jean

If you liked this post, please Pin it and share it!
06 January 2022

Vegan Sloppy Joes Everyone Loves

Vegan Sloppy Joes Everyone Loves / www.delightfulrepast.com

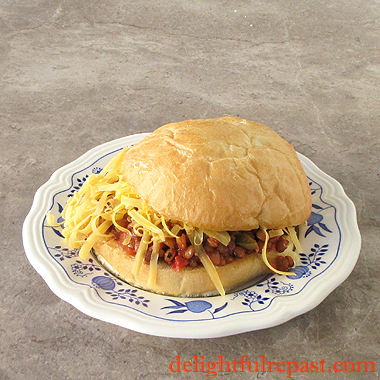
Though I am not vegan, or even vegetarian at this time, I eat like one much of the time. Meatless sloppy joes were in my regular rotation when I was a vegetarian, and I made them with TVP—textured vegetable protein—back in the day. 

But I developed this recipe with lentils, for a few reasons. One, I'm not keen on TVP. Two, I don't feel the need for a meatless product to imitate meat. And three, I really like lentils. I could live on legumes!

Cooking time for lentils is shorter than for beans, but the cooking time varies depending on the variety and the age of lentils. This time, before opening a new package, I used the last of the bag of lentils that was well past its "best by" date, which meant they required longer cooking.

If you're not toasting the buns for burgers and other bun sandwiches, I hope you'll give it a try. Heat equal parts of unsalted butter and extra virgin olive oil on the griddle and toast the split buns well on the cut side and lightly on the outside. Makes them soooo good.

Here's my Homemade Hamburger Buns recipe (apologies to my vegan friends because there is also meat in that post). There are a number of good vegan cheeses on the market now, which hasn't always been the case! Perfect also for those who are dairy-free.

This recipe even passes muster with Mr Delightful, who isn't as keen on legumes as I am. That means: if you're having vegans and carnivores at the same table, you can make them both happy with this recipe!


Vegan Sloppy Joes Everyone Loves / www.delightfulrepast.com

If you like it, please Pin it and share it!


Vegan Sloppy Joes


(Makes 8)

1 tablespoon extra virgin olive oil
1/2 medium (about 4 ounces/113 grams) yellow onion, finely diced
1 medium (about 4 ounces/113 grams) green or red bell pepper, finely diced
2 tablespoons (1.5 ounces/43 grams) tomato paste
1 cup (7 ounces/198 grams) lentils
2 1/2 cups (20 fluid ounces/591 ml) water
1 teaspoon paprika

1/2 teaspoon salt
1/2 teaspoon cumin
1/4 teaspoon coarsely ground black pepper
1/8 teaspoon cayenne
1/8 teaspoon crushed red pepper flakes
1 1/2 teaspoons dark brown sugar
1 1/2 teaspoons country Dijon mustard
1 1/2 teaspoons cider vinegar
1 14.5-ounce (411 grams) can fire roasted crushed tomatoes

8 buns, split and toasted
Garnishes: shredded cheese, chopped cilantro, sliced jalapenos, sliced dill pickles


1 In 3-quart saucepan, heat oil and cook onion for about 5 minutes. Add bell pepper and tomato paste; continue cooking for about 2 minutes.

2 Add lentils and water. Bring to a boil; reduce heat and simmer, partially covered, for about 30 minutes, until most of the water is absorbed and lentils are firm-tender (biteable, but not completely cooked).

Note: Remember that cooking times for beans and legumes can vary. 

3 Stir in paprika, salt, cumin, pepper, cayenne, crushed red pepper flakes, brown sugar, mustard, vinegar, and crushed tomatoes. Bring back up to a simmer and cook for about 30 minutes more, or until the lentils are tender and the mixture is thick. 

4 I use my own Homemade Hamburger Buns or similar ones from the bakery, split and well toasted on the griddle with half organic unsalted butter and half extra virgin olive oil, and 1/2 cup of sloppy joe mixture for each.

Disclosure: We are a participant in the Amazon Services LLC Associates Program, an affiliate advertising program designed to provide a means for us to earn fees by linking to Amazon .com and affiliated sites. We are a ThermoWorks affiliate, earning a small commission at no cost to you on purchases made through our links. This helps cover some of the costs of running the blog. Thank you for your support. 

Jean

If you liked this post, please Pin it and share it!